Cleaning heat exchanger tubes

The friendliest place on the web for anyone who enjoys boating.
If you have answers, please help by responding to the unanswered posts.
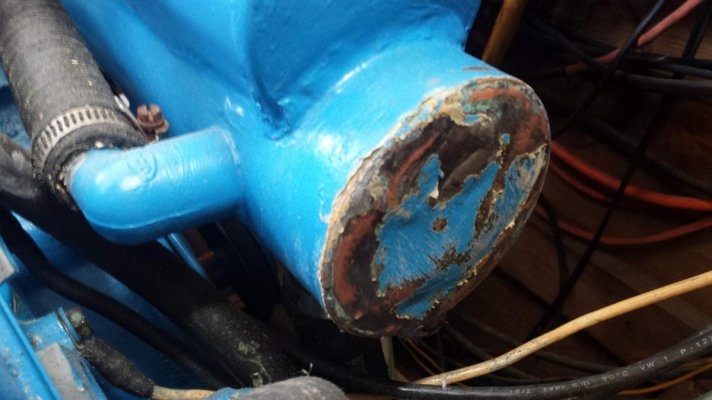
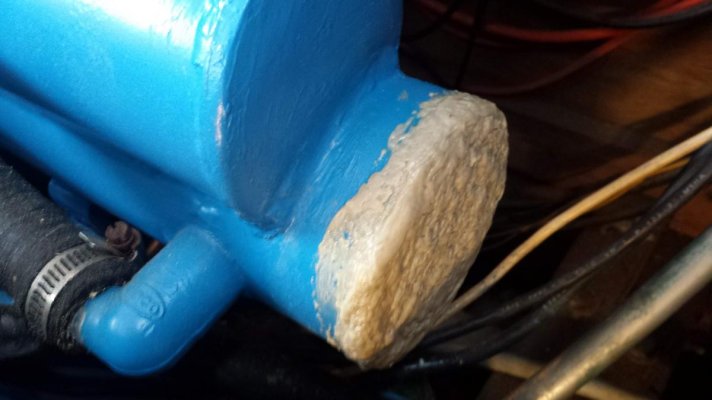
It’s 2:30pm. I’m taking a break at Starbucks. The heat exchanger is out.

The hoses weren’t as bad as I thought they’d be. Only one of the four gave me any serious trouble. And I’m sure I didn’t damage any of them. Didn’t leak over a cup full of AF. All and all it went very well.

Guys I think there’s several rad shops here in MtVernon/Burlington. I’ll pop in on my favorite auto shop and find out what shop is the best.

They have us on alert for moving boats around re dredging. Hope I get it back together before they call me.

Going to fill the engine very carefully this time and avoid air pockets. I’ll use the air bleed screw on the thermostat to avoid air there. I think my jump to 240 degrees came from having an air pocket there. I have a new thermostat but I’ll see if the old one works perfectly .. as it always had before. If not .. in w the new.

I’m glad a lot of interesting stuff came out of my posting the question. Thanks for all.

Best of luck keep us posted
 
Cleaning of heat exchanger tubes

I use what the Naval Aviation Maintainers call “Safety Wire”. I was in the Navy for 20 years and we used it all the time to secure nuts and bolts. I believe it’s called “Mousing wire” in the boating world. The same thin wire that’s used to secure the threaded nut on an anchor shackle. .32 Wire. I curve one end to form a hook and go through it each tube. Then I vacuum the face of the heat exchanger and suck out all the crumbs that the wire left behind. Then I take a look through each tube with a flashlight and make sure I can see the light on the other side. Once I’m done I put it all back together and circulate Barnacle buster through the system. Overkill? Maybe. The wire is flexible and won’t damage the tubes. My diesel runs nice and cool.

OBTW, I’ve never removed the heat exchangers.
 
Update;
Took the HE to my head mechanic. Said I was looking for a good radiator shop. He wanted to see it. I complied and he picked away at it for a minute or two and said the whitish stuff was calcified shells. Told me to scratch them out and I should be good to go.

I did. Took longer than I thought it would and I had to finish at home to do a good flush.

Yesterday I put the HE back in .. had the usual problems. Went to the store twice and solved the problem of how to install the big hose clamps that hang the HE on the bulkhead while supporting the HE. The dang thing is really soft. I’m guessing it’s solid copper. Planed to take out the screw on top of the therostat to fill the void where the water pump is. Started pouring in the AF and immediately noticed the AF was running out below the HE cap. So much for that. There is a pipe plug port on top of the HE and I filled that.

Ran the engine. After a minute or two I noticed water (quite a bit) comming out the port end of the HE. Was seawater. I tried not to tighten the caps too tight re the soft metal. The other end was fine so I tightend the port cap and the leaking stopped.

Ran the engine for about 20 minutes and everything worked perfectly including the old thermostat. Warmed up to 130 degrees in 5 minutes by the instrument temp gauge. Everything worked perfectly at that point.

Checked the fluids again today and had another perfect run.

I have no internet at home. I go to a coffee shop.

Now I can get back to my engine hatches on the salon floor .. ect ect.
 
The MSDS says it has <2% HCl, 98% water and 1% of something proprietary. It won't dissolve much scale at that concentration. That is 16 times weaker than swimming pool acid.

David
 
I have twin 3208 NA's in my 44 Tollycraft.
Does anyone have an opinion as to whether one gallon of concentrated Barnacle Buster can be divided to do both engines? I don't have yards of hose in the system.
 
I’ve done my 3208’s twice in 12 years. First time I found all but two to three tubes clogged entirely and the iron caps were dissolved on the inside. Had to replace caps which depending on age and material may be a possibility. Just pouring in a solution would not have been enough. Second time, about 4 years later I pulled caps and could have easily just used ridlyme after the thorough cleaning previously.

I always recommend pulling them apart first go round and seein* exactly what’s what. I cleaned them with acid and a rifle brush. Being able to see progress ensured just the right amount of time in acid. Nasty stuff.
 
Glad I didn’t need to use chemicals. Chemicals at the rad shop is different. They have it dialed in and know the correct mixture. And I don’t like the idea of pumping strong chemicals into the rest of my engine. No offense to those that have used chemicals though.

I did do some rodding out but the rod and action was very benign .. not like scraping at all. And my coolant pressure is only 7psi so I’m not likely to spring a leak from pressure.

I’m pleased w how the job went and now I have an extra thermostat.
Haven’t addressed the upper loop for the hot water and bus heater yet. Plan on putting a little coolant at a time in until it fills and then (when it’s cold) open the valves to activate the upper loop. That’s it and I anticipate no problems from charging the upper loop.
 
I've done my Cat 3208 NA's a couple times. If your engine temps start coming up then it's time to pull the bundles and clean them. Remove the end caps on the heat exchanger and pull out the bundle of tubes being careful not to bend the flange. Don't pry on the flange, press on the end opposite the flange (Starboard side usually) with the handle end of a plastic hammer. If the engines are old then it's likely the end caps have been converted to plastic. Cat superseded the caps years ago. If not you might consider them as they aren't that expensive and that eliminates metal corrosion in the cap. The biggest hassle is obtaining the new gaskets and O-rings.

I use 1 gallon of Muriatic pool acid in 3 gallons of water in a five gallon bucket. Place the tube bundle in the bucket and let it sit for 5 or 10 minutes. Half the bundle will be sticking out the top of the bucket. You'll notice foaming immediately coming out the top of the tubes. Take a small ladle and poor the solution into the top of the tubes. Remove the bundle and flip it 180 and back in for another 5 - 10 minutes. It should be spotless after that, pull it out of the bucket and flush with lots of fresh water. Visually inspect the tubes to see that they are clear. You can also dip the end caps and clean them in the same solution.

Be gentle with the Cat Tube Bundles as they are very expensive ~ $2000. The good thing is they are made of an alloy that is resistant to acid so they clean up nicely.
 
The only reason for rodding a heat exchanger is that you are a great distance from a radiator shop. They can 'boil it out' with their magic potion.

I had my keel cooler of my N46 boiled out twice.

That was not my experience! Mine soaked for days at a radiator shop only to see that the paint was removed. Success for me was to use a SS welding rod that a yard guy gave to me......and I would do it again. ONe thing I do remember is the rod diameter was very close to a 22 caliber cleaning rod. But to each his own.
 
Greetings,
Seems there are at least two different heat exchanger set ups. Some you can remove the tubing bundle leaving the "housing" attached. Others, like our Lehmans require removal of the complete HE. Just an observation....

Edit: Ah, forgot about keel coolers. Could be some also use auto style radiators as well.
 
Last edited:
When I was in the Navy we cleaned the inside of our ship HE tubes with a hydrojet. Granted these were heat exchangers that you crawled inside to clean.

No chemicals just extreme pressure (35,000 psi) on an inserted nozzle. I remember having to take precautions to turn the pressurized stream on and off while nozzle was inside a tube because the flow at that pressure could penetrate skin.

Perhaps there is something like this for smaller HE?
 
85% phosphoric acid is available through Amazon for about $25 a gallon. As earlier pointed out Barnacle Buster is 50% and $65-$75 a gallon. You decide.
 
Greetings,
Seems there are at least two different heat exchanger set ups. Some you can remove the tubing bundle leaving the "housing" attached. Others, like our Lehmans require removal of the complete HE. Just an observation....

Edit: Ah, forgot about keel coolers. Could be some also use auto style radiators as well.

I was surprised how thin the tube walls were on my N46's keel cooler. The entire keel cooker was mounted in a protective pocket or recess in the hull.

I had it boiled out twice. I dont think the second time was of any benefit.
 
I have Sendure HE, old ones from 1970, they are made of copper-nickel alloy tubes.
When I got the boat back in 1998, both had internal leaks, some tubes had cracked, perhaps they froze. I ended up silver brazing them shut on both ends.
I have only cleaned them out once by using a bucket and some muriatic pool acid., no rodding out the tubes.

Even missing several tubes, they have no problem cooling the engines. On mine, only one end cap is easily removable. by a solitary center bolt. The other end has a thin soldered cap, which right now has a slight leak on one, so I need to fix it. Plan is to clean off the surface corrosion and smear on a coat of PL Premium polyurethane. Otherwise I would have to pull the HE, torch off the cap and likely replace it with some new metal. I would prefer both ends to unbolt.

I have some 1/8 inch thick copper sheet, a circle could be cut and tight fit into the HE end, then soldered on. But you know, that PL is such a good adhesive sealer, I could probably just glue it together.
 
Last edited:
Greetings,
Mr. 717. Could you find one of these in the correct diameter to stop the leak temporarily?

https://www.homedepot.com/p/4-in-Plastic-DWV-Flexible-Cap-PQC-104/100372305

Probably would work, the end is about 3 inch width. The leak is slow drip, and it drips right down onto the engine mount stud for adjusting engine height which is bad. I saw it is getting rusty. Close to the end though is the HE drain so it might not fit well. I will try the glue idea first.
 
Greetings,
Mr. 717. Could you find one of these in the correct diameter to stop the leak temporarily?

https://www.homedepot.com/p/4-in-Plastic-DWV-Flexible-Cap-PQC-104/100372305

Went to boat today, cleaned off the corrosion on the ends of both HE, then sealed with layers of PL Premium. Tested and the leaky one no longer is leaky, I had seen it dripping out of the seam.
So smear on a coat, wait an hour, smear on another coat, etc... It is 100% waterproof tough stuff and can take the heat, off course. Somehow it looks like a cookie.

some pics. last 2 are the other side with one coat, which was not leaking, but had a little corrosion. These are almost 50 years old, and those end plates were made of a thin bronze or brass sheet. The main body if the HE is a thick copper, and the other end has a bolt on heavy gauge bronze adapter for connecting the raw water. A little blue paint and it will look good. The pencil zinc screws in as a drain on the bottom at the end.
 

Attachments

  • 20180518_145441.jpg
    20180518_145441.jpg
    86.4 KB · Views: 56
  • 20180518_145617.jpg
    20180518_145617.jpg
    74.2 KB · Views: 56
  • 20180518_162745.jpg
    20180518_162745.jpg
    71.6 KB · Views: 50
  • 20180518_162815.jpg
    20180518_162815.jpg
    83.8 KB · Views: 48
  • 20180518_163944.jpg
    20180518_163944.jpg
    87.3 KB · Views: 51
  • 20180518_165043.jpg
    20180518_165043.jpg
    66.5 KB · Views: 51
Last edited:
Greetings,
Mr. 717. Gotta love that PL. Hopefully you consider this a temporary repair...

We will see... all depends on leaking, no more leaking then I wont do any more work on it.
I had these off back in 1998 and reworked them using my torch, silver braze and solder. The end plates I pulled off and had to silver braze with Harris 15 several tubes shut. I never saw any tube corrosion, I know Sendure used copper nickel alloy tubes and they were real clean inside on both ends.

My theory for the internal leak was a prior owner did not drain them in a river and they froze and cracked several tubes. I could tell it had a crack as I was losing engine coolant. Then I took it home, removed both ends and pressure tested using city water to identify the leaking tubes. Where water came out, those were the leaky tubes. That torch has paid for itself many times over.

The way this HE is built, it would have to be cut apart to replace the small 1/4 inch tubes, and they packed a lot of tubes inside.
 
Last edited:
Have you given any consideration on how to get that stuff off w/o replacing the entire HE?
 
Have you given any consideration on how to get that stuff off w/o replacing the entire HE?

If I had to remove it, simply burn it off with a torch while scraping it with a screwdriver. It will easily come off with a lot of heat even using a propane torch will work ok.

I would make new end plates from 1/8 copper sheet, which could be silver brazed right on the copper HE shell. Easiest way is overlap the outer shell, rather than fit it into the copper shell. I would prefer a way of a bolt on end plate though rather than a permanently brazed part..
 
Last edited:
Or remove the undamaged end plate, take it to a machine shop and have them create new ends out of thicker material on the lathe.
 
Last edited:
I also soak heat exchangers in a bucket of white vinegar (mentioned previously) and "rod" the tubes with plastic weed eater string. Use sand paper to round off sharp edges at the leading edge. Repeat as necessary for difficult areas. Probably not as fast as more caustic chemicals, but I don't have to worry about degrading the metals in the exchangers.
 
I also soak heat exchangers in a bucket of white vinegar (mentioned previously) and "rod" the tubes with plastic weed eater string. Use sand paper to round off sharp edges at the leading edge. Repeat as necessary for difficult areas. Probably not as fast as more caustic chemicals, but I don't have to worry about degrading the metals in the exchangers.

White vinegar works, but it takes longer, it may takes several days. Heating the vinegar would improve its cleaning ability.
 
I have a 2 gallon heated ultrasonic cleaner. When the heat exchanger on my Onan got funky on the raw and fresh water sides, I put it in the ultrasonic cleaner with hot white vinegar. It was amazing how much crud came out of both sides. Took about a half hour in total as the exchanger wouldn't completely fit in the tank. It's amazing how little raw water it takes to cool an 8KW generator with a clean heat exchanger, but that's another story.

Ted
 
Last edited:
On the bundles for my old hino engines, I took some 4"PVC pipe, large enough for the bundle to fit inside. I capped one end and put a screw on fitting on the other. I'd put the bundle inside and fill the tube about half full with a mixture of water and muriatic acid. I'd cap it and roll it around on the floor.

I'd uncap wash the bundle in clean water and be good to go. I'd cap up the tube again, leaving the mixture in it, and be ready for next time. The combo is only good for about 3 uses; the more times you use it, the weaker it got.

toni
 
I have a 2 gallon heated ultrasonic cleaner. When the heat exchanger on my Onan got funky on the raw and fresh water sides, I put it in the ultrasonic cleaner with hot white vinegar. It was amazing how much crud came out of both sides. Took about a half hour in total as the exchanger wouldn't completely fit in the tank. It's amazing how little raw water it takes to cool an 8KW generator with a clean heat exchanger, but that's another story.

Ted

A two gallon cleaner would be too small to immerse one of my complete heat exchangers. However your idea seems solid for cleaning these things if one has access to adequate cleaner! Gave you a thanks!
 
Back
Top Bottom