Weekend project

The friendliest place on the web for anyone who enjoys boating.
If you have answers, please help by responding to the unanswered posts.

Tom.B

Moderator Emeritus
Joined
Jul 30, 2009
Messages
5,839
Location
USA
Vessel Name
Skinny Dippin'
Vessel Make
Navigator 4200 Classic
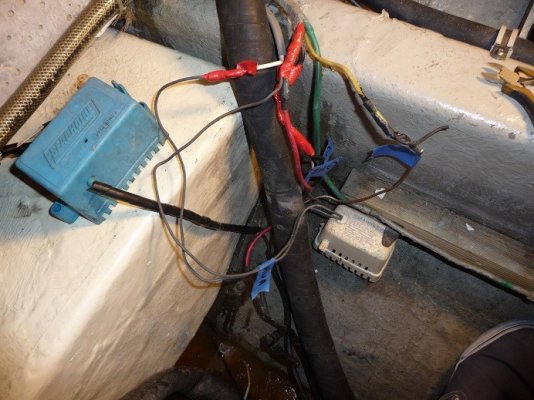
While test fitting the new fuel rig this weekend, I saw a couple of rat's nests that needed attacking. So here is a before/after pics of the wiring of the bilge pumps. Yea... I know is not to AYBS standards and doesn't have drip loops, but sometimes with 25 year-old boats, you have to compromise. At least it's not held together with electrical tape and wire nuts anymore. Actually, the bundle looked way worse thyan this before I thought to grab the camera. Now it at least has SOME order to it. I found nearly the exact same mess at the wiring for the shower sump/head power when I was moving wires for the fuel rig.

I still want to re-do the bonding wire connection in the next couple of weeks, but I was pressed for time and didn't have the correct connector to do the job, so I'll pick one up next time.

It amazes me at what people considered acceptable wiring practices. Where is that turn-key boat I was promised by my broker?
biggrin.gif
 

Attachments

  • bilge1.jpg
    bilge1.jpg
    123.6 KB · Views: 86
  • bilge2.jpg
    bilge2.jpg
    121.2 KB · Views: 93
that looks way better!... be sure to rotate the pokey ends of the zip ties behind the hoses... you will be mush happier the next time you reach down in there... and if possible try to mount barrier strips on their side so water cannot " pool" in the connector ends ( I know what can happen if you don't )
Little projects like that really help us to understand how our boats work and where everything is
HOLLYWOOD
 
GonzoF1 wrote:
It amazes me at what people considered acceptable wiring practices. Where is that turn-key boat I was promised by my broker?
biggrin.gif
And think of the fact he was a 20+ year employee of a major boat builder.* Makes you think. *Maybe the adage of the "Shoemakers kids always*need their shoes fixed" applies here.

*
 
Maybe, but I don't know for sure that this was his work. Even though the electrical tape seemed somewhat fresh. I've said it from Day One... He may have been an expert carpenter, but it's obvious he wasn't an electrician.

@Hollywood... I did want to rotate it to avoid that, but like I said, the wire had limited "leftover" length. One thing I also need to do is take the heat gun back down there to shrink those ends. The hairdryer wasn't enough to get the job done.
 
Gonzo, Looks good- What was the blue box thats been removed?* JohnP
 
It hasn't been removed. It's the mercury switch for the Rule 2000 that I had just pulled out of the bottom of the bilge and set there while I worked on stuff and traced all the wires.
 
Duh-*I kind of thought that was a little high up for a float switch.* JohnP
 
Hey... We're trawler owners. We're all a little "slow".
 
Yup, and we sure aren't fast

I've taken to glueing plywood pads, using sikaflex, to stringers rather than drilling holes in the stringers. Then I attach any terminal strips or ??? to the ply pads.
Somewhere over the years I've developed an aversion to holes in stringers. Wonder if it might have been because there were too many I found as I learned about my boat.
There are still lots of them but I'm not adding new ones. I've filled some of the more problematic ones as I figured out they were dry.


Good job. I'll bet it will even work now IF you need it, hopefully it will remain another useless piece of gear
 
Nice work!

Don't know if you are aware of heat shrink connectors. They seal the connector to the wire to keep moisture from corroding the wire in the connector. Sealing connectors to the wires is pretty much a requirement for connections in the bilge.

Here is a link that shows different types (not an endorsement for this company).

http://www.sherco-auto.com/krimpaseal.htm

Ted

-- Edited by O C Diver on Sunday 20th of February 2011 05:40:58 PM
 
Looks good! I did something similar a few years ago and used a terminal block like that. One suggestion...cut a piece of rubber or thin plastic and screw it over the block to keep things from shorting out the contacts. A good spray of Corrosion Block won't hurt either!
 
I took the heat gun down this weekend and shrank the shrankable (?) ones. Not all were. Also hit it with some CRC Corrosion Inhibitor.
 
Tom,Your weekend project inspired me to tackle mine!
We have very nice original 12 volt lighting inside the boat and outside over the sundeck. It took several months to finally get new sockets in that are original style issue from Cole Hershee. The only difference is that it is missing a small screw hole to secure it to the tab on the housing. I tried a few different methods to secure it and finally settled on a simple worm clamp. I have reworked most of the lights already. The original sockets have small screws that secure the wire to it. Most had overheated and cracked over the years (I/E=R), and getting the bulb to work was not always assured. I have some spare housings, rings, screws and glass lenses I have salvaged from a couple of lockers and the engine room. What I did:
<ul>[*]Removed light and disassembled. Cleaned parts.[*]Used a step bit to enlarge switch hole to the new larger size.[*]Soldered new wiring to new switch. I like to remove the screws and strip and twist the wiring, push through the screw holes and solder.[*]Attach to the socket to the new wiring and gently tighten small screws.[*]Fasten socket with worm clamp, install new bulb (I like to put in a dab of dielectric grease), reassemble and reinstall in ceiling.[/list]
 

Attachments

  • dscf7062.jpg
    dscf7062.jpg
    181.2 KB · Views: 86
  • dscf7063.jpg
    dscf7063.jpg
    155 KB · Views: 81
  • dscf7067.jpg
    dscf7067.jpg
    172.9 KB · Views: 64
  • dscf7066.jpg
    dscf7066.jpg
    89.4 KB · Views: 81
Forkliftt wrote:
*
<ul>[*]Removed light and disassembled. Cleaned parts.[*]Used a step bit to enlarge switch hole to the new larger size.[*]Soldered new wiring to new switch. I like to remove the screws and strip and twist the wiring, push through the screw holes and solder.[*]Attach to the socket to the new wiring and gently tighten small screws.[*]Fasten socket with worm clamp, install new bulb (I like to put in a dab of dielectric grease), reassemble and reinstall in ceiling.[/list]
SteveI have the same lighting, and have been replacing them one at a time as they fail. I think I have two more to do. Following my focus on keeping life simple, I have simply bought identical replacements. I think they have been about $20 each. Maybe I'll try your way on the next two. Either that, or I'll spend a little more and switch to LEDs.

*
 
Man Carey- I would go for a $20 identical replacements!I have glass covers and SS housings it appears. Where did you find them?
 
Forkliftt wrote:
Man Carey- I would go for a $20 identical replacements!I have glass covers and SS housings it appears. Where did you find them?
SteveI haven't bought one for two years, and find they have gone up. I got mine from Rasmussen's Marine Electonics here in Bellingham, but I see that Fisheries Supply http://www.fisheriessupply.com/ has them for $24. They are made by Sea Dog. The only difference is the glass lense. The old ones have kind of a large diamond pattern cut into the glass lens, and the newer ones are a smaller pattern. No big deal, as you'll have your old lenses to swap out.

*
 
Carey,That is a very similar light at a GREAT price. Stampeded SS too. The ring that holds the lens only has 3 fasteners and mine has 6 I think. I'm kinda annal about keeping things as original as possible. But for that price I would have considered swapping them all over to the ones you found if I had not already started my repairs. I probably have close to $15 each in a switch, socket and bulb!
 
Here are some tips for working with those light fixtures. When I remove one, I put quick disconnects in the lines so you can take it down again without having to cut out a butt splice.
I put a few dabs of silicone on the glass lens and glue it to the keeper ring so they don't fall apart.
I take a hole punch and punch some little circles out of plastic like a plastic file folder. Use something thin. Then I use another smaller hole punch to make a hole in each one a bit smaller than the screws that hold the lens ring to the body. Put the screws through the ring then force the little plastic disc over the screw. That way, next time you unscrew it the screws won't fall out and disappear.
Oh yea, hose all electrical parts down with Corrosion Block.
 
Nice job, Steve.

I have a unique problem with my sundeck lights. When we had the radar arch pulled and reseated, the wires broke off so close to the hole where they enter into the fiberglass, I can't splice into it. I still haven't worked out a solution for that yet. I am thinking of making a conduit out of some white plastic tubing to get the wires out of the arch to the first light. The rest will stay wired as-is. However, in the two years we've owned the boat, we've used those lights all of about three times and never used them as we sat there relaxing. They are more worklights.

Anyway, a project for another day. Glad I could inspire you... Returning the favor, I guess
biggrin.gif


Tom-
 
i have worklights in my cockpit, guess they were installed for night time fishing, really bright stuff and not the kind you turn on while at anchor admiring the nighttime sky.
i considered putting in one or two LED accentlights.
there is a lip coming out from the FB floor, its perfect place to put these lights and the lights i have considered are made for weather/outdoor but i am a little complacent about drilling out the glass for the mounting, and i would probably have my electrician to pull the wires and install a switch.
appreciate any comments

here are the lights i am looking at:
http://www.boatersmarinesupply.com/...r-surface-light-warm-white-chrome-finish.html
 
Back
Top Bottom