Getting Rid of the House Wire

The friendliest place on the web for anyone who enjoys boating.
If you have answers, please help by responding to the unanswered posts.

BelfastCruiser

Veteran Member
Joined
Jan 6, 2011
Messages
66
Hey All, I'm chasing the ancient runs (1973)of house wiring on the A.C side. The D.C. side is all new boat wire w/ inverter. *Here's the question: I have a few old junction boxes in which runs are simply twisted and wire nutted. Not Good! How do you run a feed line to 2 branch lines without bringing them together and twisting/nutting? I want to replace with ABYC compliant stranded boat wire, and apporpriate connectors.* I was thinking I'd put them on a parallel inside*a waterproof j-box. Is this what you guys have done?

I am solely responsible for what happens on my boat. No suggestions/advice*will change that, so please weigh in.

Thanks - Kevin O
 
Kevin,* If you are replacing the house wire (which I assume you mean single strand romex) with stranded wire you should be able to redesign the circuits to not have any junction boxes.

Example, If you have an outlet circuit --you would wire from the panel to the first outlet, than from that outlet a wire would continue to the next.

Same with a lighting circuit.

AC appliances should have their own dedicated wires back to the panel.

FYI- They do have 3way butt connectors (crimp on) if you elect to use the junction box system.* I don't like using them on AC.* Someone here may have a better suggestion.

JohnP
 
JohnP wrote:
FYI- They do have 3way butt connectors (crimp on) if you elect to use the junction box system.* I don't like using them on AC.* Someone here may have a better suggestion.

Those are terrible on AC as well as DC.* The center portion is not insulated.

Two suggestions:

1.* You can buy "reducing crimp"* connectors.* These are intended for transitioning from wire size to another (example, connecting #12 to #14).* For branching, you could use a reducing connector and put 2 #14 wires in the large side and 1 in the small side.* Or use a #10/#12 connector and put 2 # 14 wires in each side,

2.* Mount a terminal strip in the back of the junction box and put spade or ring terminals on the wires and connect them with the terminal strip. Keep in mind that the terminal strip will be "hot" so you need a cover on it.
*

*
 
Kevin, most marine electricians I know use snow cone crimps for the purpose you describe.* There isn't a specific ABYC 'approved method' for making up such connections, but the crimps are what I see the most of.* If you want to be extra careful, you can solder the wires first, then apply silicon or 3M waterproofing goop used for underground splicing to the base of the snow cone after crimping.

If you want to go hog wild, use an a/c terminal block mounted inside a box, but I don't know why you'd bother.
 

Attachments

  • moisture-guard-connector-4dyw6_as01.jpg
    moisture-guard-connector-4dyw6_as01.jpg
    10.9 KB · Views: 92
Delfin wrote:
Kevin, most marine electricians I know use snow cone crimps for the purpose you describe.* There isn't a specific ABYC 'approved method' for making up such connections, but the crimps are what I see the most of.* If you want to be extra careful, you can solder the wires first, then apply silicon or 3M waterproofing goop used for underground splicing to the base of the snow cone after crimping.

If you want to go hog wild, use an a/c terminal block mounted inside a box, but I don't know why you'd bother.

If you solder an electrical connection, there's not much point in trying to crimp it afterwards.
*

*
 
Delfin wrote:
...*If you want to be extra careful, you can solder the wires first, then apply silicon or 3M waterproofing goop used for underground splicing to the base of the snow cone after crimping...
I'm not so sure about the soldering even if you are crimping after.* You are taking stranded wire and making a section solid*by soldering.* You now have an area where vibrational flexing is concentrated.* Aren't you defeating the purpose of using stranded wire?* I would just crimp with good quality heat shrink.

*
 
Thanks guys, what I was trying to do was run from the Shore/Gen side of the panel to (2) electric heaters, a small one in a forward stateroom (750 watts) and a larger 1500 watt in the salon. I was planning to run some 12/3 and tap into it for the smaller heater. Thanks for the info - I'd never heard of some of these strategies - you guys are a great resource!
Kevin O
 
If you wiring is old, its best to have a breaker right after the heater before the long run of the old wire. So there is a breaker at both ends.* *We had an insurance audit and was required to eliminate all stacking of wires, to use Busbar/connectors and required to have a breaker at the application end before the long run of the old wire.* So I used/wired in multi plug in power strips with a built in breaker and plugged in the heater/lights. *It passed audit inspection.* Also had to added GFI plugs around any sinks, and out side plug in.*
*
Also, most electrical fire are at the main AC power selector switch as there is no breaker between the shore power plug in and the main AC power selector switch.* We were also required to install a two throw, with reverse polarity light, breaker. *The we had to install a smoke detector in any room/area that was closed off that had electrical including the bilge and engine room.* We have 14 smoke alarms.*
*
I also had the boat inspected by a marine electrician after all the changes, which passed.***Now thye boat can pass ABYC standards.* If you ever buy a older bat make sure the survey is done according to ABYC standards sas it cost us 3,000+.* *


-- Edited by Phil Fill on Friday 15th of April 2011 10:27:11 AM
 
Kevin, One approach you may consider is to install a dedicated outlet for each heater.

With electric heating I like to go oversize with the wire. Tinned marine wire and crimped ring or spade connectors to the outlets.

Behind or near your main panel you could install a small load center that will hold two breakers. I would connect this panel to your main panel with at least #10 wire (which is good for 30 Amps)* Than I would install two 15 amp breakers in the load center and run a separate 12/3 wire to each outlet. The 12/3 is good for 20 amps but the breakers will limit it to 15 so you should have no worries there.

The load center is not typically marine but they are used frequently by installers of marine hvac units and hold up pretty well. They do not cost much and are in homedepot and places like that. I would mount it somewhere accessible but not really in view,( they are not pretty)*behind your panel or in an adjacent locker.

I am sure some folks here will not like this, but installed right it will be safe and reliable.

*Before you get into working behind the panel, It is a good idea to unplug your boat from shore power to be safe.

JohnP


*


-- Edited by JohnP on Friday 15th of April 2011 12:43:41 PM
 
I forgot.

You might want to install Pic a Watt heaters where you can select/change the watts/amps.*They can be bought at most dirt hardware stores.* *I have our pic a watt set at 1000 watts or 8.33 amps so there is enough amps left over for other things and probable do not have to run a new separate wire.* Just make sure you have a breaker in between the heater and the old wire to be on the save side.*
 
BelfastCruiser wrote:
Thanks guys, what I was trying to do was run from the Shore/Gen side of the panel to (2) electric heaters, a small one in a forward stateroom (750 watts) and a larger 1500 watt in the salon. I was planning to run some 12/3 and tap into it for the smaller heater. Thanks for the info - I'd never heard of some of these strategies - you guys are a great resource!
Kevin O

For that, I would recommend home runs for each heater, each with its own circuit breaker.* That's what I would do if it were my boat.
*

*
 
Larry M wrote:Delfin wrote:
...*If you want to be extra careful, you can solder the wires first, then apply silicon or 3M waterproofing goop used for underground splicing to the base of the snow cone after crimping...
I'm not so sure about the soldering even if you are crimping after.* You are taking stranded wire and making a section solid*by soldering.* You now have an area where vibrational flexing is concentrated.* Aren't you defeating the purpose of using stranded wire?* I would just crimp with good quality heat shrink.

*

*Not a lot of agreement on the subject.* You'll find supporters of solder, and those who think it a waste.* Properly crimped connectors probably are best, but even with the best tools, I have routinely had problems ensuring that the crimp works as designed.* Am I the only one who has crimped the patooties with a Klein tool and tugged on the wire only to find it comes loose?* Maybe so, but as I said, if you want to be sure of the connection, soldering does that.* The crimp afterwards is simply the easiest way to cover the joint.

*
 
Delfin wrote:
*Not a lot of agreement on the subject.* You'll find supporters of solder, and those who think it a waste.* Properly crimped connectors probably are best, but even with the best tools, I have routinely had problems ensuring that the crimp works as designed.* Am I the only one who has crimped the patooties with a Klein tool and tugged on the wire only to find it comes loose?* Maybe so, but as I said, if you want to be sure of the connection, soldering does that.* The crimp afterwards is simply the easiest way to cover the joint.

*
*After a 6-month total rewiring project, probably made several thousand crimps, all with Ancor connectors and ratchet crimper.* Every crimp pull tested, not one failure, then heat shrink sealed.*

Maybe you*pulled too hard?*
smile.gif


*
 
-- Edited by C lectric on Saturday 16th of April 2011 07:26:50 PM
 
If you solder an electrical connection, there's not much point in trying to crimp it afterwards.


Indeed that IS backwards.

My way would be ANCHOR wire (12ga) and Anchor terminal ends , them the Anchor $70 crimper.
The A wire is about 10% larger than std sizes in grade.

You could stop at this point ,

Our way is to obtain a 3-5 lb roofing copper iron. Lightly flux wire before assembly.


Heat the copper with a propane torch , tin the end clean , but no solder is required .

Touch the hot iron to the eye of the crimped terminal about a second.

This will flow the solder on the wire and in the terminal and NOT get the wire beyond the terminal end hard.

Cover with glue 3X shrink wrap , and your set for a century.
 
C lectric wrote:
If you are doing a lot of wiring or rewiring a set of crimpers such as these is worthwhile.
*You mean you're supposed to use a TOOL?* And I was using my teeth - no wonder I was able to pull some apart.

The point of crimping after soldering is, as I said, the easiest way to cover the solder joint, but I guess I'm just talking to myself.....

*
 
I wasn't trying to give you offense. Sorry you took it that way.* See ya sometime.


-- Edited by C lectric on Saturday 16th of April 2011 07:30:09 PM


-- Edited by C lectric on Saturday 16th of April 2011 08:28:02 PM
 
I thought I would post a pic of Carl ( Delfin ) just so you can understand why he doesnt need to use crimpers... and pulls crimp connectors apart on a regular basis

HOLLYWOOD
 

Attachments

  • popeye.jpg
    popeye.jpg
    11.5 KB · Views: 108
Ladies and Gentlemen,

I was an electronic technician/electrician for most of my working life. I have connected hundreds of thousands of wires together in my lifetime, from large to very, very small, using methods appropriate for conditions.

Rather than responding to each post and discussing the connection methods individually, I am posting an article from this website:

http://www.rbba.us/documents/crimping.pdf


that discusses the matter in great detail.


Why is crimping preferred over soldering when joining wire to electrical
connectors and why do American Boat and Yacht Council Standards
specify that solder shall only be used in combination with crimping, except
in the case of battery cables?

To be sure, this subject still provokes heated discussion, especially among those who see
soldering of crimped joints as extra insurance of reliability.

Both mechanical and electrical integrity in the marine environment are essential to
reliable connections. The crimped joint provides both, if properly done. Reliable crimps
require that both wire and connector be of matching sizes, that proper tools are used, and
that the materials (wire and connectors) be of marine grade quality to begin with. A
combination wire cutter,stripper, and crimper is available at good hardware and marine
dealers. The crimping part of the tool actually comprises dies which exert a swaging
action on connector and wire, effectively created a "weld". The tool was designed to
confine the connector and wire so that the pressure exerted by the die was concentrated at
the joint. This is why ordinary pliers are not acceptable. They will crush the connector
barrel alright, but both connector and wire will squish out to the side, making a joint
which is mechanically weak, and electrically suspect.

A good crimping tool will have dies for both insulated and non-insulated connectors in at
least three sizes: #8-10, #12-14, and #16-18. it is important to make the crimp with the
right die.

If you are getting loose connections, or if you see cracks in the connector barrel or
insulation, you are using the wrong die.

Get a marine rated connector a your dealer's and carefully examine the inside of the
barrel which receives the stripped wire. Note the grooving which is designed to grip the
wire, preventing stretching, and focus the crimping pressure to effect welding action. The
crimp "work hardens" the copper of the connector so that the joint is mechanically sound.
Multi-stranded wire is required in marine applications (except when a heavy gauge, wellsupported,
dressed wire is used solely as a ground bus), made up of fine-stranded(e.g. 30
guage), pre-tinned wire for best results. Automotive hook-up wire is usually not pretinned,
and bare copper oxidizes (corrodes) in salt air.

Once a good electrical/mechanical joint is made, it is essential to protect it from water or
moist salt air. The best way to do this now is by using shrink tube insulation, especially
the type which includes a heat activated adhesive on the inner surface. The shrink tubing
is put on before the crimp is made, of sufficient length to overlap the wire insulation by a
1/2" or so. Application of heat (a heat gun used for striping paint will do) causes the
adhesive to liquefy and the tubing to shrink tight to the wire and connector.

But soldering is a time-honored method. What's wrong with it now?

Good soldering requires a certain technique. A cold soldered joint may be worse than
useless, since it may look OK to an unpracticed eye. Good soldering is especially difficult
when making up a splice in a confined or limited access space. Using a proper tool, a
good crimp is easy.

As mentioned, crimping action work hardens the connector barrel, making the joint
mechanical strong and stable. If you solder a crimped joint, you may, in heating the
connector, anneal(soften) the copper, making the joint loosen. Now it is the solder only
which provides the strength of the joint. But if the joint is subjected to vibration, the
solder, in absorbing mechanical energy over a period of time, may crystallize, and the
joint may actually fail altogether.

Melted solder may flow through "wicking" action up the strands of wire, thus creating a
stiff, solid section just behind a terminal. Since the terminal itself is made fast to a post or
stud, the place where the solder stiffened section abruptly merges with the stranded,
unsoldered wire is relatively unsupported. Vibrational flexing of the wire is concentrated
at this interface, leading to hardening, embrittlement, and eventual failure.
Contrary to popular belief, solder is not impervious to corrosion. It is a composition of
lead and tin. When connected to copper (wire and terminal) in a salt atmosphere, galvanic
corrosion can occur, resulting in leaching out of the lead, leaving a powdery residue
which is both electrically and mechanically worthless.

Whether crimped only or soldered and crimped, protection from salt atmosphere is
important. For wiring splices, shrink tubing is the way to go. For terminal strips, the are
liquid sealants available which can painted on after a connection is made up.
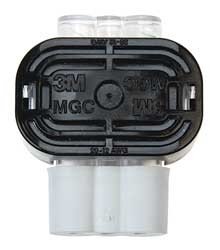
Recently, connectors which incorporate shrink-tube insulation sleeves have been
introduced to the consumer marine market. The connector-wire joint is first crimped, the
a heat gun is used to seal the connector insulation to the wire cover making a waterproof
joint. This would appear to be the best method for making up connections, especially
below decks, or in other salt atmosphere spaces.

It is rare when convenience and reliability are served by the same process. But crimped
connections, properly made up and protected from the environment offer the skipper both
ease and dependability. The local yard has even been crimping battery cables for the past
several years, using a special swaging tool.

Thanks to Lysle Gray, Technical Director, ABYC, Paul Michalczyk of ANCOR Marine,
and Jim Vaughn of FTZ Industries, all experts in marine wiring, for their consultations in
preparing this article.


-- Edited by rwidman on Monday 18th of April 2011 06:00:06 AM


-- Edited by rwidman on Monday 18th of April 2011 06:01:30 AM
 
Back
Top Bottom