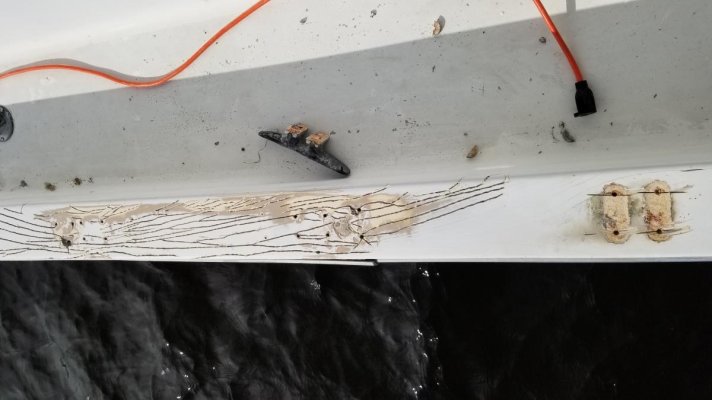
Thanks for the link FOG. They do have a size that will do very nicely. The link you sent me is a JPEG of their portlights, but there is no link to any other part of their site. I'll figure it out when I get some time, but for now I'm still grinding away. Below is a picture of today's progress. This is, by far, the worst section of the boat and I'm about half done with it. It looks like, at some point, there was something less than a perfect landing.
You are using an out of date browser. It may not display this or other websites correctly.
You should upgrade or use an alternative browser.
You should upgrade or use an alternative browser.
New to Me Prairie 36 Finally at Home
- Thread starter CapeBob
- Start date
The friendliest place on the web for anyone who enjoys boating.
If you have answers, please help by responding to the unanswered posts.
If you have answers, please help by responding to the unanswered posts.
FOG
Guru
Thanks for the link FOG. They do have a size that will do very nicely. The link you sent me is a JPEG of their portlights, but there is no link to any other part of their site. I'll figure it out when I get some time, but for now I'm still grinding away. Below is a picture of today's progress. This is, by far, the worst section of the boat and I'm about half done with it. It looks like, at some point, there was something less than a perfect landing.
Yes that was just a page from the Man Ship catalog. When I bought mine a few years ago for my sail boat I shopped around on the internet for the best price. I got a good deal because I negotiated a price based upon several portlights and hatches. However, the company I purchased mine from is no longer in business, but Man Ship does make a quality product. Good luck.
tallswede
Senior Member
Hi Bob, I replaced all the opening ports on my boat with replacement Gray Marine ports with the help of HOP CAR here on this forum. The new ones were not exactly a direct replacement as the newer ones have some slight differences in the frame and screw placements on the inner ring. They were very close though and I was able to make the necessary opening mods without much trouble. The spigots needed trimming because I wanted them flush with the outer frames like the originals. It's great having all of them working now! What ever the originals were bedded in with was some tough stuff! It took a lot of patience and care not to damage the inner cabin liner to get them out. Putty knives, chisels and saws to cut and break up the old ports along with some acetone to soften up the old sealant was used. I used butyl tape on some and silicone caulk on some others to experiment with what sealant works best over the long run. Have fun!
Kevin
Kevin
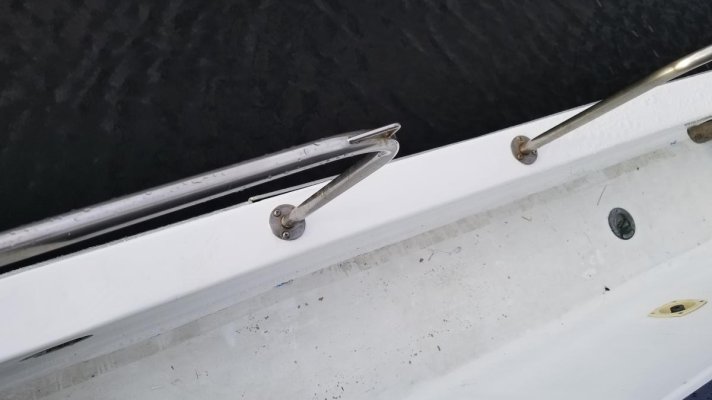
The painting project is taking a lot longer than I anticipated. After a really cold, for Florida, January, February has been really hot for February and I have been waiting for cooler weather to finish sanding and apply the paint. It is forecast to be cooler this weekend and I hope to get the paint on and reinstall that railing later in the week. Accidently ordering the wrong primer slowed the sanding down considerably. I had to wet sand the entire area where I applied the primer. Just a little bit more sanding and I'll be ready to paint.
Thanks to Kevin, tallswede on the forum,. I found the exact replacement portlights and one arrived today. I only ordered one with a smoked lens to see if I liked the darker lens. Well, the one that I got had a clear lens and that's fine with me. I guess fate is telling me to put clear lens portlights on the boat. Now when I order the other 5 tomorrow I hope I don't get 5 with smoke lenses. Once I get the railing back and the portlights installed I'm going to take a break from boat work and take a quick trip to the keys to visit an old friend. I guess "quick trip" is a poor choice of words for a guy with a trawler.")
I just remembered that CaptTom also suggested these portlights. Thanks CaptTom, I'm sorry I forgot about your advice.
Thanks to Kevin, tallswede on the forum,. I found the exact replacement portlights and one arrived today. I only ordered one with a smoked lens to see if I liked the darker lens. Well, the one that I got had a clear lens and that's fine with me. I guess fate is telling me to put clear lens portlights on the boat. Now when I order the other 5 tomorrow I hope I don't get 5 with smoke lenses. Once I get the railing back and the portlights installed I'm going to take a break from boat work and take a quick trip to the keys to visit an old friend. I guess "quick trip" is a poor choice of words for a guy with a trawler.
I just remembered that CaptTom also suggested these portlights. Thanks CaptTom, I'm sorry I forgot about your advice.
Last edited:
Hey, Bob, any advice on re-installing the railing? Mine is bolted through in some places, screwed in others, and has what I think is an aluminum backing plate in still more. Mostly the undersides are inaccessible.
I've re-bedded almost one whole side rail, but re-attaching each stanchion base was a unique challenge. Sometimes the old fasteners went right back in, but usually I had to get creative. And it looks awful - different sized screw, bolt and lag heads everywhere.
I've re-bedded almost one whole side rail, but re-attaching each stanchion base was a unique challenge. Sometimes the old fasteners went right back in, but usually I had to get creative. And it looks awful - different sized screw, bolt and lag heads everywhere.
Hi Tom, Only screws were used on my railing. Some of them were stripped so part of my painting project was repairing screw holes. Since the screw holes have all been repaired I'll be able to use the same size screws. I didn't like the cleats that were on the boat since a line can't be passed under them so I'm replacing them with stainless cleats. They were through bolted so I cut a hole to access the nuts and am covering the hole with a deck plate. I've dry fitted the deck plates and they look nice and the fiberglass is so thick in that area there will be no problems. It's a big job, but I think you could still repair your screw holes so you can use the same size screws.
Bob, that's interesting. I think some of mine were through-bolted at the factory, since there was an aluminum backing plate below, which seemed to be embedded in the fiberglass. Maybe it wasn't, and was added later. Or maybe yours were removed and re-installed with screws later.
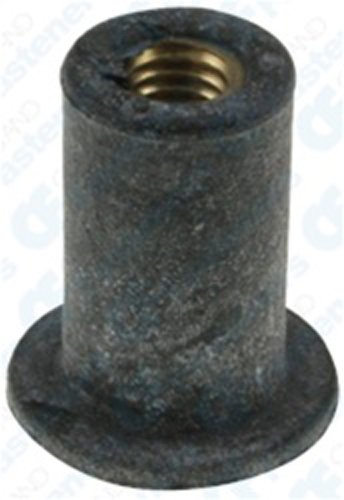
One thing I'm experimenting with where needed are rubber blind well nuts. Sort of like a sheetrock anchor but rubber. When tightened, the rubber seals the hole top and bottom. Not as rugged as having a backing plate, but I suspect it'll last OK until the next time re-bedding is needed.
One thing I'm experimenting with where needed are rubber blind well nuts. Sort of like a sheetrock anchor but rubber. When tightened, the rubber seals the hole top and bottom. Not as rugged as having a backing plate, but I suspect it'll last OK until the next time re-bedding is needed.
FOG
Guru
Just adding my $.02 regarding the railing. I had to slightly lift the aft section of my railing to get the new davits on. It was through bolted with aluminum backing plates. I had access through the cabinets on each side of the bed for all but the center stanchion. I re-installed that one with SS lag screws. I have also noticed that the forward railing has some backing plates with access through the chain locker.
Tom - let us know how the rubber blind well nuts work out and where you got them.
Tom - let us know how the rubber blind well nuts work out and where you got them.
tallswede
Senior Member
I replaced all my cleats with 10" stainless last year too. I filled the old holes with thickened epoxy and made new backing plates. I was able to access the back sides with some boat yoga and use of universal sockets on an extension. Getting this done required help from my Admiral but we now have a nice improvement. A couple of my old cleats which were hollow cast aluminum were so corroded they were easily broken off. I only had 2 that were in reasonable shape.
Kevin
Kevin
The gunwale painting is complete. It took a lot longer to complete than anticipated due to me applying the wrong primer. The primer was so soft that I had to wet sand it all off which took over a week. Anyway, the paint is on and compared to what it looked like when I got the boat it looks amazing. I used 3 coats of Quantum 99 two part polyurethane paint applied with a roller and no tipping. No, it is not perfect like a professionally applied paint sprayed on, but for a DIY job it is magic and very easy to apply. I was very disappointed in the drying time. Quantum said that the paint had to be dry to the touch before the paint could be recoated. They also said that it should take 3 to 4 hours for the paint to be dry and that if subsequent coats weren't applied within 12 hours the paint had to be abraded. It took almost 8 hours for the paint to dry so there is no way I could get all 3 coats on in one day. Two of my friends came over and help me with the abrading so we made quick work of it.
Other than using the correct primer the only thing I would have done differently is to have another person precede me with a tack rag. I ran a tack rag over the area and by the time I finished wiping and started painting the Florida breeze had liberally coated the horizontal areas with grit. I got most of it off, but with ~ 90 second wet-edge time a considerable amount of grit got rolled into the finish. But, it's not noticeable unless you rub your hand over it.
Other than using the correct primer the only thing I would have done differently is to have another person precede me with a tack rag. I ran a tack rag over the area and by the time I finished wiping and started painting the Florida breeze had liberally coated the horizontal areas with grit. I got most of it off, but with ~ 90 second wet-edge time a considerable amount of grit got rolled into the finish. But, it's not noticeable unless you rub your hand over it.
Attachments
FOG
Guru
From what I can see in the photo, it looks great. I don't know how the before and after photos compare, but they are usually a good sign of satisfactory accomplishment.
My Prairie 36 has spider cracks in the gel coat all over the top sides. The hull is fine, but they must have done something wrong when they sprayed the gel coat in the molds for the deck and fly bridge.
I wish that I had your patience and effort to do what you're doing. I'm sure when you're done you'll look back and say that you're happy with the time, money, and effort you spent.
While I'll get up with my morning coffee, sit down on the fly bridge looking at the numerous cracks and say to myself, "I wish I had Bob's boat."
Comodave
Moderator Emeritus
- Joined
- Jul 2, 2015
- Messages
- 21,288
- Location
- Au Gres, MI
- Vessel Name
- Black Dog
- Vessel Make
- Formula 41PC
Looks nice, very nice. I too am using Quantum paint on my boat. We rolled the flybridge and cabin sides last year. We are working on the hull this year. I am currently grinding out the cracks in the hull. Apparently the PO was a charter member of the coalition of the docking impaired... I am going to fiberglass the areas, sand and roll prime the hull. Then we are going to spray the hull. We have a painter that will come and spray it after I prep and tape everything. Should cost less than $600 to get it sprayed plus cost ot the paint.
As to the Prarie that had stress cracks on the deck, we did also. Many, many stress cracks through the entire deck. I looks like they put the gel coat on too thick. I sanded off the nonskid and painted the deck with Kiwigrip. It covered the fine stress cracks very nicely. We did not grind them out and fill them, there was just too many to deal with. So far it has been a year and we are very happy with the Kiwigrip.
Good luck with your project, looks good so far.
Thanks for the kind words FOG and Comodave. The next project has started which is replacing all the large portlights. A friend came over today and help me take all six out and it was a battle. It was obvious that the installed portlights were either removed, resealed, and replaced or replaced with new portlight sometime between 1979 and now. Most of the ones we removed weren't actually screwed in to anything solid, but were glued in with 5200. Removing them caused some damage to the interior fiberglass, but nothing that will take long to repair. I am sourcing some teak strips to place between the inner and outer fiberglass layers and with a little mat, resin, and elbow grease the job should look pretty good. Painting the aft cabin was on the list so I'm moving it up to next on the list.
I still don't have all the deck hardware back on the boat so I'd better get hopping.
Bob
I still don't have all the deck hardware back on the boat so I'd better get hopping.
Bob
Comodave
Moderator Emeritus
- Joined
- Jul 2, 2015
- Messages
- 21,288
- Location
- Au Gres, MI
- Vessel Name
- Black Dog
- Vessel Make
- Formula 41PC
I would not be concerned about using teak between the inner and outer layer of fiberglass. If it is never going to be exposed and all you are looking for is a filler, then I would go with something cheaper and easier to work with than teak. Also I would encapsulate the wood with epoxy as it goes in and it should last a really long time. The epoxy will also stick better to other wood than teak since teak has so much oil in it. If you do decide to go with teak, make sure to wipe it down with acetone righr before you glass it in. Good luck, I know how much work it is to replace portholes.
The aft cabin portlight project is complete and what a pain it was. At some point in the past the portlights had been changed from the original and what a hack job it was. The new ones were installed with 5200 and to get them out I had to do a lot of destruction. I had considered New Found Metals portlights but thanks to members of this forum I was able to find the plastic Gray Marine lights by Pompanette. Not as pretty as the stainless, but a whole bunch cheaper. I did not buy them directly from Pompanette, but found them much less expensive at go2marine. 
Comodave
Moderator Emeritus
- Joined
- Jul 2, 2015
- Messages
- 21,288
- Location
- Au Gres, MI
- Vessel Name
- Black Dog
- Vessel Make
- Formula 41PC
Glad it worked out for you. One of my old portholes in the aft head took the formica surface with it when I removed the porthole. I had to rebuild the entire cabinet around the porthole to replace the laminate.
Leaking Hatches
I have a leak in my forward hatch. It looked like it had been previously repaired as there was black silicone sealant that had squirted out from behind the frame and it looked terrible. When I pushed on the lens it popped right out as the silicone sealant didn't stick to the lens. I removed all the sealant. Not an easy job as there are many rivet heads that were in the way. I am just guessing here, but I think the way the lens was secured and sealed when new was with a rubber gasket that both sealed and retained the lens. That rubber gasket is still there and still sort of holds the lens in place, but not secure enough and it certainly isn't waterproof.
I think I can make a satisfactory repair by gluing the lens in place, but I have no idea what to use. Thanks for any help.
FOG
Guru
Both of my hatches leaked between the lens and frame on our Prairie 36. I dug out the bedding, removed the lens and cleaned everything with acetone. Then used Dow Corning 795 black to bed and seal the lens into the frame. It’s been about a 18 months and no leaks.
Hard to believe it's been almost a year since I last posted on this thread. The work on the boat is basically complete except for new exhaust systems for the engines. If anyone knows a good place to get the required parts for my 2 Perkins 4-236's I'd appreciate it.
Thanks,
Bob
Thanks,
Bob
FOG
Guru
Hard to believe it's been almost a year since I last posted on this thread. The work on the boat is basically complete except for new exhaust systems for the engines. If anyone knows a good place to get the required parts for my 2 Perkins 4-236's I'd appreciate it.
Thanks,
Bob
Trans Atlantic Diesel
TAD for perkins engines, perkins diesel, perkins marine, perkins parts, perkins generators, perkins service
Bought many parts from them, good people.
Just a quick update and a well done to Trans Atlantic Diesel. I decided to replace the exhaust manifolds and oil coolers on Time Finder. Trans Atlantic Diesel provided the parts with, what I think, was exceptional speed and they couldn't have been more helpful. Thanks to member FOG and TA Diesel, Time Finder's engines have some shiny new bits.
Similar threads
- Replies
- 41
- Views
- 6K
- Replies
- 22
- Views
- 1K