Repairing a failed scarf joint on my caprail

The friendliest place on the web for anyone who enjoys boating.
If you have answers, please help by responding to the unanswered posts.

waterfront

Veteran Member
Joined
Apr 18, 2012
Messages
54
Location
USA
Vessel Name
Waterfront
Vessel Make
Chein Hwa Present Sundeck 35
I have a scarf joint that has separated on my caprail. My thoughts are to clean out the material in the joint, refasten , and then fill with epoxy. After it sets up, sand and fair the area and then refinish. Are my thoughts correct or is there another method to make this repair?
 
If a scarf joint fails once it will fail again .IMO Id try not to use epoxy I would use mechanical reinforcement to repair the joint .

plated_scarf_joint.gif
 
Sounds good if you can get the two surfaces clean and dry. Most epoxies have no UV inhibitors, so maybe think about painting the glue joint with something close to the wood tone to protect the glue.

:socool:

I have a scarf joint that has separated on my caprail. My thoughts are to clean out the material in the joint, refasten , and then fill with epoxy. After it sets up, sand and fair the area and then refinish. Are my thoughts correct or is there another method to make this repair?
 
A picture of the joint would be helpful to determine the best fix. Also from my perspective as someone who worked in wood boat repair for nearly 30 years, its more properly called the rail cap. Think of it this way. That pc of wood "caps" the rail it sits on doesn't it? I know its common to say caprail but it irks me a little I confess.
 
I had a similar issue arise. After I relocated my boat from a cold climate (Puget Sound) to a warm one (Queensland). Initially I was going to try and mechanically refasten and close the joint. But on advice I accepted that the it was probably a climate adjustment that would be an on-going issue, and the best approach would be to caulk it.

I used an old hacksaw blade to clean out the joint as best I could. Then masked the wood each side and with the help of a putty knife forced the caulk as deep as I could. It cleaned up reasonably well, but it wasn't until the next rail varnish that it ended up as it is in the photo below.
 

Attachments

  • Caprail 4 sml.jpg
    Caprail 4 sml.jpg
    123.8 KB · Views: 455
If a scarf joint fails once it will fail again .IMO Id try not to use epoxy I would use mechanical reinforcement to repair the joint .

plated_scarf_joint.gif

I successfully repaired something like that in Gaston's pic, caused by some boat tyre-kicker standing on the rail too far from the upright support, to view my, then new, canvas side deck extension, and forced the scarf joint open. I used a recognised wood glue, (Aquadhere), after cleaning the joint surfaces, and then screws up from the metal reinforcing plate below, so they did not come right through, thus allowing a smooth upper surface and no bolt heads to snag clothing of fingers, etc.

After a sand down, and re-coat with the Cetol Marine Clear I use on my 'rail cap', (or should that not be 'cap rail', Puget, since there is no metal rail under it - only the uprights, so the teak is the rail), it looked as good as new, and still does 5 yrs later.
 
Last edited:
I successfully repaired something like that in Gaston's pic, caused by some boat tyre-kicker standing on the rail too far from the upright support, to view my, then new, canvas side deck extension, and forced the scarf joint open. I used a recognised wood glue, (Aquadhere), after cleaning the joint surfaces, and then screws up from the metal reinforcing plate below, so they did not come right through, thus allowing a smooth upper surface and no bolt heads to snag clothing of fingers, etc.

After a sand down, and re-coat with the Cetol Marine Clear I use on my 'rail cap', (or should that not be 'cap rail', Puget, since there is no metal rail under it - only the uprights, so the teak is the rail), it looked as good as new, and still does 5 yrs later.
I was envisioning a solid rail like a bulwark or bullrail with the wood cap on top. As to the wood rail on top of stanchions,, I call that a handrail.
 
Cap rail 78 if it "caps" the rail.
Hand rail is typically above the cap rail and on stanchions. Wood or metal.
IMO
 
I have a scarf joint that has separated on my caprail. My thoughts are to clean out the material in the joint, refasten , and then fill with epoxy. After it sets up, sand and fair the area and then refinish. Are my thoughts correct or is there another method to make this repair?

I think how it is fastened would depend on if the repair is under a load or not. A section of our cap rail has been repaired. After dry fitting, it was epoxied then fastened with counter sunk screws and then teak bungs, sanded and finished. It's a non-loaded area.
 

Attachments

  • 022.JPG
    022.JPG
    155.2 KB · Views: 140
Cap rail 78 if it "caps" the rail.
Hand rail is typically above the cap rail and on stanchions. Wood or metal.
IMO
But doesn't rail cap make more sense? Pretty much all the shipwrights I worked with over the years felt rail cap made more sense. Agree on the handrail thing, and that is what I had said. However going off the rails here so to speak on nomenclature, my fault.
 
Just for laughs... from Robert Stewards 'Boatbuilding Manual'.
 

Attachments

  • IMG_2680.jpg
    IMG_2680.jpg
    86.6 KB · Views: 172
Greetings,
Mr. 78. "But doesn't rail cap make more sense?" Indeed it does. By the same token, saloon makes more sense than salon as well for the man cabin area. I suppose both of us will have to resign ourselves to...
 
If a scarf joint fails once it will fail again .IMO Id try not to use epoxy I would use mechanical reinforcement to repair the joint .

plated_scarf_joint.gif
I think this is the way to go but I'll make two changes:

1) Stagger the holes so they are not in a straight line. 2 near the sides at the top end and one in the center at the other end. A triangle.

2) Use a good outdoor wood glue but instead of nuts and bolts, use wooden dowels (Glue them in place also). Drive them through the joint, then cut them off flush, sand and finish.
 
Whatever the nomenclature :rolleyes: 
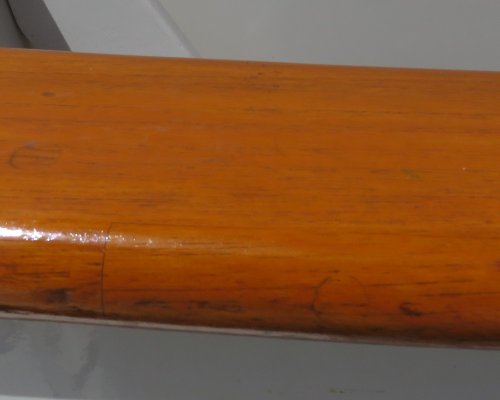
the wooden parts.I will get a close-up photo of the joint this afternoon.
 

Attachments

  • harvey 041.jpg
    harvey 041.jpg
    60 KB · Views: 114
The illustration posted above really should put an end to the debate. Its a rail cap. Apologies to the OP and look forward to seeing what the problem is.
 
IMG_0008.jpg

IMG_0009.jpg

IMG_0010.jpg

This is the failed joint. Refinish is in progress. Advice needed.
 
The joint needs to be mechanically drawn together; not dowels. "Glue" is just that; it is not intended to fill the joint unless in a structural design and prepared for that purpose.
 
To mechanically secure the top section, you should have at least 3/8" of thickness where the fasteners would be. Thinner than that, you risk cracking the top section or the fasteners pulling through.

I would consider stabilizing the joint so there is no further movement then fill and finish.
 
The Joint

Ditto.:thumb:
 
The joint needs to be mechanically drawn together; not dowels. "Glue" is just that; it is not intended to fill the joint unless in a structural design and prepared for that purpose.

Clamps. I thought that would be obvious. By the time one made room for nuts and washers and plugs to cover bolt heads, there wouldn't be much wood thickness left to hold together.
 
I wonder if you could do what the flooring folks do. Use some teak sanding/sawdust and mix it in some clear epoxy and fill the gap with it.
 
Greetings,
Mr. w. Well, whatever you do you WILL have to clean out that joint, soooo....Pop the bung(s) on the top (overlying) piece and take the screw(s) out. It/they don't appear to be doing anything at this point anyway AND it will facilitate a blade running along the whole mating surface. I suggest running a hacksaw blade through the slot and cutting out whatever is currently in there already to the level of your fiberglass.

Now would be a good time to fill the screw holes that go into your gunwale top as you're going to put those previously removed screws back in and re-bung. A whole thread on TF, somewhere....ahem..."discussing" the "best" method.

OK, Area prepped and ready to go with whatever you decide. IF you decide epoxy/glue of some sort, fill the crack, put as many clamps as you can fit in, put in those screws before the epoxy kicks off, clean up your dribbles and have a brewski. IF you decide to go the all caulk route, caulk, put in the screw(s), clean up the dribbles and have a brewski. OR you could do a combination of both and...yup...
ybr.gif


Remember to mask all non-active areas and put down some drop sheet.
 
Going to be hard to clamp that, not much to hold on to. As others state, the joint must be cleaned out of all old glues etc, then the gap filled with thickened epoxy, you can use teak dust or micro-balloons for thickening. When clean, paint a thin coat of epoxy first, let set for a bit before filling the rest with the thick stuff, get a better bond that way. Tough part will be closing the gap, as the screws probably wont do it unless its real springy. You might try weight, lead bars or whatever to bring it down. Clamps are best of course but may be tough. If you have a guard below that could be used with a pipe clamp, that might help. Or if you have a deck opening near by that could be used with a clamp and board over the top as leverage to pull it down enough to hold it with more weight. Some ingenuity may be called for.
 
Since there is nothing to clamp to, you're not going to get under it to add a plate and the joint has not lifted (at least from what I can see in the pictures anyway) clean the joint out to about 1/4" deep or so, fill with epoxy or 5200, repeat if necessary, let set well, sand, varnish and move on.
 
Since there is nothing to clamp to, you're not going to get under it to add a plate and the joint has not lifted (at least from what I can see in the pictures anyway) clean the joint out to about 1/4" deep or so, fill with epoxy or 5200, repeat if necessary, let set well, sand, varnish and move on.

Yup!
 
how-to-repair-wooden-furniture-joints-6.jpg
Clean the joint with a Japanese type saw use "West Systems" to glue sections and brass screw for a mechanical hold .
Over size drill the hole so they can be plugged with dowel .
406-7021-lg.jpg
 
Last edited:
It sucks to work with but a PL style glue would also work .

Gorilla Glue is the expen$ive version.

PL advantage is it "foams" -expands to fill the joint , so its easier to get 100% 2 surface contact.

A long wooden clamp would hold for curing , and adding a plate , glued on, would not be hard as PL sticks to metal and wood.

Get rubber gloves as it stains fingers "forever".
 

Latest posts

Back
Top Bottom