Recoring Cabin Roof Seeking advice

The friendliest place on the web for anyone who enjoys boating.
If you have answers, please help by responding to the unanswered posts.
Great work you're doing there. Really overdoing it but it will probably last a lifetime with little more than a cleaning from time to time.


Also, cute little sidekick. Gotta post that pic again.


IMG_2189.JPG
 
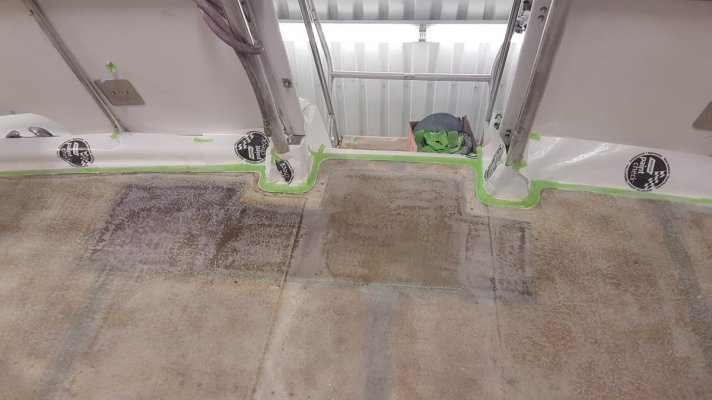
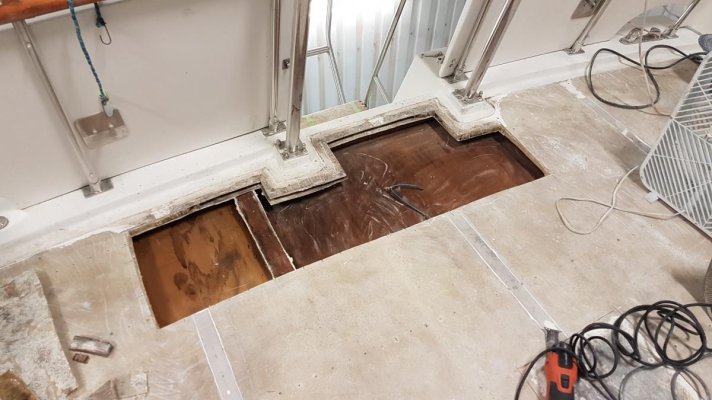
Leveled, edges ground a little more, and cloth layed!

IMG_2205.JPG


Now to build up the aft end with the new pieces, get an even bevel on the back, and lay 18oz cloth from the current edge wrapped around the end.

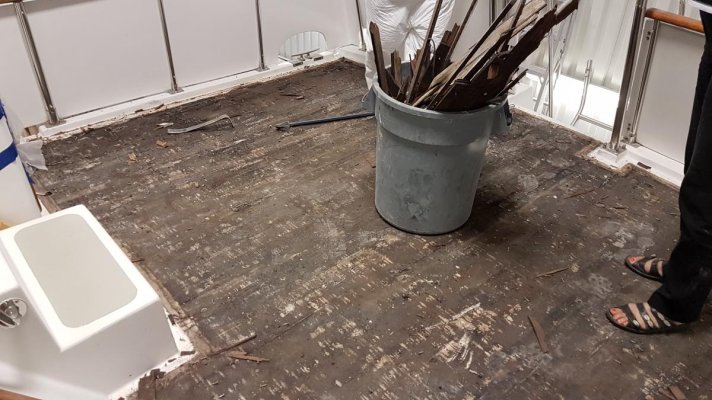
For anyone reading this who is wanting to learn how to fix their roof a few pointers:

You could just coat the marine ply with epoxy resin , sand fair, and paint or gelcoat. But if you do that it won't hold up to sharp objects (like dingy motors) being dropped on it.

Two layers of 6oz cloth would be stronger/easier for a beginner than 1 layer of 18oz.

You must wet out the wood (e.g. coat it with wet epoxy using a 4" or larger chip brush) before you lay the cloth down, or the wood will suck the resin out of the cloth.

Once the cloth is down and positioned, pour the resin on and use a fiberglass roller to spread it around and get it even. You need to keep rolling until it's just about to set to prevent any blisters that occur when the resin exotherms (a fancy word for gets hot). If you try to brush the resin onto the cloth it will pull up fibers and you'll have balls of what I call "cloth snot" you'll have to sand out.

For your own sake wear an organic respirator and replace the cartridges every year.

I used 635 thin Epoxy from U.S. composites. It's not as quality of a product as West System but it's 1/2 the price, and hey, this is a Taiwanese Trawler not a Hinkley.

This job (2 48" wide pieces of cloth just shy of 8 feet long took 72 pump strokes of resin and 24 strokes of hardener mixed in 3 batches of 30/10, 30/10, and 12/4. I get the resin tubs ready with the stroke count written on the tub so all I have to do is pump in the hardener, mix for 3 minutes with a mixing stick, and go.
 
You, sir, are going to have a fight on your hands with that 18oz cloth. Soak it good. :lol:


I'd still do two 6oz wet layups.
 
You, sir, are going to have a fight on your hands with that 18oz cloth. Soak it good. :lol:

I'd still do two 6oz wet layups.

Thanks, for the last piece that has to wrap around the end I am leaning towards using 2 wet layers of 6 oz...
 
Fair play to you for taking on such a big job and making a better than new repair. Well done.. you've a heart like a lion
 
Great to see your progress. I'm facing a boat deck repair/replace soon so this is quite inspiring. In our case two of the beams will need to be replaced as well. IMHO the boat deck beams were too few and under sized in the original build so after 37 years of wear, weather and weight they look pretty wavy. The plan is to remove the entire deck, replace the beams with laminated beams then proceed as you have done here.

Good luck and thanks for sharing everything!
 
So this is the final result on ours. I've re-posted some of the pics here for context.

Don't have a good before pic of the sink but you can see it on the left in the deck before picture. We're very glad have it done since it was one of the must do jobs planned from the day we bought her. My only regret was I didn't think of putting a good propane locker where the sink was. It can still be done of course but I could have made use of the existing hole for the sink drain/ water lines. The plan is to mount a folding table in this location that will match the main table top...yet to be selected.

Since the original picture of this area we've also had the ice box (right foreground) removed and glassed in, all new fly bridge and sun deck canvas, additional supports added to the bimini frames and custom hand rails installed
 

Attachments

  • 20160907_144329.jpg
    20160907_144329.jpg
    118.5 KB · Views: 87
  • 20180723_165522.jpg
    20180723_165522.jpg
    78.8 KB · Views: 83
  • 20180621_132040.jpg
    20180621_132040.jpg
    135.9 KB · Views: 85
  • 20180712_105110.jpg
    20180712_105110.jpg
    99.9 KB · Views: 82
  • 20180720_192456.jpg
    20180720_192456.jpg
    78.8 KB · Views: 91
  • Open_Deck.jpg
    Open_Deck.jpg
    108 KB · Views: 94
Thanks to everyone for the kind words and support. Here's the weekend warrior progress report:

As usual had big plans, but only achieved small milestones! First problem was the filler pieces for the aft end I had made at home out of 4x4's when I went to attach them they were too fat for my taste, didn't bring my portable table saw, so off to a friend's shop to rip cut 1/4" off the back. Then I realized I had left all my bar clamps at home which is 90 miles way, so off to the hardware store for a couple of cheap ones. Then, my circular saw's height adjuster broke, so all of the little blocks for the curved section had to be cut by hand:

IMG_2212.JPG


Washed the amine blush off last weeks resin/cloth and gave it a good sanding with 60 grit so the fairing layer has something to key into.

Got the pueces glued in, and the port side glued & screwed, but with two clamps... had to wait until Sunday.

IMG_2217.JPG


Mo one will ever see any of this as it will all be covered by cloth and believe it or not this is how the factory made this curve.

Sunday ground the port side out, started the build up of the curved edge - cabosil/milled fibers to bond the top of the filler piece to the edge of the plywood, which I'll top with cabolsil/microbubbles with a nice curve to it, and glued the starboard side filler piece in. Sanded and added another healthy smear of epoxy/filler to the curved section.

IMG_2221.JPG


So steady as she goes, I'm having fun making this up as I go along as usual, and at the end of the day, Hey, it's just a Marine Trader :)
 
It would have been great if you had the time and tools to make that curved area out of laminated lath or 1/4 inch ply. It will still be strong though. The resin will see to that.
 
Agreed 100%!, but as this area is directly behind the mast I need the proper shape more than anything.
 
Weekend Update...

It was hot, and being in a giant metal building with no clouds the heat chased me out at 2:00 both days. By 11 AM it was too hot to play with epoxy so I worked on other tasks.

On Sunday I discovered the roll of 6oz cloth didn't have near as much as I thought... Ordered more today.

That being said I completely finished the aft end rebuild and I am very happy with it. Starboard side end:

IMG_2238.JPG


There's a slight downslope on this end that has always been there, perhaps next weekend before i lay cloth I'll grind a little off. In the picture you can't see the nice curve I made on the top edge that was a sharp edge before, I took a large hole saw to the plastic spreader to make a perfect curve, sanded the spreader, and trimmed with shears to make a template which was then pulled across the epoxy/cabosil/phonelic microbubble paste.

Mast curve:

IMG_2240.JPG


Very happy with how this turned out, this was my first radius like this.

Port side End:

IMG_2243.JPG


Hoping next weekend is a little cooler as I am sweating the final application of cloth. Fairing and sanding will be easy, it's mostly just a big, flat surface.
 
That will be strong. It's looking pretty smooth in pics. Is that plastic to protect everything below from drips or did you use a peel ply material to help keep things smooth?
 
has anyone tried the foam injection processes i have seen on the web ? they claim the foam will drive out the moisture, encapsulate any rotting plywood, balsa or those little wood squares and give you the structural integrity you seek. i am curious as it seems too good to be true...
 
has anyone tried the foam injection processes i have seen on the web ? they claim the foam will drive out the moisture, encapsulate any rotting plywood, balsa or those little wood squares and give you the structural integrity you seek. i am curious as it seems too good to be true...


I am skeptical about it's ability to push water or trapped moisture out. It may drive out or absorb humidity as some foaming agents use humidity to expand the foam. If expanding foam isn't done properly there will be incomplete cavity filling and worse it can split things open or cause bulges in surfaces. I have used expanding foam in boats with open cavities that I was covering over such as decks and floors. I've never done a blind fill into a cavity.
 
Weekend Update & and added rant!

<rant>
I'm going to start that Rot Porn thread... To dispel all notions that there is ANY fix other than removing the rot and replacing it. You can hide it, you can encapsulate it, you can drill a thousand holes and put a heat lamp on it, you might get the water out but once wood has gotten rot cancer is looses all it's strength. The balsa at the back of the cabin roof had the structural integrity of mashed potatoes. After it dried it turned into a pile of brown dust.
</rant>

I did it, I laid the cloth around the two bends, hardest fiberglass job of my long amateur career. Got epoxy on my arms, in my hair, and a couple of drips on the boat... but it's done! Ended up using 7.5 oz "ultra soft" cloth from U.S. Composites and I can say it's really great stuff. Used strips in the center.

What I did was saturate the plywood, place the cloth, spreading it flat with my gloved hands, poured resin on, spread it with a 4" fiberglass roller, when that was completely saturated and well stuck I took my 4" chip brush and saturated the back, and up underneath, then saturated the cloth (of course it dripped everywhere) then used my hands to fold it up and under. Once I had it in place I swapped gloves and worked it with the roller until it set up. There were a few times during the exotherm it tried to unravel itself and I got fiberglass snot (little threads with blobs of epoxy) that threatened to tangle in the roller so I had to be quick with the shears to cut those off. Made a ferocious mess on the plastic I had taped down.

Here's picture after I finished the second end. I did the left/right sides with big pieces on Saturday, and laid strips over the mast curve on Sunday.

IMG_2248.JPG


Let the fairing begin! :dance:

Getting a lot of other boring little projects done while waiting for the glue to dry too. The only sad part about this kind of work is once you're done the only thing normal people see is the paint...
 
No boat work this weekend or next, life intervened. Will continue updating until finished no worries. Fairing flat surfaces is easy, it’s the vertical ones that take forever.
 
Ingersoll-Rand IR315 Heavy Duty Air Twin Piston Straight Line Sander
 
I didn't get very far on the roof this weekend. My plan was to lay down the first skim coat on Saturday morning, work on other projects once it got hot, come back Sunday and fair that out. One batch went down fine, and then to my surprise I had 1/4 gallon of resin but had run out of hardener!

Here's how far I got with the skim coat:

IMG_2286.JPG


For those of you that have never done this before, I sanded down the original resin/cloth with 60 grit to eliminate the blush and knock down all the high spots. Then I gave it a bucket wash to make sure it was clean. Dried it off. Then I mixed a batch of Q-Cells and Epoxy (A medium density easily sand-able filler) to the consistency of runny mayonnaise, and spread it with a 4" brush. This will self level, and fill in all the low spots. I'll come back and sand this fair with 60 grit, and then come back once more with a low density filler mixed to the consistency of peanut butter filling any remaining low spots.

It was so miserably hot by late Saturday afternoon that my 2nd boat (Where I am sleeping while I work on the Sea Moose) was miserable inside even with the A/C running, so I decided to go home and work on inside the house projects.

Does Yorksie look hot?

TooHot.png
 
Fine job there. That shouldn't take a lot of sanding from the looks of it.


You may know this but you can remove amine blush without sanding. Of course it will need sanding afterward anyway.


I use acetone on blue shop towels and change areas of the towels often, until I have to replace them. I follow up with a quick scrub with Dawn dish soap. Not much though. Then sand until I'm sore from stem to stern.


Amine blush removal
 
The rest of the skim coat is finally down, and all my other projects are nearing completion too. Next weekend we sand/sand/sand and fill any remaining voids with low density filler (the bright red stuff)

IMG_2311.JPG


Thanks for the tip on the blush I usually wash with soap and water, although with a skim coat like this I just sand it off.
 
Looking very nice. What are you going to finish it with? Paint or gel coat?
 

Latest posts

Back
Top Bottom