Painting the boat

The friendliest place on the web for anyone who enjoys boating.
If you have answers, please help by responding to the unanswered posts.

wingspar

Veteran Member
Joined
Jan 24, 2008
Messages
79
Vessel Name
White Star
Vessel Make
Canoe Cove
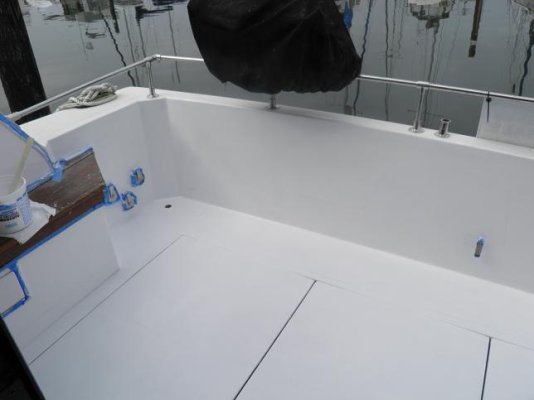
I wanted to do this last year but finally got the time to at least start on it. :banghead: The paint I'm using is Interlux perfection. The color is Snow White and will have navy blue trim. The cockpit is completed. I will do the flybridge next year when it warms up and then haul the boat to paint the Hull and upper deck in a semi enclosed area.
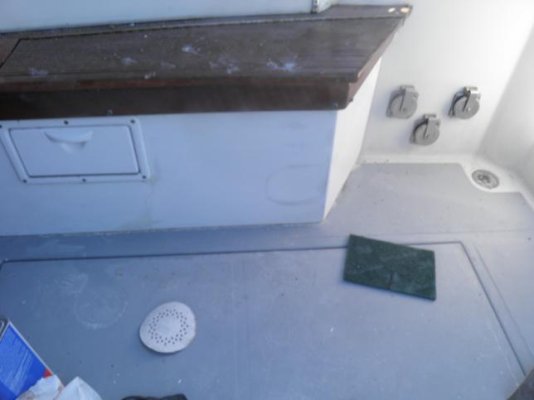
 

Attachments

  • boat1.JPG
    boat1.JPG
    30.7 KB · Views: 143
  • boat.JPG
    boat.JPG
    33.4 KB · Views: 162
You're going to like it!
 
Application was just about to manufactures recommendations.

Repair chip, dings etc with an epoxy filler. Sand smooth

Primed with Interlux 404. Sanded down with 220

First coat thinned 8% with 2333n was applied using a 9" roller cut down to 4.5" that is safe for Interlux's two part paint. Tipped with a 4" badger hair brush.

Next day found lots of runs in the paint. #^@*^$%

Sanded out runs with 220 paper.

The next coat I used 4' and 6" small foam rollers I bought from Ace hardware. This time it went on really smooth and needed very little tipping if any at all. However the foam roller would get soft after about 15-20 minutes so I replaced them about every 10 minutes.

Next day paint looked good with zero runs :)

A light scuff and wipe down for the third and final coat.

No drip, no runs, no errors. Looks great and is very shiny.

As a side note I would start painting around 11:30 AM and put a blue tarp over it with a heater to prevent any condensation on the new paint during the evening.
 
Looks great. Someday, unless we decide to turn the boat over to a yard in Vancouver for a total rebuild and repower, we'd like to try painting it ourselves when we get the time. Good to see your method is turning out so well as it's the sort of thing we'd try.
 
I used the same two pack paint & colour on the hull, but wimped out and had the yard professional do it, and the outcome is amazing. He sprayed it in a heated booth of course. Actually, I don't think we are allowed to do such major work outside on the hard here at our marina - they've gone too green.
I did all topsides myself with one part Toplac - also looks great, and a bit easier than what you did, but all praise to you for having the time, motivation and gumption to do it.
 
Can you share more of the prep work part? How far did you sand and how to repair the dings?? Our PO painted the topsides without proper prepwork and the paint seriously needs redone.
 
When you thin the paint if you test it on a piece of glass you can get the perfect thickness.
If it doesn't leave brush marks or runs on the glass it is just right.
The glass because you can wipe it off as you adjust the thinner and retry.

SD
 
Can you share more of the prep work part? How far did you sand and how to repair the dings?? Our PO painted the topsides without proper prepwork and the paint seriously needs redone.

My gelcoat is still in good condition with no crazing or spider cracks:D The only dings to fill were from normal usage for a boat 27 years old. I wiped down the cokpit with a fiberglass wash made by Interlux. This removes any old wax and contaminates on the gelcoat. Then sanded down with 220 grit paper usinging a 5" orbital sander. I filled in any dings with an epoxy filler made by Interlux. Sanded everything smooth the next day. Applied a coat of 404 primer with a second coat over any filler or worn through gelcoat. Sanded down with 220. Lots of sanding disks were needed as this primer when dry is very HARD.

I did price out a professional paint job at around 35,000 dollars. With this the boat would look better then new. With me doing it material cost should be around $2500. As I'm in the open air and not in a sealed and headed painting booth my results would not be nearly as good with bugs, dust, etc settling on the paint. But is will be 100% better then it is now with easy clean up and not having to wax and buff.

As a side note one of big seabirds deceided to take a big dump on my new paint. Even after it had dried, needed only the water hose to wash it off. No scrubbing:smitten:

Dave


Dave, How long did it take you?
 
Day 1 Remove as much hardware as possible. Solvent wash fiberglass. Sand with 220 grit. Fill any dings with epoxy filler.
About 4 hours

Day 2 Sand down epoxy filler. Used alcohol in gallon cans with cotton rags as a wipe down. Blue tape as needed. Roll on primer.
About 3 hours

Day 3 Sand down primer. Alcohol wipe down. Paint with perfection Snow White
About 5 hours mainly in sanding primer.

Day 4 Complete sand down of paint do to runs and sags
About 2 hours.

Day 5 Wipe down again and repaint
About 1 hour

Day 6 Light sand with green pad. Wipe down and apply final paint
About 1 hour.

Thus about 16 hours total.

Dave
 
We did our trawler the same way a few years back; still looks very good. Roll and tipping easy to do.
 
Back
Top Bottom