Hatch idea suggestion

The friendliest place on the web for anyone who enjoys boating.
If you have answers, please help by responding to the unanswered posts.

Pack Mule

TF Site Team
Joined
Jan 24, 2013
Messages
3,749
Location
USA
Vessel Name
Slo-Poke
Vessel Make
Jorgensen custom 44
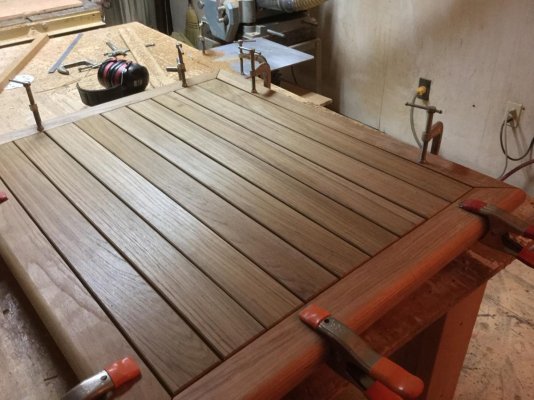
I just tore out my aft deck acces hatch today . Looking for a replacement idea. The hatch area is about 24" x 30" . It was flush mount with drain trough that didn't work very well . Thinking about an aluminum hatch with frame . It doesn't have to be flush . Can anyone make a suggestion on having one built or a factory made that's that big ?
 
I had an aft deck hatch a bit bigger on my 42 Chris. Drain trough worked nicely, but the gap between hatch and deck was covered by 1" SS on 3 sides with a piano hinge on the stern. Also had one of those SS spring hatch holders to keep it open. A little gasketing may help if the waves are overwhelming your drains? Larger drain holes or hoses? And make sure that they are clear? The big hatch was nice. Made the lazerette much easier to access.
 
The hatch was was flush made out of plywood and fiberglassed . The framing around the hatch opening had the trough incorporated and was glassed in. The framing was rotten and the trough was all busted up . I cut it all out and I'm starting over . My other hatch has a built up area around the opening and the hatch closes down over it .
 
How are your carpentry skills? Or how this is your wallet? Fiberglass over plywood will last longer than you will own the boat. And with a little thoughtful design it should be as good or better than original. How old is the boat will you be keeping it that long? I see a lot of people over doing things.
 
I've decided to rebuild it myself . I,m going to go back like it was but better with better troughs and better drainage . The big hatches are too pricey for me .
 
Marty: I did a new 46 X 36 hatch in my veranda for a generator swap. I had no frame or hatch lid to begin with, so I just copied the design from the lazaretto hatch. Same self draining frame, etc.. For the hatch lid, I used the cut-out, which was a mistake. I could have removed the surface teak and top layer of glass and used something like Divinicel to form the lid for less work and $$. All in all, the hatch probably cost 3K or so and an awful lot of time. Most critical was reinforcing the frame to maintain a rigid veranda sole. Recently, another Manatee "Cool Beans" also completed the same modification. Now there are two of us Manatees with these hatches, working very well. I still need to find some matching pulls.
 
Larry ,
I remember the thread on the generator relocate . The hatch work was second to none . I.m going to rebuild mine . I'm planning on just reframing out the hole and using UHMW for the trough area with drain tubes out the transom . Everything you replace or rebuild on Bucky is always better than factory built . How is your swim platform coming?
 
The swim platform is nicely mated and tomorrow I'll be installing the angle supports. I had to split the transom tailgate in half in order to swing the doors in instead of dropping down like a station wagon. Heck, maybe I can even bring the boat home before the new year!

I hope you share your project on here so we can correct your flubs when we have to do it. It seems every time I finish a project, someone learns more than I do about it.
 
Changed my mind . I think I'm going to frame the area up around the opening and built the hatch raised instead of flush . Seems to make more sense to keep the water out instead of letting it in and then having a trough with drain tubes to get rid of what you just let in . Flush is nice and you don't stump your toe but this hatch is almost all the way aft right over the rudder post and it is pretty good size . My other hatch is not flush and it is under cover . I think it will be easier to build and maintain.
It came to me when going back and reading Buehler's Backyard Boatbuilding . When it gets too complicated I always refer to this book and it always makes sense .:thumb:
 
Take down the dimensions that could be made to work , then go to the Dania Flea Market and get a new or used sailboat hatch.

No skid tape on the plexi glass surface will be needed.

Second choice if you are going to build a hatch is to research the Maurice Griffiths dual coaming hatch.

These are use on wooden sail boats where the deck will be immersed by a wave on board and are not hard to construct.
 
It's 22 x 28 . It's one of the old fish hold hatches.
 
Pics of progress on this would be a great addition to the thread
:popcorn:
 
The tear out is all that has been done so far . It's probably going to be a little crude . I'm just planning on frame around the opening on the deck and then just a lift off hatch that just sets over the opening not hinged .
 
Should the area get flooded a lift off hatch can simply float off.

22x 28 is more water than a dozen pumps can lift .
 
Finally getting started on my teak hatch

Just got started on my hatch this weekend . I decided to make a raised hatch instead of a flush hatch . It's about 22 x 28 . Nothing on the hatch is epoxied or screwed down yet . I'm using TDS caulking for the seams . My teak lumber pile is shrinking :facepalm:
 

Attachments

  • image.jpg
    image.jpg
    137.3 KB · Views: 94
Thanks Andy G . I was going to build it out of plywood and epoxy coat . The wife said if I would build it out of teak she would varnish it.:thumb:
 
I hope forever ! I help but she does most of the varnish work . She just did the finish on this piece of furniture I built . It's a kitchen work table . I made it out of mahogany and hard maple .
 

Attachments

  • image.jpg
    image.jpg
    95.9 KB · Views: 87
Thanks Sailor of Fortune. I love your avatar . Is that where you go to work everyday ? Looks like one tough tug .
 
All parts are epoxied and screwed down . Ready for bungs , sanding , varnish then caulk . I'm going to to round and radius the outsides of the 45 % corners so the won't slice the ankles .
 

Attachments

  • image.jpg
    image.jpg
    144.1 KB · Views: 81
Last edited:
Don't forget it should be dogged down, especially a wood hatch that will float off in a a wave over transom.
 
Thanks Brooksie ,I plan on dogging it down . We are in pretty tame waters here on the Tennessee river . Maybe one of these days I'll get out of this play pin . Bahamas maybe::D
 
All parts are epoxied and screwed down . Ready for bungs , sanding , varnish then caulk . I'm going to to round and radius the outsides of the 45 % corners so the won't slice the ankles .

PM: If you varnish before you caulk are you worried about the TDS adhering or lifting over time on a varnished finish?
 
PM: If you varnish before you caulk are you worried about the TDS adhering or lifting over time on a varnished finish?
I try to keep the varnish just on the face and not down the edges where the caulk is . I have done it both ways . TDS told me that the varnish has a tendency to break loose from the caulking when varnishing over the top of it . I have it both ways right now . My rails are varnished after caulk and my doors are before . I guess time will tell what's best . I'm under cover so it's probably not a good test . It's hard to get the black caulk out of the grain .
 
I just went thru 6 years of Wooden Boat magazines looking for articles on hatches, found two but nothing that you haven't discussed. By the look of craftsmanship displayed in the photos you posted you don't need any help. Looks great !!
Makes me want to work on our Bomar type hatch on the fore deck that wants to leak if it's not covered with a tarp.
 
Thanks HiDHo . I wish I could have built a flush hatch but trying to figure out drains and troughs made my head hurt .
Having a decent supply of teak,good tools and a shop makes a big difference . It also doesn't hurt working at lumber company to get a better deal on teak. I don't know if I could ever give up my shop to live aboard . It would be a good excuse to learn how to use hand woodworking tools instead of power tools .:thumb:
 

Latest posts

Back
Top Bottom