The Finer Points Of Teak Scrape and Sanding

The friendliest place on the web for anyone who enjoys boating.
If you have answers, please help by responding to the unanswered posts.

Capn Craig

Guru
Joined
Oct 16, 2010
Messages
519
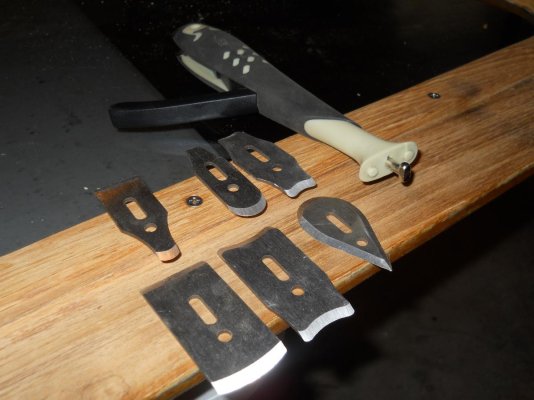
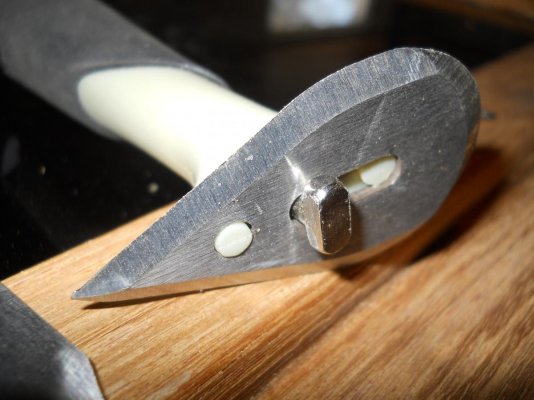
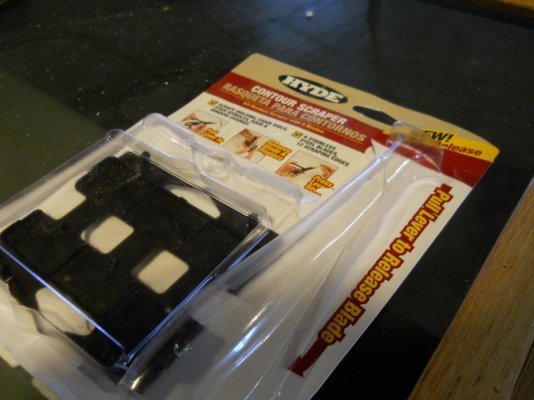
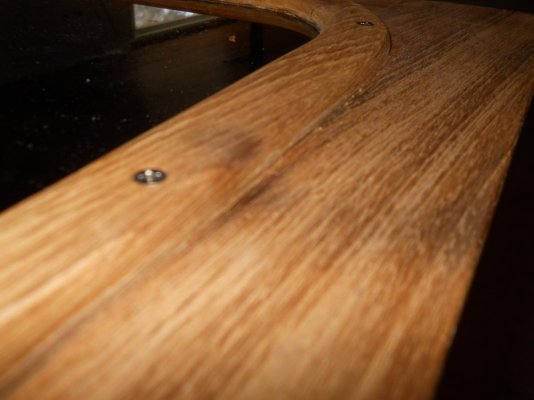
As I scrape My teak cabin doors in preparation for a Cetol coating. I'm learning that there is an art to effective scraping. The process of varnish removal is much easier than I anticipated, except My learning has not come at the expense of some screw ups. Here is my first and biggest so far. My Milwaukee heat gun puts out some wicked heat, It doesn't take long to soften the varnish. If your not careful, I wasn't, it is very easy to scorch the teak. You don't realize you are doing it until you see the slightly black place. Now that I have scorched a few places, I am finding it darn near impossible to make it go away with sand paper. It seems that the charcoal from the scorch just works its way deeper and deeper as you sand. The best luck I have had so far is sand just a little, then use a brush tipped nozzle on the shop vac to vacuum the wood and the sandpaper, then sand just a little more and repeat the process. I have trying washing the surface with MEK and a clean white paper towel and get any black up. I have tried sanding the still wet MEK soaked wood in hopes that perhaps the black charcoal would stick better to the sanding dust. That doesn't work either.

Anybody got advice??

Craig
 
Before you do more damage experimenting with cleaners, try scorching a piece of scrap wood and fixing it, instead of the door.
Would careful bleaching work? I used a wood bleach once to lighten some oak. If necessary, you could later re-match the color using teak stain.
 
We, or rather my wife who's the heat gun artist in the family, remove old finish from teak with it and scrapers of various shapes. It does not take much heat at all to bubble up the old fiinish. My wife uses a Makita heat gun with a very wide heat adjustment range controlled by a big dial on the back. She operates on a relatively low setting. And of course, the other important thing is to always keep the gun moving. But we have (so far) never experienced the scorching you describe.

It's also important when removing finish from cabin trim to use a heat shield to protect the gelcoat adjacent to the trim. My wife has several different sizes of Formica that she holds in place as a heat shield and this has proven to be very effective.
 
We use a citrus based stripper from Home Depot. Works great and doesn't harm anything it contacts, it only removes the finish. Flush with water, then a light sanding and start the Cetol application.
 
Have you tried scraping instead of sanding? I'm not talking about a scraper you would use on house siding, I'm talking about the handheld ones used for furniture making. The kind you burnish before using.

45260-01-200.jpg


http://www.rockler.com/product.cfm?site=ROCKLER&page=4898
 
It is very difficult to sand old finish off because one invariably ends up removing wood. And wood that goes away you cannot get back. This why most wood re-finishers (marine, anyway) recommend scraping. With heat and the correctly shaped scrapers for the job one can remove all the finish and none of he wood.
 
Last edited:
By scraping, do you mean fooling with a heatgun and puttyknife?
Scraping is done with a scraper (Red Devil 1"-1.5" good choice) and loose the heatgun on teak.
While your at it, scrape out the charcoal and blend the edges with a sander. BTW don't use Minwax brand stains under Cetol or epoxy.
If you have a lot left to do, Cetol is hard, use the Red Devil blades but make your own handle from wood about a foot long so you can put some pressure on the tool w/ 2 hands.
 
My suggestion of scraping and the tools I recommended were to deal with the OP's issue of having removed the finish and burning the wood. A possible way to remove the blackened wood with minimal damage to the rest.

These tools are used in fine woodworking and finishing. I would suggest looking to youtube for instructions on how to use them.

Properly used, they beat sanding in many situations.
 
My suggestion of scraping and the tools I recommended were to deal with the OP's issue of having removed the finish and burning the wood. A possible way to remove the blackened wood with minimal damage to the rest.
.

Agree, but based on my experience removing Cetol the whole job could/should be done by scraping, but that's just me...
 
We use a variety of different shaped scrapers that are made for the purpose of removing finish. The blades are removeable and are meant to be re sharpened with files sold for this purpose. While the scrapers will remove the old finish on their own, the use of the proper amount of heat softens the old finish and makes te removal process faster as well as reducing the amount of scraper pressure needed, thus greatly reducing the risk of slipping and gouging the wood.

We have used this method with great success to remove old varnish finishes as well as Bristol. We would never use Cetol so we have no idea if this removal method would be effective with it or not.
 
Last edited:
Gawd. Some people even think scraping/finishing wood is fun.
 
..and others like (or will like) scraping, sanding and painting steel. To each his own.
 
..and others like (or will like) scraping, sanding and painting steel. To each his own.

But I'm not tempted to cover steel with fabric for protection.
 
But I'm not tempted to cover steel with fabric for protection.
Now what was the OP`s problem? Ah yes, black blowtorch scorching on teak doors, with the black embedding into the teak despite sanding.
A photo might help. Sanding sounds about as productive as scraping burnt toast. Material removed might require filling a depression to get back to fresh teak, or letting a patch into the surface. Hope not, but any furniture restorer would have the clues and skills.
 
We use a variety of different shaped scrapers that are made for the purpose of removing finish. The blades are removeable and are meant to be re sharpened with files sold for this purpose. .

I don't want to get into the entire process here, but the scrapers I posted are filed to a flat surface and then the edges are burnished with a hardened burnishing tool to create a sharp "lip" on each side. They are used in fine furniture making and finishing and provide a surface that needs no sanding if used correctly. I'm only suggesting this technique to solve the problem of trying to remove the charred wood without further damage, not for routine varnish removal.

youtube.com should have videos of how to burnish and how to use the scrapers.
 
The blades are removeable and are meant to be re sharpened with files sold for this purpose.
When I was 15 years old (57 years ago. :eek:) my buddy's dad had a Star class sailboat that was his pride & joy. Every spring, he could be seen in his back yard scraping & painting. One of the methods he used for (scraping) removing varnish was the straight edge of "glass." He'd even break glass to find a shape that would fit in the nooks & crannies where it was almost impossible to reach. At the time, I was all wrapped up in hunting and fishing and I use to refinish gun stocks for some of my neighbors. I tried the "glass" approach and was very successful with it. I'll admit I never tried it on a boat but I've seen it done. No need to re-sharpen either as there are few edges that are harder than glass.
 
... the scrapers I posted are filed to a flat surface and then the edges are burnished with a hardened burnishing tool to create a sharp "lip" on each side. They are used in fine furniture making and finishing and provide a surface that needs no sanding if used correctly.

The scrapers you illustrate may indeed be an effective way of solving the OP's problem. Sanding may simply be forcing the charred particles deeper into the grain. Here is a crappy cell phone photo of a couple of the scrapers we use and a sharpening file. Used with the correct application of heat they are very effective at removing old finish. I suspect they would not do as precise a job as the scrapers described by Ron.

image-2844255658.jpg
 
My apologies for getting back to you on a more timely basis. Marin, I have a variation of the scrapers you show. I bought a set at my local they got everything type of hardware store. Tomorrow evening I'll post pictures. It is a no tools needed to change blades handle and 8 scraper blades that are double ended. 16 shapes in all. It was a little pricey, but quality doesn't come cheap, The grinding work on the blades left some slight burrs, but nothing that couldn't be fixed with a few strokes on an oil stone. It is the best tool I have bought in a while. I'll take a few pictures of my scraping and sanding progress. It is going OK and getting better. Running the scraper is a lot like playing a musical instrument, it is all about finesse and feel. My scorch marks aren't charcoal black but they are darker than the rest of the wood. I haven't found the perfect fix yet, but they are lighter than they were. So far the best method I have found is brush a light coat of rubber cement over the top and allow to dry. Then hand sand with 120 grit and a block, vacuuming the wood and the sand paper every couple of strokes. This seems to help avoid driving the darkened dust deeper. Then I bleach. Lesson learned, be darn gentle with the heat, Let more cool air pass thru the heat gun to lower the temp. And pay attention to where the heat gun is pointing when concentrating on scraper technique. Like everything else, there is a learning curve to get ahead of. Heck, I couldn't sing either the first time I picked a microphone.
 
Below are few pictures of my scraper. below that is a picture of a sample scorch marks. I have made them better but I can't get rid of them. Scrsping does seem slightly more effective than sanding. But the color must run deep. I haven't seen the result of bleach yet, I applied it last night but had to leave before the area completely dried.
 

Attachments

  • DSCN0546.jpg
    DSCN0546.jpg
    105.9 KB · Views: 160
  • DSCN0547.jpg
    DSCN0547.jpg
    113.8 KB · Views: 150
  • DSCN0550.jpg
    DSCN0550.jpg
    100.2 KB · Views: 146
  • DSCN0548.jpg
    DSCN0548.jpg
    74.2 KB · Views: 154
I don't want to get into the entire process here, but the scrapers I posted are filed to a flat surface and then the edges are burnished with a hardened burnishing tool to create a sharp "lip" on each side. They are used in fine furniture making and finishing and provide a surface that needs no sanding if used correctly. I'm only suggesting this technique to solve the problem of trying to remove the charred wood without further damage, not for routine varnish removal.

youtube.com should have videos of how to burnish and how to use the scrapers.

We always called these "Cabinet Scrapers". They work very well, and leave an exceptionally smooth surface. You do not use heat with these, as it will clog the burnished edge that does the cutting. This is akin to using 600+ Paper in smoothness. These will scrape neat little curls similar to what comes off with a wood plane, but much thinner.
 
Capt. Craig: Regarding the burnished spots,.....by mistake while testing a biodegradable stripper called Multistrip (purchased at Home Depot), I saw that some screw hole staining (from cheap stainless screws) on my teak rail was made much worse by sanding the area, but then the stain was lifted very nicely by the stripper. Looks OK now.

If you are sanding the charcoal, for sure it is bound to stain beneath. Just thought I'd mention this.
 
Healhustler,

I couldn't find Multistrip tonite but I did try a different brand of biodegradable stripper. It didn't seem to do much. I redid the bleaching process, and scrubbed it with a relatively soft stainless toothbrush. I scrubbed off a fair amount of dark woodfiber. I can't tell what it will look like when it dries, But I suspect it will be a bit better. I am about at the point of saying I give up and living with it.

You mentioned something I didn't know though. Will stainless screws discolor teak? The screws holding the window trim were brass or bronze. The doors have been refinished multiple times in the past by someone who didn't have any restraint using a sander. The brass screws were slightly higher than the surrounding wood since the wood had been sanded away. Most of the screws had been sanded to the point that that the phillips sockets were very shallow. I decided it was time to pull the screws, recountersink the holes deeper and put new screws in before it became impossible to remove the old ones. I had to make a decision to use cheap brass which in my experience are darn easy to strip or twist off or stainless (18-8). I opted for stainless. Was that a mistake? Should I have bit the bullit and ordered bronze?
 
We always called these "Cabinet Scrapers". They work very well, and leave an exceptionally smooth surface. You do not use heat with these, as it will clog the burnished edge that does the cutting. This is akin to using 600+ Paper in smoothness. These will scrape neat little curls similar to what comes off with a wood plane, but much thinner.
Yes, cabinet scrapers. The resulting finish is not only smooth, but flat.
 
Stainless screws in teak will almost always leave black streaks/staining if there is moisture present. Look at many old teak decks. Bronze is best but hard to find and needs to be good quality.
 

Latest posts

Back
Top Bottom