It’s nice to see some common since solutions for plumbing issues. I’ve had zero issues since installing my dirt style system on the Rose, gravity fed to grinder tank 40 gallon then overboard
You are using an out of date browser. It may not display this or other websites correctly.
You should upgrade or use an alternative browser.
You should upgrade or use an alternative browser.
Rebuilding Sewage System
- Thread starter Xsbank
- Start date
The friendliest place on the web for anyone who enjoys boating.
If you have answers, please help by responding to the unanswered posts.
If you have answers, please help by responding to the unanswered posts.
Donsan
Guru
- Joined
- Jul 6, 2014
- Messages
- 2,300
- Location
- United States
- Vessel Name
- No Mo Trawla
- Vessel Make
- Hurricane SS188
So why do boat builders use marine hose instead of dirt style PVC?
Alaskan Sea-Duction
Guru
- Joined
- Jul 6, 2012
- Messages
- 8,058
- Location
- USA
- Vessel Name
- Alaskan Sea-Duction
- Vessel Make
- 1988 M/Y Camargue YachtFisher
So why do boat builders use marine hose instead of dirt style PVC?
Cheaper, labor. Lot easier to run a flex pipe than ridged
So is PVC approved for use by ABYC? (Not that I am a fan, but could affect resale value?)
foggysail
Guru
So is PVC approved for use by ABYC? (Not that I am a fan, but could affect resale value?)
Not sure but I believe stink will affect resale
OP
OP
Xsbank
Guru
- Joined
- Sep 7, 2013
- Messages
- 3,791
- Location
- Canada
- Vessel Name
- Gwaii Haanas
- Vessel Make
- Custom Aluminum 52
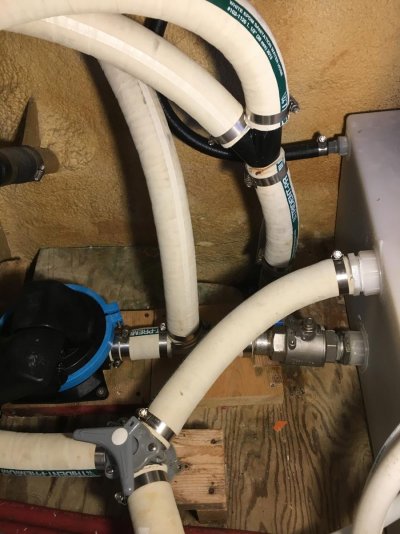
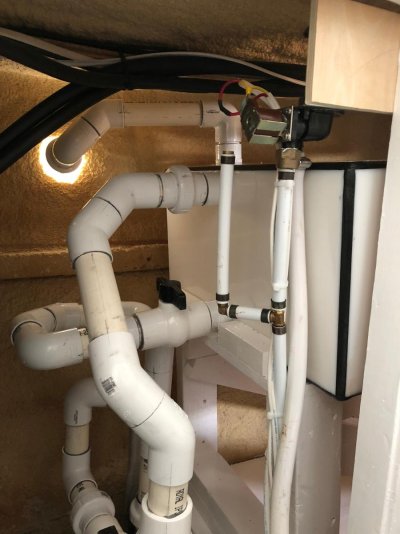
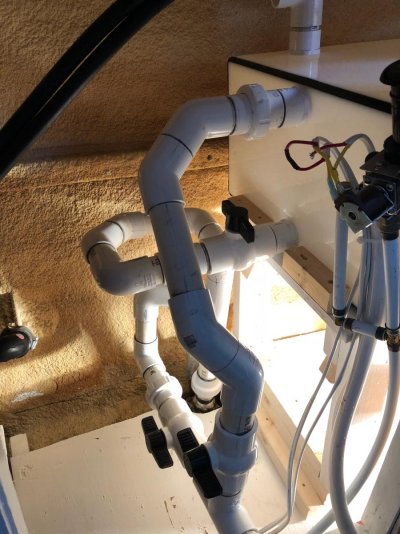
I have installed the new poop system and have not installed the front vent (today's project) yet as it involves three hole saw cuts in 1/4" 6061. The hole I cut in the hull nearly ripped off my hand at the wrist! Need more cutting lube and a drill with 2 handles. No more Y-valve, it has simple ball valves; no more dump pump or wiring/switch and a gravity discharge for offshore. 1 1/2" vents times 2. I have also not hooked up the pumpout as they are rare here and I have never used one in all the time I have owned her. Easy to add if needed, the deck fitting is still there. Schedule 40 PVC. Besides, Victoria...
The old first, then the new. The last photo was before the vent install and before I finished the paint. The system works fine, the toilet has no difficulty pumping uphill although it might stress my water supply more and the drain works great. No 'deposits' yet so I will have to wait to see if the vents work. I also use a little No-Flex in there usually too.
I built the platform with fiddles all around and there are braces side-to-side and some big ones front-to-back in case I have a sudden stop. Also quick disconnects if I have to remove the octopusses for any reason.
The selector valves are just at the bottom of the photo, need to move 2 ball valves like the one on the tank to direct the effluent. We don't need locks up here but it would be easy to drill the handles for some.
Attachments
Last edited:
foggysail
Guru
NICE JOB! Impressive! 
boathealer
Guru
Might try a spiral cutter with a dremel or rotozip for the hole cutouts - if doable (I've cut some pretty impressive stuff with them) through 1/4 aluminum, might be easier on the wrists/forearms.
OP
OP
Xsbank
Guru
- Joined
- Sep 7, 2013
- Messages
- 3,791
- Location
- Canada
- Vessel Name
- Gwaii Haanas
- Vessel Make
- Custom Aluminum 52
Thanks Foggy!
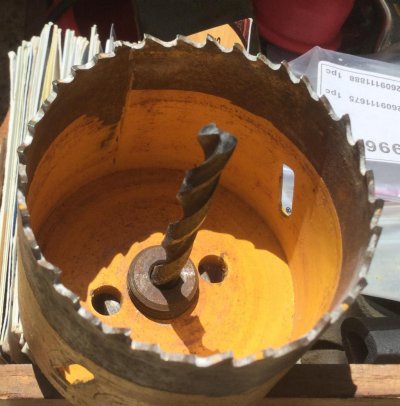
One of the problems I am facing is making a bigger hole in the hull where there is already a smaller hole. The new hole is not big enough to drill the pilot next to the old so I will have to plug the old hole before I can re-drill the larger one, if that makes sense. Its just a 2" hole and the old was an inch so my jigsaw is too large to cut the hole larger. I could also install a small strip of aluminum across the hole with screws, inside the new hole and drill it out. I will stare at it some more today and see if inspiration dawns on me. The other two holes will need the drill as there is no room but I can brace it against the structure and squirt lots of cutting lube on it. I also have an old Rotozip, I think that needs to be tested. it would be a good solution for the hull. Hmmm...
One of the problems I am facing is making a bigger hole in the hull where there is already a smaller hole. The new hole is not big enough to drill the pilot next to the old so I will have to plug the old hole before I can re-drill the larger one, if that makes sense. Its just a 2" hole and the old was an inch so my jigsaw is too large to cut the hole larger. I could also install a small strip of aluminum across the hole with screws, inside the new hole and drill it out. I will stare at it some more today and see if inspiration dawns on me. The other two holes will need the drill as there is no room but I can brace it against the structure and squirt lots of cutting lube on it. I also have an old Rotozip, I think that needs to be tested. it would be a good solution for the hull. Hmmm...
Lepke
Guru
- Joined
- Jun 19, 2016
- Messages
- 3,034
- Location
- US
- Vessel Name
- Charlie Harper
- Vessel Make
- Wheeler Shipyard 83'
I have Incinolet toilets now, but when I used marine toilets I plumbed everything in pipe. If I used plastic pipe, schedule 80 - thicker wall. Pipe will last close to forever. Also if you add a fitting near the toilet, you can flush out the lines if you need to do a repair. Better than working with the brown stuff.
...One of the problems I am facing is making a bigger hole in the hull where there is already a smaller hole. The new hole is not big enough to drill the pilot next to the old so I will have to plug the old hole before I can re-drill the larger one...
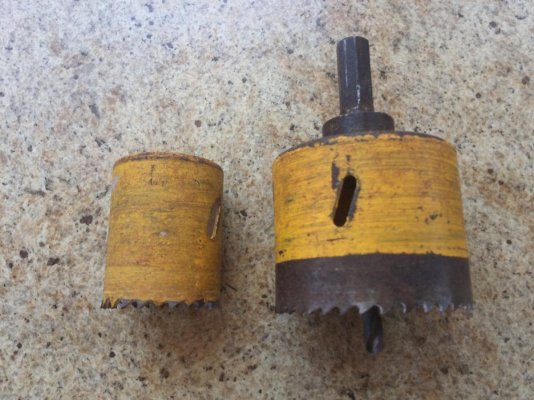
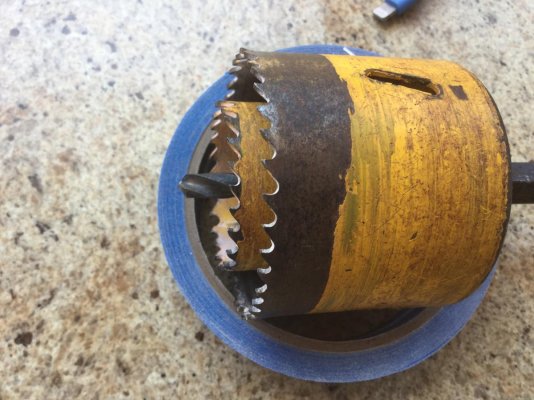
Have you tried adding a small hole hole inside the arbor for the larger hole saw. I recently had to go from 1.5” hole to a 2.5” hole. I have a set of Dewalt hole saws and arbor. The 1.5” or any size smaller or less than 2.5” for that matter, that uses the same size arbor will screw in on the inside. The threads on the arbor are long enough to mount two hole saws with the smaller one being the pilot. No holes to plug or hole saws “walking” across your finish.
Attachments

foggysail
Guru
Larry’s idea has merit. Another suggestion but maybe somewhat off the wall is to get a piece of scrap material, maybe 3”x3” for example (if it will fit inside the hull wall behind the current 1” hole) and drill a pilot hole in the center for your hole saw.
Next use a hot glue gun to temporally mount this temp material onto the inside of the hull. There will be little force applied to the pilot hole and the temp piece should support the pilot drill and run your 2” hole saw though the hull.
Wild yeah, might work though.
Next use a hot glue gun to temporally mount this temp material onto the inside of the hull. There will be little force applied to the pilot hole and the temp piece should support the pilot drill and run your 2” hole saw though the hull.
Wild yeah, might work though.
Well, its been 4 years and the "Premium" 5 year guaranteed poop hose has permeated and so has the holding tank so out it all goes. My question is the pump-out pump. The existing pump is a Jabsco 59090-0012 diaphragm pump which has worked fine but it has been superceded by a "newer" model pump. I want everything new but I can't duplicate this pump any more. Does anyone have any recommendations for a new poop pump? The toilet itself is electric and has its own macerator so another macerator-type is not necessary. Any ideas? Pumps you have installed and forgotten about and you and the pump are still happy?
I'm not sure about the new Jabsco model as they change them to make them cheaper not mo' better. Has anyone had experience with this new-model pump?
Out with the old -
Vetus has this one, I had similar one from Vetus on the sailboat. It's bucks !, but it will pump concrete ....... Say all you want about Vetus, but you get what you pay for .... you could even Y valve it to the bilge while you are at it.
https://www.vetus.com/en/waste-water-bilgepump-12-v.html
fb
jskinner30PII
Senior Member
Great post! Nice compound plumbing fitting Xsbank. Maerin,Duvie, I love the, (outside the box ) approach yougentleman use. Excellent fitting tips. It’s always nice when Peggy chimes in also.
Lou_tribal
Guru
Xsbank, any concern about vibration when using all rigid line like you did? Just asking.
L
L
OP
OP
Xsbank
Guru
- Joined
- Sep 7, 2013
- Messages
- 3,791
- Location
- Canada
- Vessel Name
- Gwaii Haanas
- Vessel Make
- Custom Aluminum 52
Hi Lou,
I didn't know that people vibrated while seated on the throne? I hadn't taken that into consideration...
Seriously, I think there is 'just' enough flexibility that the pipes will absorb vibration. As I have never done this thusly, there will be some learning, no doubt.
Thank you JS!
Peggy will likely not chime in here as she is mad at me. I agreed to call her on a weekend to discuss this project and I forgot. That wasted her time so no more contributions to me...sorry again Peggy!
Larry, I love the idea of the nested hole saws, that's the winner so far. Today I had to work on the windlass rebuild project, its going back together now. Hydraulic hoses will be fabricated tomorrow then I can install them and test it. Tomorrow too I slack off the stern lines and let the boat drift so that I can secure the bow next to the dock, then I can sit on the dock and try and cut the hole larger. I was going to try the Rotozip today but there was a boat rafted to me so plan A had to be modified. Once I get that through-hull installed I can drill 2 more holes in bulkheads and run the pipe. Then the system will be complete.
Peggy will likely not chime in here as she is mad at me. I agreed to call her on a weekend to discuss this project and I forgot. That wasted her time so no more contributions to me...sorry again Peggy!
I'm not chiming in, but not because I'm mad at you....I'm not. But because there's not much left to contribute after the job is completed.
Actually, though, I do have one comment...someone posted:
Also if you add a fitting near the toilet, you can flush out the lines if you need to do a repair. Better than working with the brown stuff.
Why would you need a fitting? Flushing plenty of clean water down the toilet would rinse out the lines.
Last edited:
Comodave
Moderator Emeritus
- Joined
- Jul 2, 2015
- Messages
- 21,284
- Location
- Au Gres, MI
- Vessel Name
- Black Dog
- Vessel Make
- Formula 41PC
I think the whole thing is a bit crappy, but nice...
BeeJay
Senior Member
I really like Larry’s idea and am sure to use it in the future - Thanks Larry. The other way is to cut a 2 1/2” plug using your hole saw out of a piece of scrap timber and epoxy it centrally over the 1 1/2” hole. This gives you a both a pilot hole and guid plug to cut the 2 1/2” hole cutting the hull and guide plug out at the same time using your hole saw. Or epoxy up the old 1 1/2 “ through hull fitting screw it back in and then bore it out with your 2 1/2” hole saw. What could possibly go wrong.........
FF
Guru
- Joined
- Oct 12, 2007
- Messages
- 22,552
"If I used plastic pipe, schedule 80 - thicker wall. Pipe will last close to forever."
If you create a center plug wood or metal the Skd 80 plastic pipe can be threaded , same as iron or brass pipe.
This allows the use of better parts as they can be re used.
The Hayward true union valves , 2 way or 3 way are superb , and can be removed , if required in seconds.
https://www.usplastic.com/catalog/i...MIt8mKptO02gIVSBuBCh1ppggBEAQYBCABEgI_rPD_BwE
siestakey
Guru
- Joined
- Jul 7, 2013
- Messages
- 1,815
- Location
- USA
- Vessel Name
- Steppin Stone IV
- Vessel Make
- Marine Trader Kelly Trawler 46
Thanks Foggy!
One of the problems I am facing is making a bigger hole in the hull where there is already a smaller hole. The new hole is not big enough to drill the pilot next to the old so I will have to plug the old hole before I can re-drill the larger one, if that makes sense. Its just a 2" hole and the old was an inch so my jigsaw is too large to cut the hole larger. I could also install a small strip of aluminum across the hole with screws, inside the new hole and drill it out. I will stare at it some more today and see if inspiration dawns on me. The other two holes will need the drill as there is no room but I can brace it against the structure and squirt lots of cutting lube on it. I also have an old Rotozip, I think that needs to be tested. it would be a good solution for the hull. Hmmm...
A trick I have used in the past is to
1.cut a piece of 1/2 plywwod square larger then the hole
2. drill a center hole in it
3. caulk it over the old hole withthe center hole center ( use 4200 or similar caul not 5200)
4. then drill your new hole through the plywood and hull
FoxtrotCharlie
Guru
Have you tried adding a small hole hole inside the arbor for the larger hole saw. I recently had to go from 1.5” hole to a 2.5” hole. I have a set of Dewalt hole saws and arbor. The 1.5” or any size smaller or less than 2.5” for that matter, that uses the same size arbor will screw in on the inside. The threads on the arbor are long enough to mount two hole saws with the smaller one being the pilot. No holes to plug or hole saws “walking” across your finish.
Isn't he cutting into aluminum?
OP
OP
Xsbank
Guru
- Joined
- Sep 7, 2013
- Messages
- 3,791
- Location
- Canada
- Vessel Name
- Gwaii Haanas
- Vessel Make
- Custom Aluminum 52
The new hole was big enough to drill the pilot right next to the existing hole. The new hole is completely covered by the through-hull fitting. The secret is to use aluminum cutting fluid, lets the saw cut like the hull was warm butter, no grabbing or ruined wrists! Plus the drill with the second handle helped too.
Last edited:
Thanks Foggy!
One of the problems I am facing is making a bigger hole in the hull where there is already a smaller hole. The new hole is not big enough to drill the pilot next to the old so I will have to plug the old hole before I can re-drill the larger one, if that makes sense. Its just a 2" hole and the old was an inch so my jigsaw is too large to cut the hole larger. I could also install a small strip of aluminum across the hole with screws, inside the new hole and drill it out. I will stare at it some more today and see if inspiration dawns on me. The other two holes will need the drill as there is no room but I can brace it against the structure and squirt lots of cutting lube on it. I also have an old Rotozip, I think that needs to be tested. it would be a good solution for the hull. Hmmm...
Xsbank
I had to cut a bigger hole over a smaller hole (installing a larger transducer) like you are describing and what I did was place a wooden dowel plug in the existing hole and then used a hole cutter, worked perfect.
foggysail
Guru
Obx- Your solution seems to be the best offered so far.........my opinion only
Duvie
Senior Member
- Joined
- Nov 5, 2011
- Messages
- 341
Follow up
Xbank, so how has your new system performed at odor control?
My new 1 1/8 inch vents and the PVC pipe install has eliminated all odors in the bilge and reduced any odor from my vents by 80%. Sometimes when the wind blows I will get a slight odor from the vents but nothing like the stench I used to get when I would flush on the old system.
I am very happy with my results.
FF
Guru
- Joined
- Oct 12, 2007
- Messages
- 22,552
"I had to cut a bigger hole over a smaller hole (installing a larger transducer) like you are describing and what I did was place a wooden dowel plug in the existing hole and then used a hole cutter, worked perfect."
Even quicker is a blob of Bondo . Always fits and will be discarded anyway.
Even quicker is a blob of Bondo . Always fits and will be discarded anyway.
Similar threads
- Replies
- 15
- Views
- 1K
- Replies
- 16
- Views
- 1K