what finish is on my teak?

The friendliest place on the web for anyone who enjoys boating.
If you have answers, please help by responding to the unanswered posts.

seattleboatguy

Senior Member
Joined
Nov 2, 2013
Messages
327
Location
USA
Vessel Name
Slow Bells
Vessel Make
Marine Trader 38
When I purchased my trawler last fall, the outside teak was coated with the u-v ravished remains of some kind of brown stuff. I'm getting ready to start taking it all down to bare wood this year and finish off with Cetol, but I'm curious what the brown stuff is (or was...). It is tempting to call it plain old paint, but in places you can see a little of the wood grain through the overcoat. Any ideas?
1.jpg


2.jpg


3.jpg
 
looks like old cetol to me. paint scraper will work best
 
I Have no idea as what that finish is, try a sharp scraper with a heat gun and then light sanding.

This is what Cetol should look like or at least it does on our boat, three thin coats, first thin coat of Cetol Marine and then two thin coats of Cetol Natural.......:thumb:
 

Attachments

  • DSC_0016.jpg
    DSC_0016.jpg
    74.7 KB · Views: 104
This is what Cetol should look like or at least it does on our boat, three thin coats, first thin coat of Cetol Marine and then two thin coats of Cetol Natural.......:thumb:

That is more like what I am used to seeing with Cetol. The brown stuff looks pretty strange to me.
 
Yup, I agree. My six year old cetol on my stern rails was getting spots that resembled that this spring. Time to cut it down and start over.

Just as an added thought, I've found that after establishing a good foundation of several coats, as others have said. I do one additional thin coat later in the year applied with a cloth. Then in the Spring, run 220 sand paper over it lightly, just to knock the shine off it and apply another thin coat with a rag.

Don't forget to lift your rail stanchions, apply Cetol under them on your base coats too. Otherwise, moisture will leach under the Cetol and begin to separate it from the wood prematurely.
 
It looks to me like a plastic type paint, perhaps a polyurethane like mat Minwax but I didn't think something like that would peal. I says this because I did an indoor project with the stuff and it was a similar milky color.
 
About 50 layers of some kind of varnish.
OR, varnish on top of epoxy.
Epoxy will peel off the wood like that when it is thick and aged due to UV rays. Epoxy under varnish truly looks good for a short time.
 
Looks like dark cetol on top of teak oil or it wasn't clean enough when applied. Could have been applied too thick in the sun and dried on top first .
 
I Have no idea as what that finish is, try a sharp scraper with a heat gun and then light sanding.

This is what Cetol should look like or at least it does on our boat, three thin coats, first thin coat of Cetol Marine and then two thin coats of Cetol Natural.......:thumb:
Hello Mr Rochepoint. I like to use a heat gun and a scraper to get rid of old varnish, but I have a tendency to BBQ the poor teak with burn marks. Any suggestions on how I might improve my technique?
 
Greetings,
Mr. sbg. Although others (the heat gun crowd) will probably disagree, I've found that a VERY sharp scraper removes a finish quite well. Yes, a bit more tedious and you do have to re-sharpen often but no chance of burning.

The possibility of burning or discoloring the wood is NOT the reason I don't use a heat gun. The reasons are: Where do you put that hot sucker when you need two hands? You're dragging an electrical extension cord around and if working over the side from a dinghy or a float, there's the danger of wetness.

giphy.gif
 
I've been doing quite a bit of this work lately on my boat. It took some practice, but I bought a heat gun and a QUALITY scrapper to remove some finishes and it works well once you get the hang of it. For others, or final clean up after getting what I could with the scrapper, I used the palm sander.

I have had the benefit of taking pieces off the boat and working on them in my home shop, but I would think the scrapper would work well on your railing.

This is the scrapper I purchased:

http://www.amazon.com/Bahco-650-Pre...&redirect=true&ref_=oh_aui_detailpage_o05_s00

It's long enough that you can apply heat to the area you are scrapping without burning your hand.

As for going back with a varnish, I've been redoing my aft cabin wood with Man O War Spar Varnish and it looks amazing. Epifanes was a close second. I did use Cetol on some steps that just needed color, but you may want to experiment with one of these other products if you have the inclination.

Good luck!
 
Hello Mr Rochepoint. I like to use a heat gun and a scraper to get rid of old varnish, but I have a tendency to BBQ the poor teak with burn marks. Any suggestions on how I might improve my technique?

The trick is to heat up a small area so it is just hot to touch and then scrape it off using a paint scrapper, not a putty knife. A little practise and you will get the feel for it very quickly with the gun travelling in front of what you are scrapping. If you are making burn mark you are leaving the heat gun in place too long.

This is the type of paint scrapper I use available at any hardware store and make sure you get extra blades. A touch up with a file will keep them sharp....sharp....sharp.......:thumb:
 

Attachments

  • 16603211.jpg
    16603211.jpg
    18.6 KB · Views: 348
Greetings,
Mr. r. EXACTLY!!!!! Cheap and available in a variety of widths. Mill Bastard file to touch up as you go along and...

 
The trick is to heat up a small area so it is just hot to touch and then scrape it off using a paint scrapper, not a putty knife. A little practise and you will get the feel for it very quickly with the gun travelling in front of what you are scrapping. If you are making burn mark you are leaving the heat gun in place too long.
So, if the old varnish gets hot enough to pull away from the wood, or wrinkle or bubble or change colors, it is too hot, is that right? I'm surprised that just "too hot to touch" would be of much help, but I will get a scraper similar to what you recommend and try it out. Thanks for the advice.
 
In my experience, it's ready to scrape when it starts to bubble. It really isn't hard once you try it. Just move the heat gun back and forth in a small area and run the scraper over that section. You will see when it starts to work and go from there. My father, who is not the handy type, got the hang of it in 5 minutes. Just don't use too much pressure with the scraper or you can gouge the wood.
 
Heat gun is no problem, easy to use as it softens the finish it is easier to scrape off.
Likely better than a liquid stripper., besides being cheaper.
 
Buy a Project Select 14 in one tool for scraping. It has all the angles and curves you'll need for the job.
Unless you like scraping and refinishing, or can hire someone yearly I wouldn't do the traditional finish again. Looks nice for a couple days, but it's always going to be indoor furniture finish on outdoor exposure.
Compare fancy options to Teakguard products. That's what I did after I spent too many hours scraping, melting and sanding. Easy touch up on this product. Research and see what you think.
 
TeakGuard for us.

Dewalt makes a great heat gun for stripping, adjustable temperature and some nice scraping attachments. 1100 degrees works best for that layer you are removing.

Our mess was the same color and thickness, it was Cetol.

Before
ImageUploadedByTrawler Forum1463549677.206711.jpg

During
ImageUploadedByTrawler Forum1463549968.705969.jpg

After
ImageUploadedByTrawler Forum1463549940.944654.jpg
 
Can you repair smaller areas versus doing the whole thing at once?
I understand I'd have to put on several coats of Cetol to match the thickness of the original coating,
but I'd rather not have to think about doing everything at once now.
I'm talking about a spot like this:
 

Attachments

  • Cetol-Peeling.jpg
    Cetol-Peeling.jpg
    122.3 KB · Views: 78
Your Cetol is past done. Time to strip and start over.

You would be wasting your time doing anything else IMO.
 
Greetings,
Mr. WD. Well, the bare wood isn't going to get any better, exposed as it is. It will continue to degrade over time. What you could do is remove the worst of the really loose stuff and give it a quick one or two coats of Cetol to seal it until such time you are going to tackle the whole stretch. I wouldn't bother to try to match the existing coating in color or thickness. Just seal it for now.

When you DO re-finish, keep in mind there will be some color difference that you may never be able to equalize between the bare/weathered pieces and what is currently under your old coating.

Just saw Mr. 11's post and agree, the old finish is past done but I stand by my statement above for a couple of protective coats to protect for the time being as a temporary stopgap.

Oh, and get some very cheap, non silicone caulk or tape on the edge of that hatch @ the 1:00 o'clock position in the photo NOW.
 
Last edited:
Thanks for the replies.
It's not what I wanted to hear, but it is what I expected. :(


Oh, and get some very cheap, non silicone caulk or tape on the edge of that hatch @ the 1:00 o'clock position in the photo NOW.
Hatch?
Here's a picture showing more of the area in question.
Maybe you mean the "seam/gap" on the edge?


PS:
Hope I'm not hijacking, but it does appear the OP and I are both in the same conundrum, so maybe this will help them as well.
 

Attachments

  • Cetol-Peeling2.jpg
    Cetol-Peeling2.jpg
    124.8 KB · Views: 71
Last edited:
Seeing that picture, I bet the old stuff comes off in sheets. You may not even need a heat gun. Just scrape, sand, and redo with cetol.


Edit: You posted the picture above as I was typing my response to #24. Seeing that, it doesn't look quite as bad as I imagined.
 
Last edited:
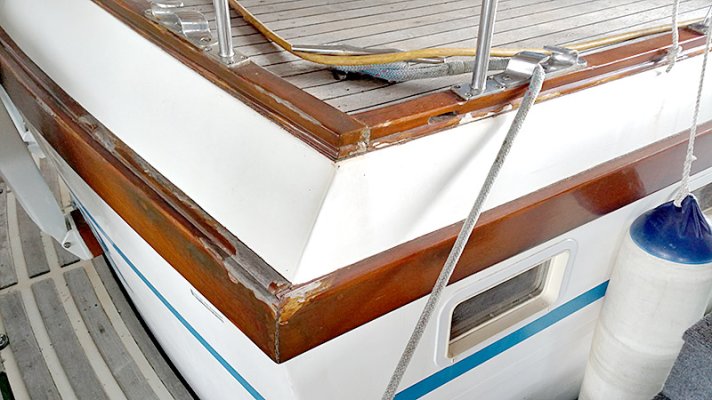
Varnish has mostly failed on our Fu Hwa. A PO stripped about half the boat to bare Teak. A PO also painted the Teak window trim white and another stripped that just to peek, I suppose. Some of the Teak trim (up under the Euro-hat) was never varnished. Subject to further rumination, I plan to strip and let most of the Teak go grey. I plan to repaint the once-painted trim. I plan to strip and Cetol the two sliding doors and their trim.

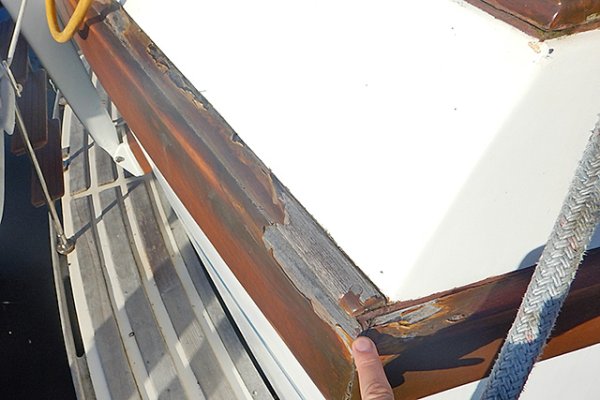
Both varnishes and Cetol are susceptible to water creeping under the finish from under poorly-bedded items, failed sealant lines and failed glue joints, and away from poorly bedded edges. There really is no cure for for the resulting lousy appearance but rebedding, resealing, and constant refinishing. (That's why your finish failed along the fiberglass.)

As RTF said, you can gain a little time and stop a little continued color change and wood loss by knocking the loose stuff off, doing a little sanding, and slopping a little finish on. I think you'd be happier if you'd pick a section, preferably with natural end points and do it well. You can 'feather' layers of finish by sanding to hide the transition between new and pretty and the thick old stuff, but it will be obvious.

Teach yourself some tricks like cutting in/edging by hand. Taping takes time. The tape will occasionally peel up your new Cetol if you've been a little slapdash with the thickness overlapping the tape. Tape left on too long leaves a sticky mess that only shows later, when it's collected dirt. Keep your scraper sharp and continually sharpen it. A fine file is good enough. Don't sharpen your steel scraper over your boat, the metal chips will rust and stain your new work. I use the Allway FE1, 1" wide scraper; I've even added a long handle to one for easier control. The 1" width removes a satisfactory amount of varnish with a reasonable amount of force. I use a heat gun, but take great care to not heat the adjacent fiberglass, not always easy. Use a sander where ever possible. I have a Fein MultiMaster and use the plastic hook-n-loop backers (rather than the metal ones with the plastic face). They're expensive and the backers are readily ruined by sanding heat - expensive. Stick with the triangular pads and don't bother with the sharp-pointed ones, they are ruined almost instantly by heat. Fein is no longer exclusive for such tools, shop around.
 
Greetings,
Mr. WD. Yup, seam/gap for sure. The reason I specified very cheap caulk is the old stuff that's barely there will probably be removed when you eventually refinish the cap rail so you really only want to seal the crack temporarily and it would be a waste of $$ to put the pricey stuff on only to scrape it off in a year or two. The cheap stuff will be easier to remove as well.

From the angle of the second picture, the finish doesn't look all that bad. You may be able to sand and coat only those bare areas BUT plan on a total re-do in the future.
 

Latest posts

Back
Top Bottom