Replacing Hawsehole internal suppports

The friendliest place on the web for anyone who enjoys boating.
If you have answers, please help by responding to the unanswered posts.

JanisK

Veteran Member
Joined
Aug 8, 2011
Messages
88
Location
Australia
Vessel Name
NightinGayle
Vessel Make
Tradewinds 42
Gemma is currently undergoing a hull and topsides repaint as the old topcoat was badly flaking and peeling due to weathering and poor preparation prior to painting by a PO.

During this exercise (which shall be the subject of a later post) a number of unknown unknowns have emerged. For this particular one I would like some help please.

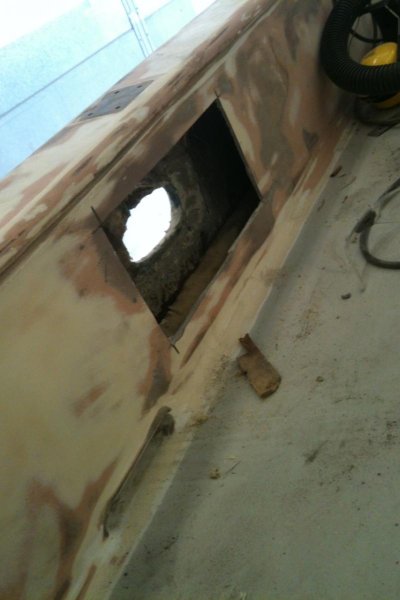
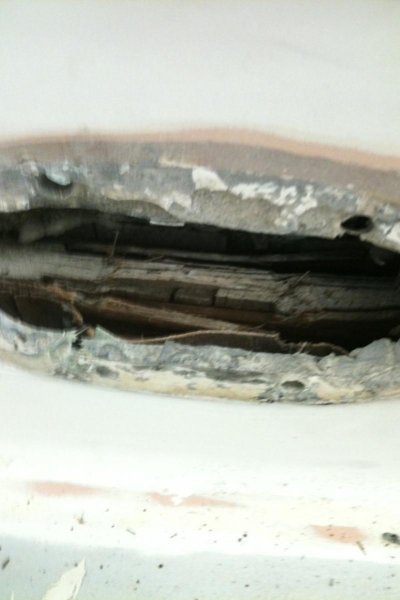
The Hawse brass cleats and fairleads have over time become quite loose allowing movement when under tension by a berth line or snubber thus allowing water to enter into the area between the hull fibreglass and the inside bulwark. The timber ply support between the hull and bulwark has completely delaminated and broken apart and has to be removed and replaced.

Since the cleats and thus the immediate surrounding areas of the bulwark endure a lot of tension, pressure and jerking as berth lines or snubbers take up tension I am told these are very important reinforcements and supports to eliminate flex in the bulwark.

Problem is after removal of the cleats and fairlead the hawsehole is very small relative to the size of the new ply supports to be inserted and are nigh on impossible to fit so that they provide effective support.

The shipwrights at the slipyard are telling me the best way to replace these supports would be to cut out an area of fibreglass from the bulwark that is greater in diameter than the hawsehole, insert and epoxy the timber sorts, the re glass the bit of the bulwark that was cut out and then do some cosmetic filling prior to repaint.

This seems rather extreme to me as it will need be done for all six hawseholes.

So the questions are:
Has anyone ever done this and is there a better way?
Also how important are these timber supports anyway as the ones being removed (or what is left of them) do not appear to have been the full thickness of the inside cavity between bulwark and hull and could not have been much use anyway?
What do current boatbuilders of Clippers and even Bayliner do to reinforce the hawseholes?

Thanks in advance for your help.
 
Simplest might be different castings , that reach into the non rot area.

Many smaller foundries will sand cast from your wood pattern at a reasonable price .

I had a set simply copied in bronze and they were about $125 each.

FF
 
All boats are made different.

Difficult to respond to the post alone.

How about some pics.

That could help better define the issue.

SD
 
Easier to have fabricated SS made at local shop or better yet use the old and just have a bigger SS backing plate made. There have been several area/thing that I had bigger SS made to covered/strengthened the area. The stern of my run about rotted out where the engine mounted, so had the fabrication shop fab a SS stern plate that covered the whole stern. 2 years ago one of the mast stanchions connections 2” X 6” rotted through. So I had new SS one make 1 ft X 1 ft and at the same time I had them fab a new aluminum mast.
 
If in the throws of a repaint sounds like the shipwrights are on the right track. Happy boating.
 
Thanks for the responses. I guess I didnt explain myself properly as most responses are suggesting new casting for the hawse. The issue is not with the castings but with the delaminated ply sandwich between the inner and outer hull fibreglass and how to replace it (6 times). The objective being to prevent compression flex of the inner fibregass when a cleat is under pressure from a line tied to it being pulled hard.

Perhaps these pictures explain better. One is of the hawsehole and the ply in situ, The other of the removed cleat with a remnant of ply placed so that it is easier to understand what it is supposed to do.
 

Attachments

  • Hawsehole with delaminating sandwich fillet between hull and internal skin.jpg
    Hawsehole with delaminating sandwich fillet between hull and internal skin.jpg
    64.1 KB · Views: 97
  • Hawse1.jpg
    Hawse1.jpg
    87.8 KB · Views: 94
I would go with the shipwrights on this one. Fiberglass is very easy to add or take away and fares out well. I would cut a big hole, fix the wood (maybe upgrade to something a little more rot resestant and glass her back up. Doing 6 or doing 3 will take about the same time time if you consider getting the trades to the boat, setting up and making way. I would also try something different with the cleat. Use the hawsehole as a pass though and attach a cleat some 2 feet away to not put so much strain on the pass though.
 
Greetings,
MY opinion is to go with the advice of the shipwrights. The ultimate strength of your hawse pipes is dependent on the backing and if repaired and bedded properly should be good for the life of the vessel. That being said, a friend has a 38' Island Gypsy with hawse pipes like the ones pictured. At some time in the past, his vessel was secured via the "horns" during a severe storm. The pressure on the "horns" was such that they bent the casting to the point of failure. Internally mounted deck cleats might be called for as additional tie offs.
 
have no real idea what the problem is...can't get my head around it this morning...sorry..

how about compression pipe....can you thread long bolts through pipes that will prevent the assembly from compressing?

I can also see epoxying multiple layers of ply that can be slipped back into the hole with the final 1/4 inch or so being filled with structural filler...not quite sure why you would have to enlarge the hole if you didn't want to..but it would make the repair go faster for some.
 
Last edited:
How far does the rotten wood go around the hole.

Like I said before, I would have a larger backing plates made, and stuff the rotten plywood/void with epoxy past, additive #4, peanut butter texture, bolt it together and call it good. If the area/void is big, you can soak fiber glass cloth/mat/even paper towels in epoxy, and stuff in the area/void, then fill with epoxy paste.

So ask them what they think about filling the void and/or a bigger backing plate. I learned the above method from fiberglass guys.
 
Greetings,
Adding/stuffing epoxy or FG cloth into an area that is already strength compromised is a dumb, half a$$ed way of making a repair! I suspect those "fiberglass guys" were half a$$ed as well for even suggesting that this is an acceptable way of strengthening an area which will be subjected to potentially very great loads.
 
Replacing the units will be a big plus , the corners look too sharp NOT to damage a line.

The ears are great as there is little line stretch in the port .

The outside should be radiused by more than a few line diameters.

FF
 
What is the difference between a haws hole and a haws pipe.

Am I wrong? I thought a haws pipe directed the chain to the chain locker.
The Haws hole was for running line through a bulkhead or Gunwale.

Not being fussy just trying to keep my terms straight.

I have heard. To run aground with the hooks still in the pipes.
Refering to anchor rode and what I assume is a Haws pipe.

So perhaps the term are interchangeable

I am with everyone else looks like you need to fix that right.

SD
 
Last edited:
Just a suggestion. We removed ours and fiberglassed the inside hole and replaced them. You might consider cutting a series of narrow plywood strips, coat them with epoxy and put them into the hole until it is filled. Then, with thickened epoxy and mat, glass in the inside of the hole and reinstall the hawse pipe. This might help...

DSC07934.jpg

Chuck
 
Seeing the pics confirms the way to go is along the lines of the shipwrights. Won`t be cheap, I had the wood and fibreglass enclosed winch platform rebuilt due to rot and cracking, it cost. Depends how far the rot has extended,it can be like the "strawberry punnet syndrome", the deeper you go the worse it gets. Aussies will understand when I liken water rotted wet wood to "wet Weetbix"( breakfast cereal).
Remember you are restoring bulwark strength as well as foundations for the hawsehole fittings.

Would teaching the teenage G/Shepherd to pee thru the holes avoiding the fittings help? BruceK
 
These are not extensive wood inserts to begin with.They are either plywood shims jammed in to fill the space or a 2X6 that is put in place and the hole cut, and do not extend more than a couple of inches all around the hardware. It's no more than a filler. There is no more than caulking in place to hold it from falling into the inner hull. So rebuilding the bulwarks around the hole will definitely strengthen the area more than it was when built. I just don't think that extensive a rebuild is necessary, but that's my opinion. Before my repair we dealt with some serious storms with winds in excess of 60 knots and one tropical storm with sustained winds for two days with no strain on the cleats. Chuck
 
Thanks everyone for your thoughts. We've made the executive decision to cut a larger diameter hole than the existing ones as they provide very little room for hands or tools to be able to remove bits of ply, mastic and trim rough fibreglass. The plan is to shape layers of ply epoxied together to form a solid internal sandwich filler to be enclosed when the cutout bulwark section is epoxied back. This will enable larger panels to be fitted and avoid the jigsaw of joining bits and pieces together inside the small hole (notwithstanding your success in doing this Captn Chuck :)). Also they should be stronger than new.

The forward horn cleats will not be changed as in rough seas they will perform a pass through role for the snubber lines which will be tied off at the samson post.

Attached is a photo of a cut out.

BruceK: Please remember the German Shepherd is still very much a growing lad. To teach him to pee through the small hawsehole could mean he gets his donger stuck in rough seas... and It would be up to me to the rescue!!
 

Attachments

  • Hawse cut.jpg
    Hawse cut.jpg
    73.1 KB · Views: 84
Maybe it is good the area was cut it out, so you can see what the structure is, and be sure to watch how they built/put it back as its not that difficult
 

Latest posts

Back
Top Bottom