Aftercooler Maintenance

The friendliest place on the web for anyone who enjoys boating.
If you have answers, please help by responding to the unanswered posts.

Moonzy1

Senior Member
Joined
Feb 20, 2018
Messages
115
Location
United States
Vessel Make
2007 Henriques 35 Express
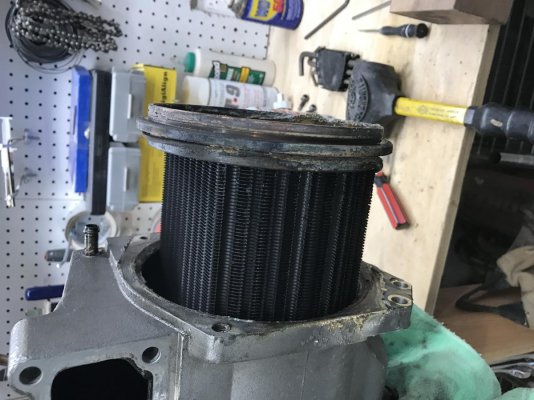
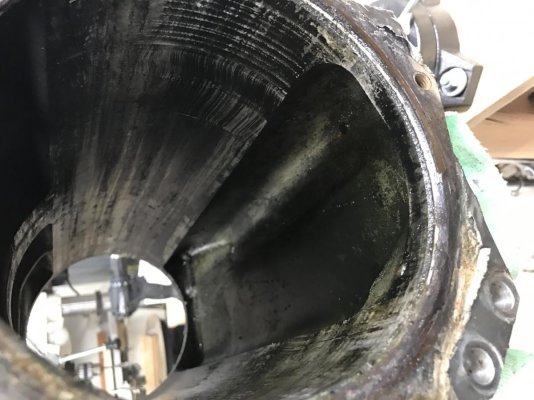
Pulled my coolers this weekend and sent the cartridges out

Kept the housings to clean myself.

To remove the black very hard gunk that is left behind on the mating surfaces of the housing and end cap...is it ok to take an orbital sander w 220 grit to it to clean it up? w light pressure

Housing is Aluminum and caps are brass I think.

Ive tried every type of solvent and doesnt get it off.

Motors are yanmar 6LYA 370's

Thank you
 
Try barnacle buster. Look up on google...works great
 
I'd be a bit nervous, just because of the risk you don't get it even. I'd be more inclined to use a rotating wire brush in a drill. Have you tried actual gasket remover that is sold at the auto parts store? Its spray on, wait, scrape off and repeat. I've had decent luck with it. A couple times when I've felt the need to use sandpaper, I've glued it to a flat piece of granite tile and put it on the work bench. Then moved the part around on it.

good luck

toni
 
Try barnacle buster. Look up on google...works great

I've used that for the raw water side ...i.e... the cooler cartridge and other exchangers but I am referring to the black gunk on the housing and end caps

Barnacle buster for that too?

I was thinking some type of solvent as perhaps some of it is coming from the exhaust ?
 
And my main question is, is ok to use 220 grit on an orbital w light pressure to clean up the matin surfaces of housing and end caps ?
 
Ultra sonic cleaning is the way to go for marine coolers. I know some people that send their after coolers from Juneau to Seattle in the off season. Sending ACs out works that good if a commercial ultra sonic shop is not nearby. Industrial non marine users have been doing it this way for decades with great success. on water treatment and boiler pieces.

As always, use the acids with great care, not only for your self but the hard metal unit you are dunking in acid. Not all core welding rod is acid proof, no fun to find out the hard way.
 
keeping the ends flat is important so a sander could be a problem. Razor blades work sometimes on old gasket sealer.
I would try a file kept flat across both edges of the opening. If the black stuff is some sealant then more of the same once it is flat and clean would probably work without perfectly cleaning the metal.

this is why im thinking 22o light pressure
I tested it out and it does seem to take down the dark guy without hitting the metal too much.

going to call a radiator shop that specializes in this
 
Just spoke to radiator shop who specializes in this. Said cannot dip aluminum in acid or caustic solution.

They remove the gunk by scrapping flat.

Said 220 sanding is ok as long as i am not deforming the metal.

O rings make up for minuscule variation if there even is any.
 
Are there gaskets or O-rings on the mating surfaces. If O-rings, it would be OK to clean up with sanding. Probably ok with gaskets too. Die-grinder with polishing discs is what I usually use to clean up funky surfaces.
 
Are there gaskets or O-rings on the mating surfaces. If O-rings, it would be OK to clean up with sanding. Probably ok with gaskets too. Die-grinder with polishing discs is what I usually use to clean up funky surfaces.

O rings
Good call on the die grinder

Any excuse to buy a new tool... I'm in !
 
Get a good one, Ingersoll 5102max is great. This is air powered. They have electric ones, never used an electric so no comment on them. And the pneumatic ones use a lot of air. Must have tool, in my opinion. Had to replace upper bearing on a rudder shaft last year, no room to beat it off, so hauled compressor to boat and die grinder and cut off wheel took care of job rather quickly.
 
Moonzy1,

I have the same engines. Can you post some pics?

JimL
 
Moonzy1,

I have the same engines. Can you post some pics?

JimL

I can Jim
I took tons of pics along the way. This was really not a difficult job.

I can send to your email as well and you are free to call me with any questions.

I jut reassembled them yesterday.

You want the whole process or specifics pics?

C
 
Here is an annotated pic of what needs to be loosened to get it off.
This is a pic w the cooler already out. Its easier to see many of the points w it removed.

Coolerremovaldiagram.jpg
 
Did you pressure test them? I used rubber pipe caps and a schrader valve to pressurize my coolers then put it in a water tank
 
Bayview
I have not yet but plan to do that today if i can get some time.
 
I also removed the oil filter mount, and put it to the side w the filter on. Just plugged the holes. This was a lot less messy than taking the filter off.
IMG_4297.jpg
 
Get it on a vise, pull the caps and i used a 4x4 wood block and mallet on the fore end of the cooler to get it moving out. It wasnt terribly stuck. Once started, I was able to slide it out by pulling w my hands.

I also bought all new stainless bolts from McMaster Carr for reassembly. Some of the old bolts were beatup and I didnt trust them going back in. $10 for 25 brand new screws. No brainer.
 

Attachments

  • removingbundle.jpg
    removingbundle.jpg
    138.5 KB · Views: 78
  • insidehousing.jpg
    insidehousing.jpg
    118.2 KB · Views: 73
  • bundleout.jpg
    bundleout.jpg
    166.8 KB · Views: 84
I keep an dedicated 1" wood chisel for scraping off old gaskets and had no issues and peels things off quickly. I personally would never use a sander as they are hard to keep perfectly flat at all times. Wire wheel on a die grinder or dremel would work also IMO.
 
I keep an dedicated 1" wood chisel for scraping off old gaskets and had no issues and peels things off quickly. I personally would never use a sander as they are hard to keep perfectly flat at all times. Wire wheel on a die grinder or dremel would work also IMO.

Spoke to Mechanic that does these and he said sander is fine due to O-rings, but I ended up using a wire wheel and dremel as you say because it was just was more effective to clean it up.
 
I sent out the cartridges and cleaned the housing and caps myself.

They did not come back as clean as i would have liked on the air side but I could see though them all. For the remaining black soot that I wanted to remove, I soaked it in SEAFOAM and that went through the air side like a hot knife through butter. Cleaned it rt up.

Then got ALCO METALUBE and lubed everything up and reassembled.

cleanhousing.jpg

alcoappliedtohousing.jpg

aftcartridgejustbeforeinsert.jpg

newcartridge in.jpg

Finishedcoolers.jpg
 
Well done!!!!
 
Thanks Baker
Been wanting to try this project for a long time
Feels good to have it completed
 
Moonzy1,

Thanks for sharing. I wish there was a youtube video for this. I need to do mine as a new owner of a 2005 Mainship, previously owned by one owner. Don't know if the last owner cleaned them up, but I'm feeling I need to before I embark on serious cruising.

Jim
 

Latest posts

Back
Top Bottom