You are using an out of date browser. It may not display this or other websites correctly.
You should upgrade or use an alternative browser.
You should upgrade or use an alternative browser.
Davis 42 Light Refit / Rehab
- Thread starter fractalphreak
- Start date
The friendliest place on the web for anyone who enjoys boating.
If you have answers, please help by responding to the unanswered posts.
If you have answers, please help by responding to the unanswered posts.
sunchaser
Guru
- Joined
- Apr 9, 2008
- Messages
- 10,196
- Location
- usa
- Vessel Name
- sunchaser V
- Vessel Make
- DeFever 48 (sold)
Good work FP. Nice to see that vessel getting to where it started. Your initial analysis of the exhuast elbow and tanks seems spot on as do the remediation steps.
Some say the Taiwan yards have done very good work for a long time, including Art DF. I'd guess very good bones. How do the rudder posts look? Congrats.
Some say the Taiwan yards have done very good work for a long time, including Art DF. I'd guess very good bones. How do the rudder posts look? Congrats.
fractalphreak
Senior Member
- Joined
- Jun 23, 2018
- Messages
- 318
- Location
- United States
- Vessel Name
- Northwest Dream
- Vessel Make
- Davis Vashon 42 Trawler (Defever design)
wow man, that is all looking good. not sure where yiu find the time.
jim
Thanks! I'm not quite sure either, but I can tell you I have been extremely focused. While she understands the need, and agrees we need to do all the work, the admiral is disappointed that the boat has been offline for so long. We've really only used it for our one long-weekend delivery trip from Sequim to Anacortes. We want to start using the boat as soon as we can, so I'm driven!
Unhappy Admirals make sad Captains

fractalphreak
Senior Member
- Joined
- Jun 23, 2018
- Messages
- 318
- Location
- United States
- Vessel Name
- Northwest Dream
- Vessel Make
- Davis Vashon 42 Trawler (Defever design)
Good work FP. Nice to see that vessel getting to where it started. Your initial analysis of the exhuast elbow and tanks seems spot on as do the remediation steps.
Some say the Taiwan yards have done very good work for a long time, including Art DF. I'd guess very good bones. How do the rudder posts look? Congrats.
Thank you. Its funny looking at how the boat is put together. There are a lot of things done really well, and other things that make you wonder. Example - I'm guessing most of the flooring and cabinetry was assembled in place before the house sides and top went on. In the sealed/hidden spaces they simply didn't clean up the sawdust and debris, just left it there (I found some really nice 3 x 4 rough teak board sections, and even a few bungs circa 1980!). On the other hand, the original copper tube water lines were very finely placed, evenly spaced, nice bends with no kinks, even in places no one would see. Weird.
I haven't detected any issues with the rudder posts, but then I haven't spent a lot of time with them. Our surveyor didn't come up with any findings on them, and they we're weeping while the boat was in the water. Here's a few shots of the stbd side. The port side appears the same. Needs cleaning, and we'll give it a closer look, since we've found so much that we've been able to do PM on, I'm sure there's something we'll find with this.
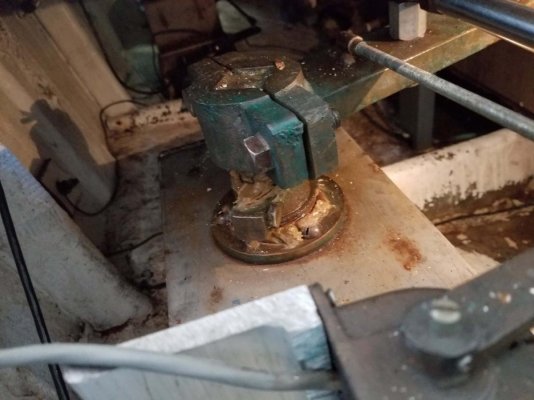
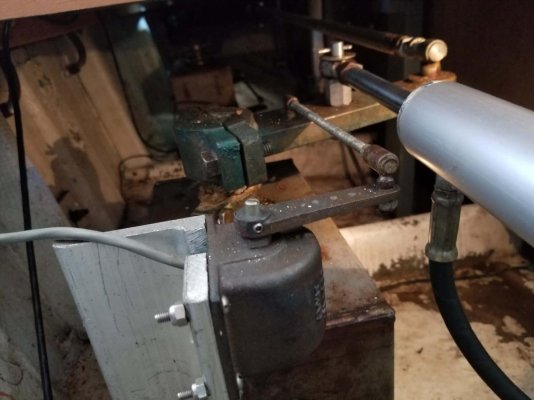
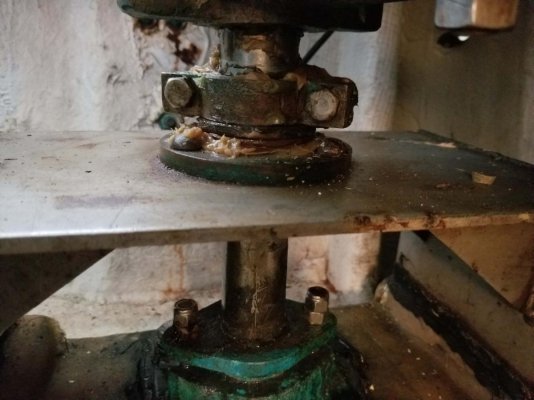
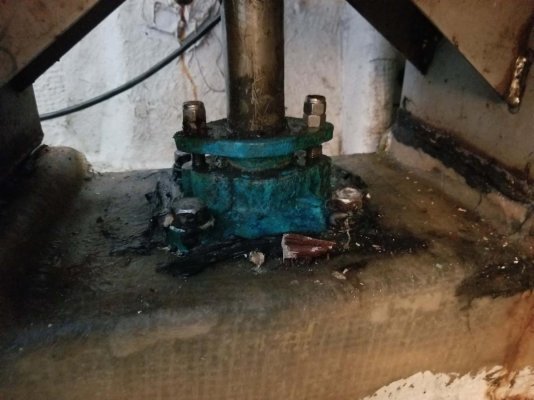
One thing I have noticed, is it doesn't appear there are any bleed fittings on the hydraulic ram. The documentation I have on our steering system (hydraulic made by Wagner) shows the bleeding process involves bleed fittings on each end of the ram to completely bleed the entire system. I'm guessing its been replaced with an aftermarket cylinder that I just haven't figured out yet. One of my projects is to completely drain/purge the hydraulic system and replace the oil. I found automotive power steering fluid on board, and have since found and purchased the correct oil for the system (#10 hydraulic fluid AKA AW-32), so I'd like to make sure we have all the correct fluid in the system.
I just have to figure out a bleed procedure. The cylinder doesn't appear to be leaking, so I don't have much articulable reason to replace it, other than my fear of whatever odd fluids in it may damage seals or a very expensive autopilot pump.
After spending so much time in the Holy of Holies, it will be nice to spend time in another cramped compartment!
ben2go
Guru
I have to admit I haven't done much steering repair work. I have seen a few boats that have used straight SAE 30 engine oil and good ole ATF in place of the recommended hydro fluid. I don't know if that was an owner's idea, some wives tale about using those in the steering system, or a temporary fix that was never sorted out.
fractalphreak
Senior Member
- Joined
- Jun 23, 2018
- Messages
- 318
- Location
- United States
- Vessel Name
- Northwest Dream
- Vessel Make
- Davis Vashon 42 Trawler (Defever design)
Going back in the water Friday!
Well,
We are all set for Shelter Bay Marina in La Conner, we are leaving the North Harbor Diesel/AMG dry storage and getting our wet slip. Not too bad, we only waited 5 months for a 42' slip, and the estimated cost will be $330/month. (Estimated because we'll have to measure with the harbormaster for exact LOA, but we'll be very close to that.)
Finished up an epic 3 days working hard to complete final projects. Still have some cleanup and minor finishing details of some things to complete, we'll do that during the week this week, or rather Josh and the Admiral will be.
Here's our major before and after, that has transformed the engine room. I think it will be easier to maintain, and the boat will be a little quieter...
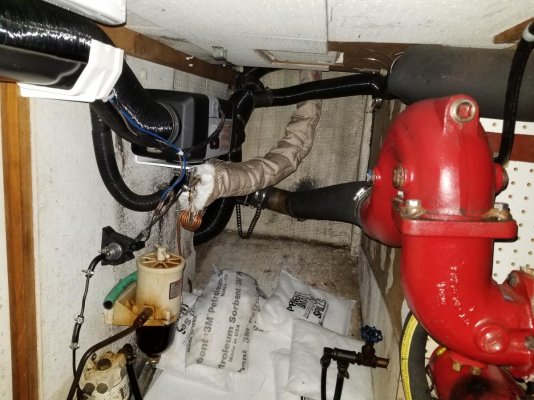
Before - Port side aft end of engine room. (We did the same work on both sides). Filters for port engine and heater hard to get to. Funky exhaust elbow, at end of life anyway...
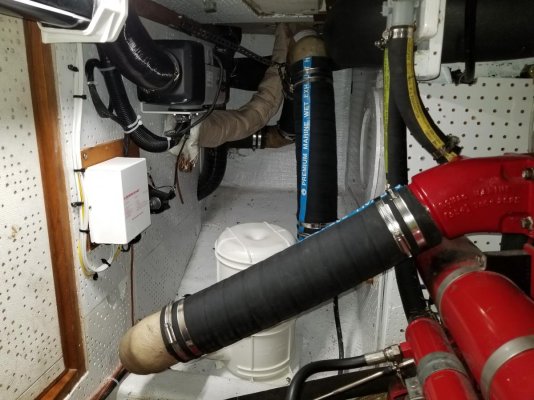
After - Same view. Fuel filters moved to a central location for easier service. Moved the heater control box next to heater to make room for filter relocation. Did the fuel tank work, left an access through the sound wall/bulkhead to get to the access port. Cleaned, primed, painted. New exhaust elbow, added vented loop (with both engine tell tales exiting through stbd side, same side as lower helm position where there is a sliding door to look out through), new Vetus waterlock HD, ran the out side up as high as we could get, and braced it in position. Replaced too-small main heating duct forward with proper/larger size with insulation. Added sound bulkhead in outboard ceiling space where ceiling had been removed in past to add heating system exhaust and ducts.
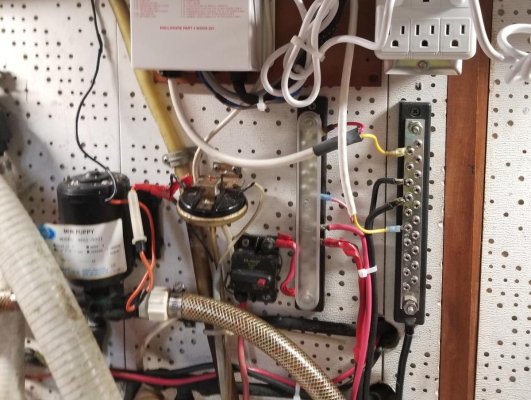
Before #2 - aft engine room bulkhead. Wiring/pump/hose mess. I think the Surewire was mounted for installer convenience; they left the fuel filter for the heater in a difficult to reach location. You'd think regular maintenance would be a priority. I've already talked about the unfused bus bar coming directly off the start battery...
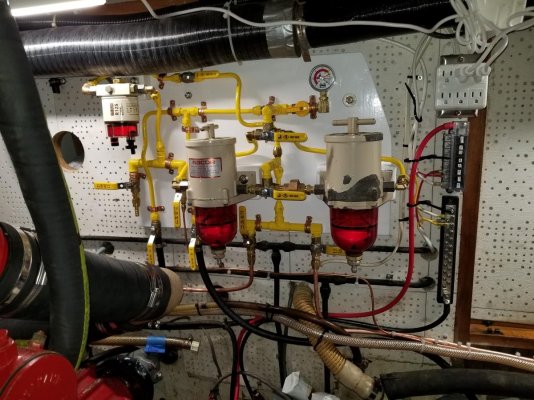
After #2 - same view. Two main things - 1) the filters are no longer one per tank. Either filter can run both engines and either tank. I can switch from one to the other, and they are in a very easy to service location. 2) The wiring now includes fuses for each circuit on the positive side, and the main cable is coming from the house bank terminal block via a properly (actually rated lower than the wire) sized circuit breaker about 8 inches of wire length from the terminal block.
Lots more going on, will update next weekend, but the progress has been good if exhausting. I am hoping for a good trip down to La Conner Friday, then I'm going to STOP spending all of both days of every weekend on boat work for a while.
Well,
We are all set for Shelter Bay Marina in La Conner, we are leaving the North Harbor Diesel/AMG dry storage and getting our wet slip. Not too bad, we only waited 5 months for a 42' slip, and the estimated cost will be $330/month. (Estimated because we'll have to measure with the harbormaster for exact LOA, but we'll be very close to that.)
Finished up an epic 3 days working hard to complete final projects. Still have some cleanup and minor finishing details of some things to complete, we'll do that during the week this week, or rather Josh and the Admiral will be.
Here's our major before and after, that has transformed the engine room. I think it will be easier to maintain, and the boat will be a little quieter...
Before - Port side aft end of engine room. (We did the same work on both sides). Filters for port engine and heater hard to get to. Funky exhaust elbow, at end of life anyway...

After - Same view. Fuel filters moved to a central location for easier service. Moved the heater control box next to heater to make room for filter relocation. Did the fuel tank work, left an access through the sound wall/bulkhead to get to the access port. Cleaned, primed, painted. New exhaust elbow, added vented loop (with both engine tell tales exiting through stbd side, same side as lower helm position where there is a sliding door to look out through), new Vetus waterlock HD, ran the out side up as high as we could get, and braced it in position. Replaced too-small main heating duct forward with proper/larger size with insulation. Added sound bulkhead in outboard ceiling space where ceiling had been removed in past to add heating system exhaust and ducts.

Before #2 - aft engine room bulkhead. Wiring/pump/hose mess. I think the Surewire was mounted for installer convenience; they left the fuel filter for the heater in a difficult to reach location. You'd think regular maintenance would be a priority. I've already talked about the unfused bus bar coming directly off the start battery...

After #2 - same view. Two main things - 1) the filters are no longer one per tank. Either filter can run both engines and either tank. I can switch from one to the other, and they are in a very easy to service location. 2) The wiring now includes fuses for each circuit on the positive side, and the main cable is coming from the house bank terminal block via a properly (actually rated lower than the wire) sized circuit breaker about 8 inches of wire length from the terminal block.

Lots more going on, will update next weekend, but the progress has been good if exhausting. I am hoping for a good trip down to La Conner Friday, then I'm going to STOP spending all of both days of every weekend on boat work for a while.
Last edited:
fractalphreak
Senior Member
- Joined
- Jun 23, 2018
- Messages
- 318
- Location
- United States
- Vessel Name
- Northwest Dream
- Vessel Make
- Davis Vashon 42 Trawler (Defever design)
Batteries and Battery Box Work
I'm quite a bit behind posting about this work - it was completed in July and early August, before our vacation into Canada...
Part of our refit work was to move the genset start battery out from under the generator, move the engine start battery to make room for more house batteries, and add to the house bank.
The main driver of this is we wanted to keep using the fridge, and I use a CPAP machine, and our initial survey of our Ah use told us we were going to be up around 120-140 Ah per day. (With our use of the stereo, charging the laptop and cell phones, etc we are actually closer to 150 to 160 Ah per day on the hook during warm days.) When we start thinking about using lead acid golf cart batteries, charging on the genset, and having them last a long time, that translates into a battery bank up over 800 Ah. Moving that engine start battery would give me room to add 4 more GC-2 6v batteries for a total of 8, or 840 Ah.
For this portion of the project I made a total of three battery boxes. One for the genset battery. It moved from under the generator, in the bilge, to up on the port side stringer next to the generator waterlift.
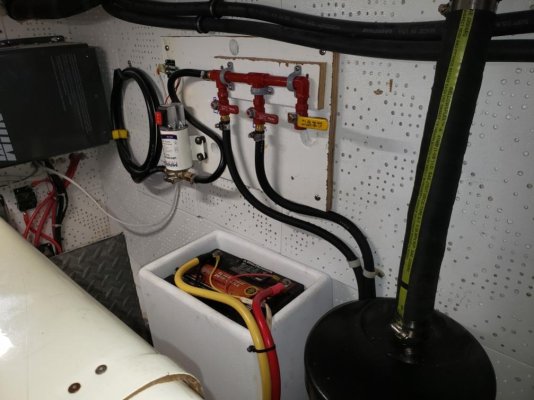
Also in the above picture you can see the manifold and pump for our oil change system, a new system to NWD. We changed the oil for the first time with this system before our trip. It lets us pump the oil from the mains directly up into a 5 gallon bucket on the salon floor, no lifting oil in and out of the engine room...!!!
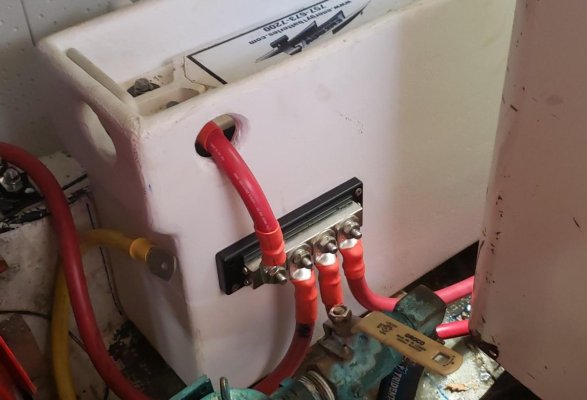
The second battery box is for the engine start battery. It moved from under the false floor (in the bilge area) to next to the outer stringer in front of the port engine. The port engine cables ended up being shorter, but the starboard engine cables ended up being longer. They were and are all 4/0. (We didn't have the cover for the positive conductors when we took the photo, we have it now and its installed.)
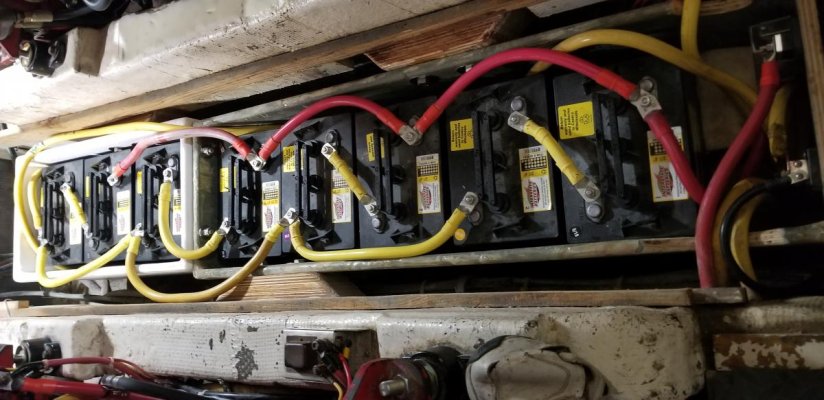
The third battery box is for the additional house batteries. The original house box could fix 5 of the CG-2's, so I sized this one to fit 3 more, and bolted them together. They are in the bilge space under the false floor. The boxes are lag bolted into large plywood pads that are laminated with epoxy and fiberglass onto the stringers - they aren't going anywhere.
All three boxes are 3/4 marine plywood with 1.5 oz CSM over them and gelcoat over that. I am still in the process of making lids and some better hold downs for the batteries.
We had to do some rerouting and rewiring of our major cabling. We ended up buying a total of 12 feet of addition 4/0 battery cable, as we already had some "in stock" that we used for everything. Josh had just finished a class on DC power and inverters, and got to put his new found education to use. We found we did not have the proper fuse on the battery side of our house bank, so we added a class T fuse there.
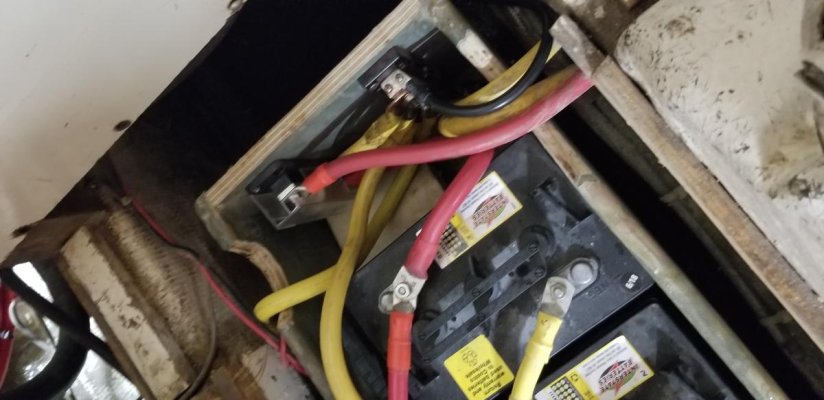
We also added a Victron battery monitor, which has a bit of a learning curve. It turns out that when you fail to upgrade your engine charging system to suit your new massive battery bank, the Victron thinks the bank is getting topped off and is now fully charged, leading you to falsely believe you have a fully charged battery bank. That took me a day or two to figure out!
Winter will see us finish up the project by adding proper engine charging, not sure whether we will go with a very large single alternator on one engine or two large alternators on both with a combiner. Spring will see us adding solar charging, until then we will be using the generator a little more than we would otherwise.
I'm quite a bit behind posting about this work - it was completed in July and early August, before our vacation into Canada...
Part of our refit work was to move the genset start battery out from under the generator, move the engine start battery to make room for more house batteries, and add to the house bank.
The main driver of this is we wanted to keep using the fridge, and I use a CPAP machine, and our initial survey of our Ah use told us we were going to be up around 120-140 Ah per day. (With our use of the stereo, charging the laptop and cell phones, etc we are actually closer to 150 to 160 Ah per day on the hook during warm days.) When we start thinking about using lead acid golf cart batteries, charging on the genset, and having them last a long time, that translates into a battery bank up over 800 Ah. Moving that engine start battery would give me room to add 4 more GC-2 6v batteries for a total of 8, or 840 Ah.
For this portion of the project I made a total of three battery boxes. One for the genset battery. It moved from under the generator, in the bilge, to up on the port side stringer next to the generator waterlift.

Also in the above picture you can see the manifold and pump for our oil change system, a new system to NWD. We changed the oil for the first time with this system before our trip. It lets us pump the oil from the mains directly up into a 5 gallon bucket on the salon floor, no lifting oil in and out of the engine room...!!!
The second battery box is for the engine start battery. It moved from under the false floor (in the bilge area) to next to the outer stringer in front of the port engine. The port engine cables ended up being shorter, but the starboard engine cables ended up being longer. They were and are all 4/0. (We didn't have the cover for the positive conductors when we took the photo, we have it now and its installed.)

The third battery box is for the additional house batteries. The original house box could fix 5 of the CG-2's, so I sized this one to fit 3 more, and bolted them together. They are in the bilge space under the false floor. The boxes are lag bolted into large plywood pads that are laminated with epoxy and fiberglass onto the stringers - they aren't going anywhere.

All three boxes are 3/4 marine plywood with 1.5 oz CSM over them and gelcoat over that. I am still in the process of making lids and some better hold downs for the batteries.
We had to do some rerouting and rewiring of our major cabling. We ended up buying a total of 12 feet of addition 4/0 battery cable, as we already had some "in stock" that we used for everything. Josh had just finished a class on DC power and inverters, and got to put his new found education to use. We found we did not have the proper fuse on the battery side of our house bank, so we added a class T fuse there.

We also added a Victron battery monitor, which has a bit of a learning curve. It turns out that when you fail to upgrade your engine charging system to suit your new massive battery bank, the Victron thinks the bank is getting topped off and is now fully charged, leading you to falsely believe you have a fully charged battery bank. That took me a day or two to figure out!
Winter will see us finish up the project by adding proper engine charging, not sure whether we will go with a very large single alternator on one engine or two large alternators on both with a combiner. Spring will see us adding solar charging, until then we will be using the generator a little more than we would otherwise.
Last edited:
fractalphreak
Senior Member
- Joined
- Jun 23, 2018
- Messages
- 318
- Location
- United States
- Vessel Name
- Northwest Dream
- Vessel Make
- Davis Vashon 42 Trawler (Defever design)
Anchor Locker Rebuild
After returning from our August 2019 vacation, we were talking about some things we could do to better organize the boat. One idea was to make better use of storage in the v-berth and the forward head. As part of that, we recognized that in our boat, there is some space in the v-berth bed cabinet that is wasted and inaccessible, and we started wondering about adding a drop-in storage compartment in there.
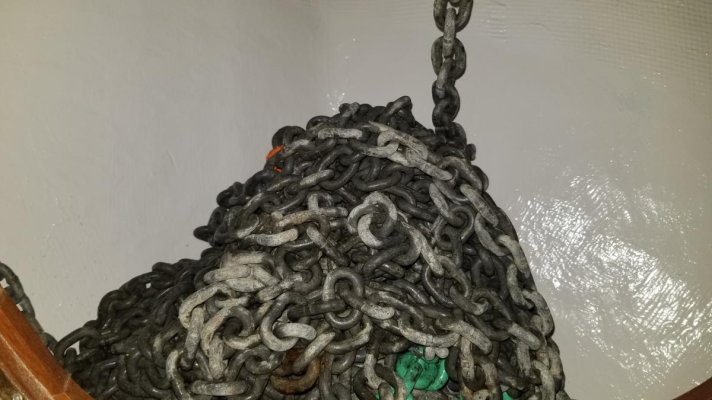
My son Josh started poking his head in the side compartments to see just how much space there was. He called out a couple minutes later to announce that all our chain was down in the bilge.
It turns out our anchor locker floor had collapsed. The plywood floor had delaminated and flexed until it let all the chain by.
Near as I can figure, the original builder had only ever installed a pull out plywood triangle piece of plywood, which would allow any saltwater/muck/whatever to drip/drain down into the bilge. Eventually, and likely during our tacking into the Strait of Georgia swells up off Patos Island, that old plywood finally gave way enough that our chain slid through down below.
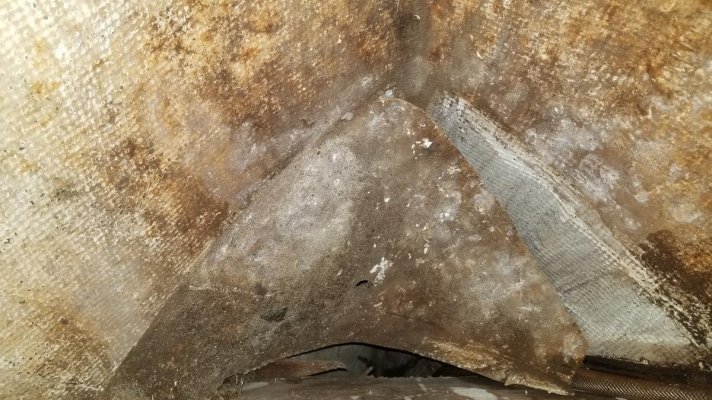
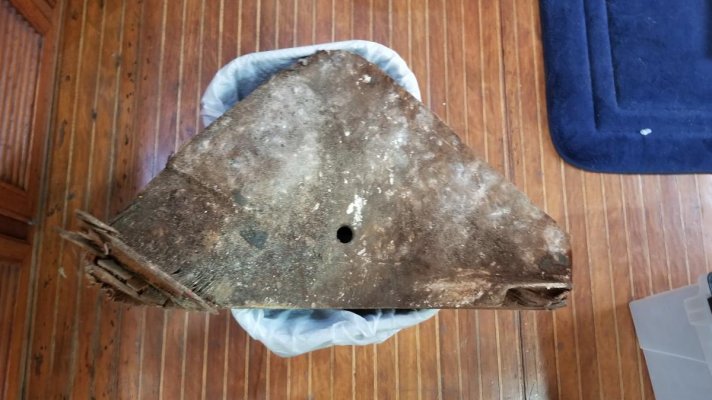
It was Sunday. Next weekend was going to be Labor day – last long weekend of the summer. I had to work all week. Wednesday Josh hand pulled all the chain and laid it on deck.
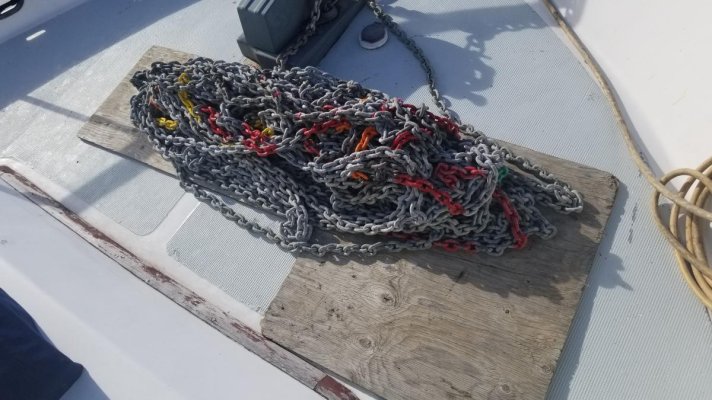
Thursday I took all our fiberglass supplies and some likely candidate pieces of wood out to see if I could get something cobbled together.
It turns out when the chain collapsed, it pulled out anchor windlass cable out of its cable strap. It also turns out that our anchor locker bulkhead was nailed together, and those cables were up against the nails poking through.
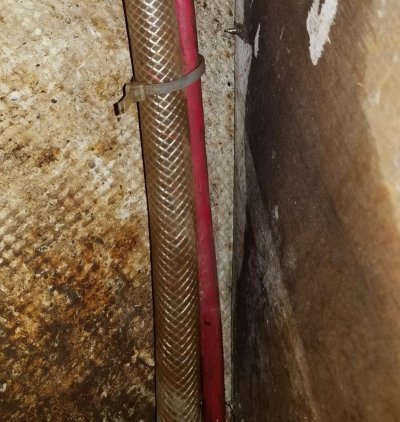
I had the option of a quick temporary fix or doing it right the first time…sooooo I had this piece double ¾ exterior ply already laminated together, (to make 1 1/2 inches thick) and it was just about the right size. I cut another piece of ply to make a protective channel for the windlass cables and the washdown supply hose. And a third little block made a lower recess for my drain hole, down low.
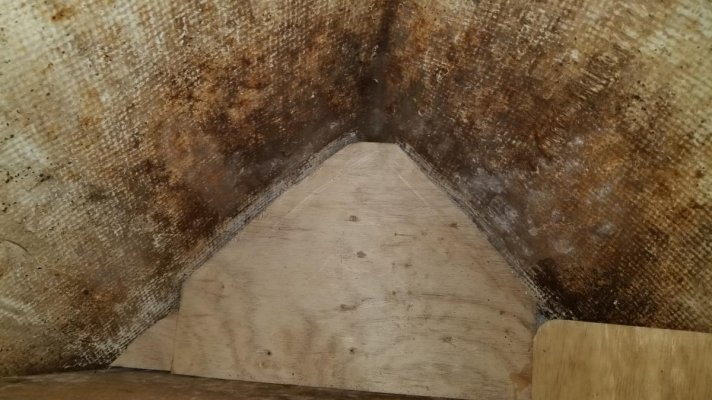
Everything got 1.5 oz chopped strand mat on the bottom Thursday night. Friday, I got off work an hour early and headed out to the boat for a marathon work session. You miss it here because I didn't stop to take pictures but there was about two hours of grinding, sanding, vacuuming, itching, sweating, ugh. It was a tight area to work it, with the PPE I wear (This job was eye protection, respirator and ear protection.) I also didn't stop to take photos of the glass work - it was really warm and I had the resin kicking just right, and was OUT OUT OUT of gloves, so I didn't want to risk getting any on my cell. After some sanding/grinding in the anchor locker (all freshly ground glass, wiped clean and “moisturized” with acetone) and some more fitting, the pieces were in place and I was off to the races. Everything was installed first with thickened resin (cabosil and milled glass fibers) to make nice fillets and seal the edges, then tabbed first with 1.5 oz CSM then with multiple layers of 1708 biaxial cloth, followed up by an additional layer of CSM over everything, including the v-berth plywood wall, which had never been protected against moisture. After all that cured and got a quick sanding to deburr, it all got a nice coat of gelcoat to add to the waterproofing. The new anchor locker floor was installed sloped to the drain. I was done and on my way home to sleep at 0415 Saturday, and back up an out to the boat by late morning to start our long weekend.
Last but not least, a hole was drilled down and to aft out the side of the hull, and a clamshell vent added to the outside for the drain.
The anchor locker is now completely sealed. It will down out the side of the hull, about 18 inches above the water. It could potentially block up and fill with water. If it does, it will spill over the cable raceway down into the bilge before in comes into the v-berth.
Here's the final look, I didn't get any pics of the final drilled drail hole or clamshell vent - its a 1/2" hole with a SS clamshell, exactly how a Nordic Tug is fitted out.
Looking into the locker to starboard. The cable race is to protect the windlass cables and washdown hose. Out of sight and way up to the starboard is the windlass control relays.
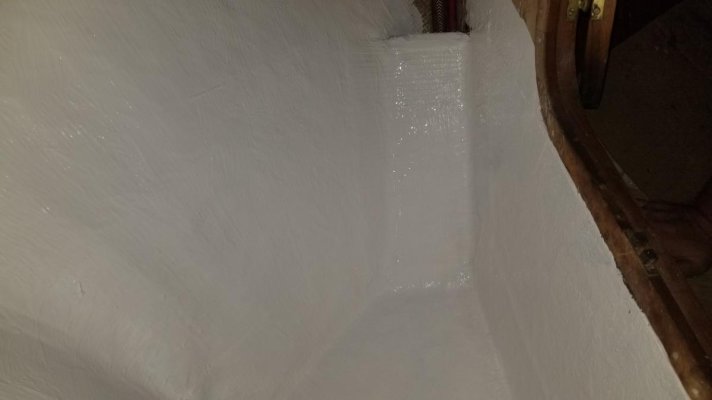
Looking directly forward into the nose of the anchor locker from the v-berth.
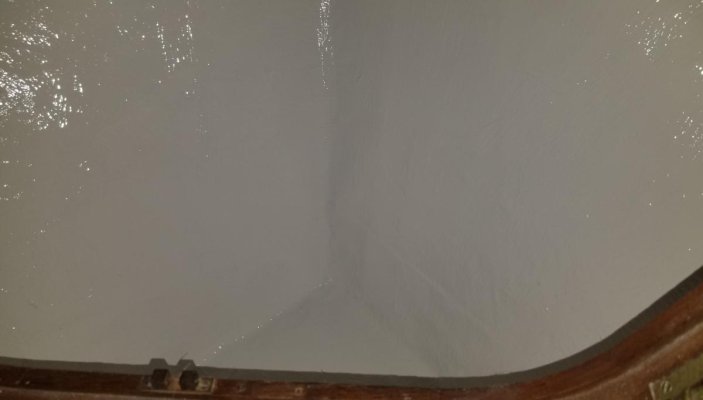
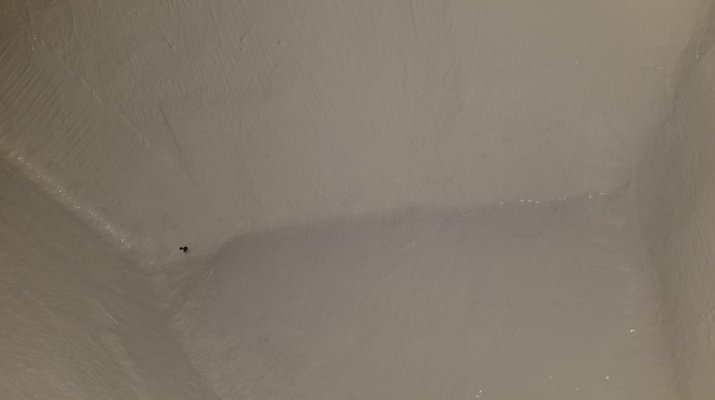
Looking to port inside the anchor locker. The drain recess and the initial small pilot drill hole can be seen. The lowered recess was done to ensure that I could get a drain below the surface of the main anchor locker floor to make sure the bulk of all water would drain out of the locker.
Chain back in...
End result? ALL DONE. All of the plywood I added ended up completely encapsulated, and I added the waterproofing to the v-berth bulkhead that the chain sits up against. We went out to Hope IS for the weekend, anchored out, and what do you know, after we pulled in anchor we checked over the side and could see a little water draining out! whoot whoot! Only issue is the current chain pipe is just a tad aft. If I ever add more than the 235 ft of chain I have, it will have to move forward or it will pile up into the access doors into the v-berth. All told this project took just over 1/2 gal of resin, 16 oz of gelcoat, and likely (I'm guessing) about 1/4 to 1/3 yard of 50" 1.5 oz CSM and 180" in of 9" 1708 seam tape. (I used up some 9" I had, then cut more from a roll of cloth I had.)
After returning from our August 2019 vacation, we were talking about some things we could do to better organize the boat. One idea was to make better use of storage in the v-berth and the forward head. As part of that, we recognized that in our boat, there is some space in the v-berth bed cabinet that is wasted and inaccessible, and we started wondering about adding a drop-in storage compartment in there.
My son Josh started poking his head in the side compartments to see just how much space there was. He called out a couple minutes later to announce that all our chain was down in the bilge.
It turns out our anchor locker floor had collapsed. The plywood floor had delaminated and flexed until it let all the chain by.
Near as I can figure, the original builder had only ever installed a pull out plywood triangle piece of plywood, which would allow any saltwater/muck/whatever to drip/drain down into the bilge. Eventually, and likely during our tacking into the Strait of Georgia swells up off Patos Island, that old plywood finally gave way enough that our chain slid through down below.


It was Sunday. Next weekend was going to be Labor day – last long weekend of the summer. I had to work all week. Wednesday Josh hand pulled all the chain and laid it on deck.

Thursday I took all our fiberglass supplies and some likely candidate pieces of wood out to see if I could get something cobbled together.
It turns out when the chain collapsed, it pulled out anchor windlass cable out of its cable strap. It also turns out that our anchor locker bulkhead was nailed together, and those cables were up against the nails poking through.

I had the option of a quick temporary fix or doing it right the first time…sooooo I had this piece double ¾ exterior ply already laminated together, (to make 1 1/2 inches thick) and it was just about the right size. I cut another piece of ply to make a protective channel for the windlass cables and the washdown supply hose. And a third little block made a lower recess for my drain hole, down low.

Everything got 1.5 oz chopped strand mat on the bottom Thursday night. Friday, I got off work an hour early and headed out to the boat for a marathon work session. You miss it here because I didn't stop to take pictures but there was about two hours of grinding, sanding, vacuuming, itching, sweating, ugh. It was a tight area to work it, with the PPE I wear (This job was eye protection, respirator and ear protection.) I also didn't stop to take photos of the glass work - it was really warm and I had the resin kicking just right, and was OUT OUT OUT of gloves, so I didn't want to risk getting any on my cell. After some sanding/grinding in the anchor locker (all freshly ground glass, wiped clean and “moisturized” with acetone) and some more fitting, the pieces were in place and I was off to the races. Everything was installed first with thickened resin (cabosil and milled glass fibers) to make nice fillets and seal the edges, then tabbed first with 1.5 oz CSM then with multiple layers of 1708 biaxial cloth, followed up by an additional layer of CSM over everything, including the v-berth plywood wall, which had never been protected against moisture. After all that cured and got a quick sanding to deburr, it all got a nice coat of gelcoat to add to the waterproofing. The new anchor locker floor was installed sloped to the drain. I was done and on my way home to sleep at 0415 Saturday, and back up an out to the boat by late morning to start our long weekend.
Last but not least, a hole was drilled down and to aft out the side of the hull, and a clamshell vent added to the outside for the drain.
The anchor locker is now completely sealed. It will down out the side of the hull, about 18 inches above the water. It could potentially block up and fill with water. If it does, it will spill over the cable raceway down into the bilge before in comes into the v-berth.
Here's the final look, I didn't get any pics of the final drilled drail hole or clamshell vent - its a 1/2" hole with a SS clamshell, exactly how a Nordic Tug is fitted out.
Looking into the locker to starboard. The cable race is to protect the windlass cables and washdown hose. Out of sight and way up to the starboard is the windlass control relays.

Looking directly forward into the nose of the anchor locker from the v-berth.

Looking to port inside the anchor locker. The drain recess and the initial small pilot drill hole can be seen. The lowered recess was done to ensure that I could get a drain below the surface of the main anchor locker floor to make sure the bulk of all water would drain out of the locker.

Chain back in...

End result? ALL DONE. All of the plywood I added ended up completely encapsulated, and I added the waterproofing to the v-berth bulkhead that the chain sits up against. We went out to Hope IS for the weekend, anchored out, and what do you know, after we pulled in anchor we checked over the side and could see a little water draining out! whoot whoot!
 Only issue is the current chain pipe is just a tad aft. If I ever add more than the 235 ft of chain I have, it will have to move forward or it will pile up into the access doors into the v-berth. All told this project took just over 1/2 gal of resin, 16 oz of gelcoat, and likely (I'm guessing) about 1/4 to 1/3 yard of 50" 1.5 oz CSM and 180" in of 9" 1708 seam tape. (I used up some 9" I had, then cut more from a roll of cloth I had.)
Last edited:
Comodave
Moderator Emeritus
- Joined
- Jul 2, 2015
- Messages
- 21,287
- Location
- Au Gres, MI
- Vessel Name
- Black Dog
- Vessel Make
- Formula 41PC
It looks very nice, good job.
fractalphreak
Senior Member
- Joined
- Jun 23, 2018
- Messages
- 318
- Location
- United States
- Vessel Name
- Northwest Dream
- Vessel Make
- Davis Vashon 42 Trawler (Defever design)
Good work. The factory couldn't have done a better job, even if they applied themselves.
It looks very nice, good job.
Thank you both! Now if I can just get all the rest of the projects done, I'll be good. I think most everything else I wanted to get done this year as far as glasswork will be waiting for spring. The warm dry fall I had been hoping for has turned into rain rain rain here in the PNW. I have a few interior projects I can work on, and then I'll start turning my attention to canvas. Time for me to start sewing covers for windows and rails in anticipation of refinishing brightwork next season.
