Reply
 
Thread Tools Search this Thread Display Modes
 
Old 02-19-2018, 10:43 PM   #1
Guru
 
healhustler's Avatar
 
City: Longboat Key, FL
Vessel Name: Bucky
Vessel Model: Krogen Manatee 36 North Sea
Join Date: Oct 2009
Posts: 5,196
KK Manatee Pilothouse Redux

After the recent Helm Project, http://www.trawlerforum.com/forums/s...ect-33921.html my tired old pilothouse was in dire need of updating. The abusive roof reskin undertaken a few years ago left the gelcoat on the inside of the roof discolored and spider-cracked everywhere. Then last year's new window project provided a decent foundation for improving the pilothouse environment in general, so it seems worthwhile to go after the ceiling and surroundings with some affordable fixes. The plan is:

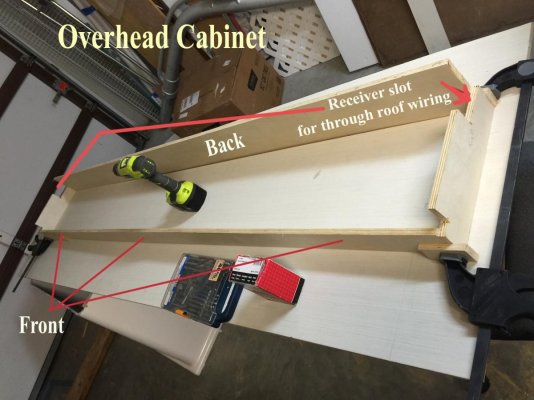
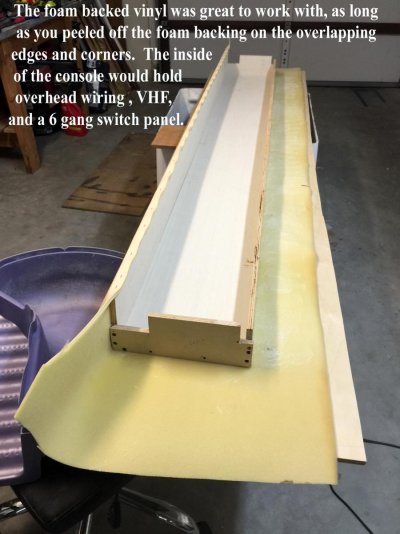
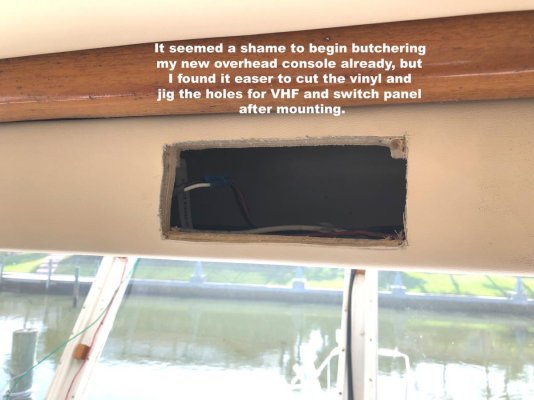
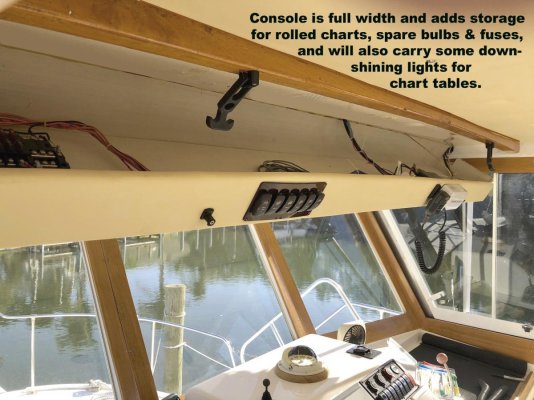
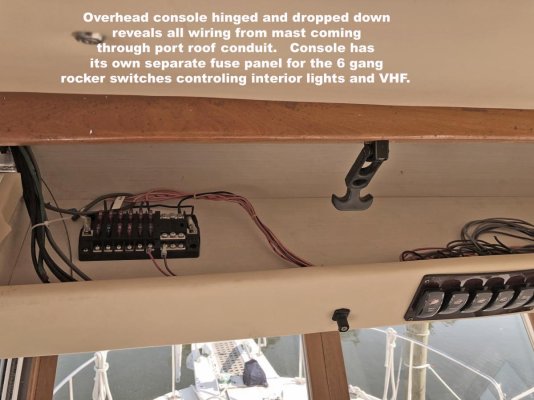
1. Build a new hinged overhead console to receive all the wiring coming from the mast through the new conduit on both sides of the roof (installed during the roof reskin). Install 6 gang rocker switch panel and new AIS GPS VHF radio in overhead console.

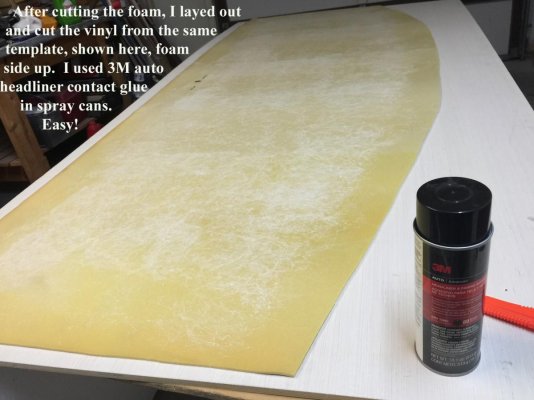
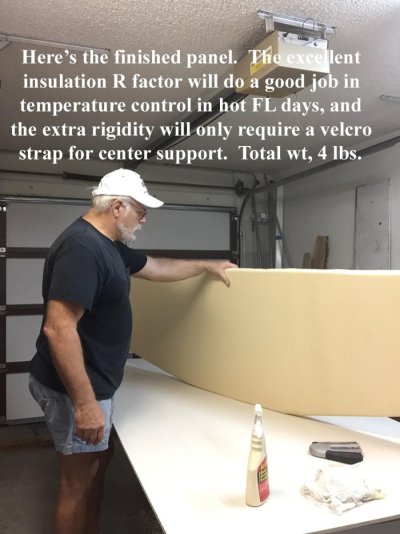
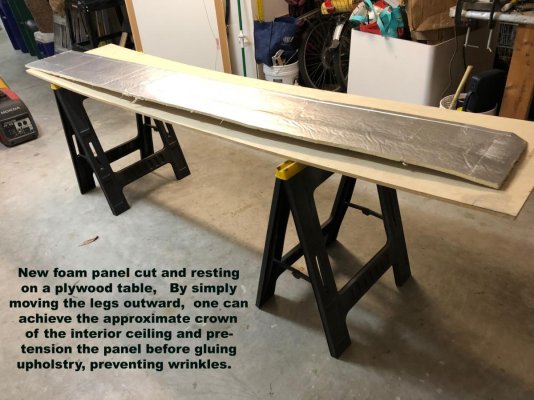
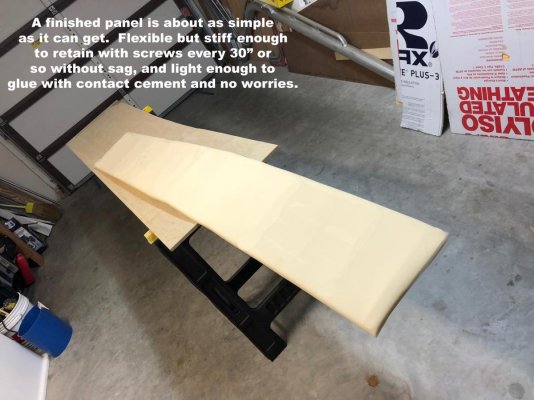
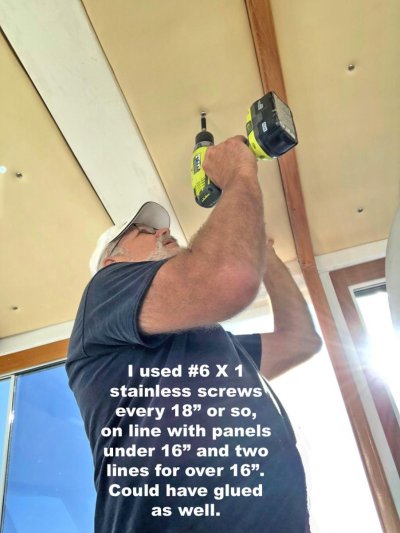
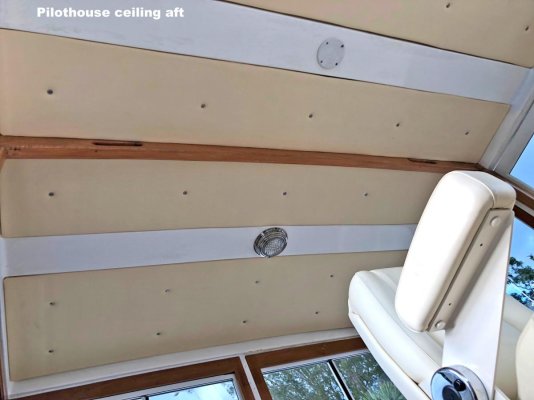
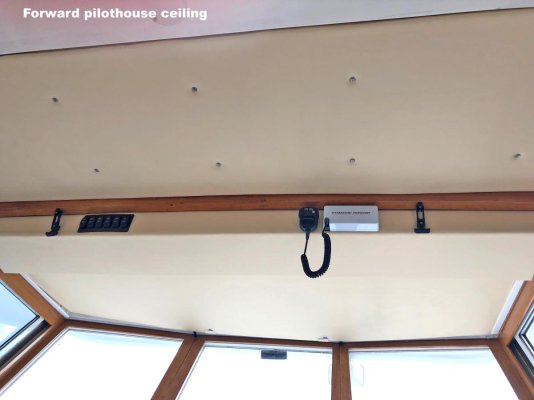
2. Use foam backed Ivory marine vinyl to upholster foam insulation panels cut to fit in the recesses of the roof.

3. Cut & finish teak beam caps to cover raised ribs in roof.

4. Modify teak window frames (built a couple of years ago for old windows) to fit new windows.

5. Add teak molding around instrument console base, chart table areas and pilothouse doors to match window frames.

6. Paint and varnish where necessary. Re-hinge doors, add locking hardware and hold-back latches.

Here's the before and after shots of the helm console:
Attached Thumbnails
my ratty old helm.jpg   New helm.jpg  
__________________
Larry

"When life gets hard, eat marshmallows”.
healhustler is offline   Reply With Quote
Old 02-19-2018, 10:50 PM   #2
Moderator Emeritus
 
Comodave's Avatar
 
City: Au Gres, MI
Vessel Name: Black Dog
Vessel Model: Formula 41PC
Join Date: Jul 2015
Posts: 21,129
Looks very nice. Want to come and do mine?
Comodave is offline   Reply With Quote
Old 02-20-2018, 12:49 AM   #3
Guru
 
dhmeissner's Avatar
 
City: Port Townsend
Vessel Name: The Promise
Vessel Model: Roughwater 35
Join Date: Sep 2012
Posts: 1,569
That’s a very nice transformation. Well done!
dhmeissner is offline   Reply With Quote
Old 02-20-2018, 07:39 AM   #4
TF Site Team
 
Pack Mule's Avatar
 
City: Paris,TN
Vessel Name: Slo-Poke
Vessel Model: Jorgensen custom 44
Join Date: Jan 2013
Posts: 3,749
Looks great Larry . All of your projects are so well thought out and results are awesome.
__________________
Marty
Pack Mule is offline   Reply With Quote
Old 02-20-2018, 08:52 AM   #5
Guru
 
Wayfarer's Avatar
 
City: Beaufort, NC USA
Vessel Name: Sylphide
Vessel Model: Kingston Aluminum Yacht 44' Custom
Join Date: Aug 2014
Posts: 2,228
She looks brand new!
__________________
Dave
Just be nice to each other, dammit.
The Adventures of Sylphide
Wayfarer is offline   Reply With Quote
Old 02-20-2018, 11:16 AM   #6
Guru
 
Aquabelle's Avatar
 
City: East Coast, Australia
Join Date: Jun 2012
Posts: 935
Great job on the new helm Larry. Looking fwd to photos of the other components of the pilot house refurb as they get done.
Aquabelle is offline   Reply With Quote
Old 02-20-2018, 01:14 PM   #7
Guru
 
Star0210's Avatar
 
City: Madisonville, LA
Vessel Name: Sea Star
Vessel Model: 2004 Cruisers Yachts 50SS
Join Date: May 2016
Posts: 906
How about some pilothouse before pictures?
Star0210 is offline   Reply With Quote
Old 02-20-2018, 09:42 PM   #8
Guru
 
healhustler's Avatar
 
City: Longboat Key, FL
Vessel Name: Bucky
Vessel Model: Krogen Manatee 36 North Sea
Join Date: Oct 2009
Posts: 5,196
Thanks for all the accolades, folks. I'll look for some of those older "before" photos to compare later, but meanwhile the ceiling is the next thing in line. The job will require five separate panels, one of them being the overhead console for wiring, radio and some rocker switches for accessory interior lights. The first panel below is the one most forward, actually over top of the windshield where there will be an inch or so space over the panel for wiring that travels from the mast, coming through the roof just forward of the helm, and then down the windshield posts. Since only line-of-sight (not headroom) is the only concern, a thicker panel there won't have any negatives to speak of, so what the heck, make it thick. Although later panels will be thinner and require the foam backing on the vinyl to be stripped off around the perimeter, no need for that on this one.
Attached Thumbnails
pilothouse proj 1.jpg   Pilothouse proj 2.jpg   Pilothouse Proj 3.jpg   Pilothouse Proj 4.jpg  
__________________
Larry

"When life gets hard, eat marshmallows”.
healhustler is offline   Reply With Quote
Old 02-23-2018, 10:24 PM   #9
Guru
 
healhustler's Avatar
 
City: Longboat Key, FL
Vessel Name: Bucky
Vessel Model: Krogen Manatee 36 North Sea
Join Date: Oct 2009
Posts: 5,196
Next came this odd looking overhead cabinet to receive all the wiring coming through the roof from the mast, power and ground wiring coming up the windshield frames to a 30 Amp Blueseas fuse box, antenna cables, NMEA 2000 hookup for the AIS GPS VHF radio, etc. etc.. As you can see, it was some odd shaping to fit the contours of the roof. Because of the crown of the roof, only two hinges are possible to enable the full width cabinet to tilt down for easy wiring access.

The material used is 1/2" marine plywood, fastened with glue and deck screws. Total weight was 22 lbs. if you're counting (I am). Upholstering this shape required stripping a perimeter of the foam backing off the vinyl to keep the corners and edges relatively flat. I'm thinking about putting the reliable old monkey fur inside to dress it up a bit. We'll see when it's installed. Upholstery comes next.
Attached Thumbnails
pilothouse prog 5.jpg  
__________________
Larry

"When life gets hard, eat marshmallows”.
healhustler is offline   Reply With Quote
Old 02-26-2018, 07:52 PM   #10
Guru
 
healhustler's Avatar
 
City: Longboat Key, FL
Vessel Name: Bucky
Vessel Model: Krogen Manatee 36 North Sea
Join Date: Oct 2009
Posts: 5,196
Overhead console continued:
Attached Thumbnails
pilothouse proj 6.jpg   pilothouse proj 7.jpg   pilothouse proj 8.jpg   pilothouse proj 9.jpg  
__________________
Larry

"When life gets hard, eat marshmallows”.
healhustler is offline   Reply With Quote
Old 02-28-2018, 10:46 PM   #11
Senior Member
 
Knot Fast's Avatar
 
City: St Petersburg
Vessel Name: Knot Fast
Vessel Model: Great Harbour GH37
Join Date: Jan 2018
Posts: 243
Sweet set-up, Larry!
Knot Fast is offline   Reply With Quote
Old 03-02-2018, 07:54 AM   #12
Guru
 
Arthurc's Avatar
 
City: Seattle
Vessel Name: Sea Bear
Vessel Model: Kadey-Krogen 54
Join Date: Sep 2016
Posts: 752
Looks great! What process did you use to refinish the dash, looks like you filled some holes and painted?
__________________
Kadey-Krogen 54
Arthurc is offline   Reply With Quote
Old 03-02-2018, 08:06 AM   #13
Guru
 
Star0210's Avatar
 
City: Madisonville, LA
Vessel Name: Sea Star
Vessel Model: 2004 Cruisers Yachts 50SS
Join Date: May 2016
Posts: 906
You got skills!!
This is fun to watch.
Star0210 is offline   Reply With Quote
Old 03-06-2018, 08:51 PM   #14
Guru
 
healhustler's Avatar
 
City: Longboat Key, FL
Vessel Name: Bucky
Vessel Model: Krogen Manatee 36 North Sea
Join Date: Oct 2009
Posts: 5,196
Quote:
Originally Posted by Arthurc View Post
Looks great! What process did you use to refinish the dash, looks like you filled some holes and painted?
Art: If you're referring to the center section of the helm, it's all covered here in the Manatee Helm Project link: http://www.trawlerforum.com/forums/s...ect-33921.html

Otherwise, the chart tables on either side were touched up after sanding, but no holes to fill. After the ceiling project is done, I'll either cover them in teak plywood or perhaps something else non-glare. Have you seen those rolls of foam, gripy shelf vinyl available in super markets, Bed & Bath, etc. in several colors? I may use the black stuff to make mats for all the dash surfaces. The stuff lays flat, doesn't slide off and is easy to cut.

Anyway, back to the Pilothouse redux project. After finishing the overhead console, it was time to mount the unit in place.
Attached Thumbnails
pilothouse proj 9A.jpg   pilothouse proj 9B.jpg   pilothouse proj 10.jpg   pilothouse proj 11.jpg  
__________________
Larry

"When life gets hard, eat marshmallows”.
healhustler is offline   Reply With Quote
Old 03-06-2018, 09:05 PM   #15
Guru
 
Star0210's Avatar
 
City: Madisonville, LA
Vessel Name: Sea Star
Vessel Model: 2004 Cruisers Yachts 50SS
Join Date: May 2016
Posts: 906
That overhead console is a fabulous idea!!!
Star0210 is offline   Reply With Quote
Old 03-06-2018, 09:30 PM   #16
Guru
 
healhustler's Avatar
 
City: Longboat Key, FL
Vessel Name: Bucky
Vessel Model: Krogen Manatee 36 North Sea
Join Date: Oct 2009
Posts: 5,196
OK, now time for the rest of the ceiling panels. I selected a 5/8" aluminum-over-foam wall insulation panel available at Lowes, Home Depot or a host of other building suppliers. Why use this stuff instead of fiberboard or thin plywood?

1. Insulation R-factor
2. lightweight
3. easy to cut and shape
4. firm enough to upholster and glue does well with aluminum sheething
5. these panels can stand a compound bend, so on crowned ceilings, the panels
can be pre-loaded for the crown before upholstery is glued, preventing wrinkles in the foam backed vinyl once installed.
6. the finished panels will be light enough to glue and firm enough use screws and upholstery washers to fasten.

One thing though. In order to give the panels a relatively uniform thickness, I chose to strip off the foam backing of the vinyl in the areas overlapping the back of the panel. This was a bit of extra work, but folding the vinyl over itself was no issue. Folding multiple of layers of foam backed vinyl would get thick and unworkable very quickly.
Attached Thumbnails
pilothouse proj 12.jpg   pilothouse proj 13.jpg  
__________________
Larry

"When life gets hard, eat marshmallows”.
healhustler is offline   Reply With Quote
Old 03-08-2018, 07:22 PM   #17
Guru
 
healhustler's Avatar
 
City: Longboat Key, FL
Vessel Name: Bucky
Vessel Model: Krogen Manatee 36 North Sea
Join Date: Oct 2009
Posts: 5,196
On with the ceiling panels. Here’s a before & after shot below. If you have a crowned ceiling, make sure to consider that before you glue on the upholstery, and crown the work board so the upholstery can be glued to the panel in the approximate form it will end up on the ceiling.
Attached Thumbnails
pilothouse proj 16.jpg   Pilothouse proj 17.jpg   Pilothouse proj 18.jpg  
__________________
Larry

"When life gets hard, eat marshmallows”.
healhustler is offline   Reply With Quote
Old 03-08-2018, 07:59 PM   #18
Guru
 
healhustler's Avatar
 
City: Longboat Key, FL
Vessel Name: Bucky
Vessel Model: Krogen Manatee 36 North Sea
Join Date: Oct 2009
Posts: 5,196
Ceiling panels complete, and only the teak beam caps to come. The gelcoat on the original recessed ribs is pretty cracked, so I'm attempting to copy and install the same style of beam cap found throughout the interior. But for now, the ceiling is greatly improved. Heat reduction in the FL sun is also evident.
Attached Thumbnails
pilothouse proj 19.jpg   Pilothouse proj 20.jpg  
__________________
Larry

"When life gets hard, eat marshmallows”.
healhustler is offline   Reply With Quote
Old 03-08-2018, 08:06 PM   #19
Guru
 
dhmeissner's Avatar
 
City: Port Townsend
Vessel Name: The Promise
Vessel Model: Roughwater 35
Join Date: Sep 2012
Posts: 1,569
Well done sir!
dhmeissner is offline   Reply With Quote
Old 03-08-2018, 10:46 PM   #20
Guru
 
HiDHo's Avatar
 
City: Beverly Hills
Join Date: Feb 2012
Posts: 1,371
Great project Larry, I like the forward panel tilt down design.
Larry after you finished the pilothouse exterior roof structure rebuild years ago, did you recoat the roof exterior ? I’m toying with the idea of recoating ours with two part epoxy.
Bill
HiDHo is offline   Reply With Quote
Reply

Thread Tools Search this Thread
Search this Thread:

Advanced Search
Display Modes

Posting Rules
You may not post new threads
You may not post replies
You may not post attachments
You may not edit your posts

BB code is On
Smilies are On
[IMG] code is On
HTML code is Off
Trackbacks are Off
Pingbacks are Off
Refbacks are Off


» Trawler Port Captains
Port Captains are TF volunteers who can serve as local guides or assist with local arrangements and information. Search below to locate Port Captains near your destination. To learn more about this program read here: TF Port Captain Program


All times are GMT -5. The time now is 09:22 PM.


Powered by vBulletin® Version 3.8.8 Beta 4
Copyright ©2000 - 2024, vBulletin Solutions, Inc.
Search Engine Optimization by vBSEO 3.6.0
Copyright 2006 - 2012