EB47 transom shower faucets?

The friendliest place on the web for anyone who enjoys boating.
If you have answers, please help by responding to the unanswered posts.

wkearney99

Guru
Joined
Feb 17, 2018
Messages
2,164
Location
USA
Vessel Name
Solstice
Vessel Make
Grand Banks 47 Eastbay FB
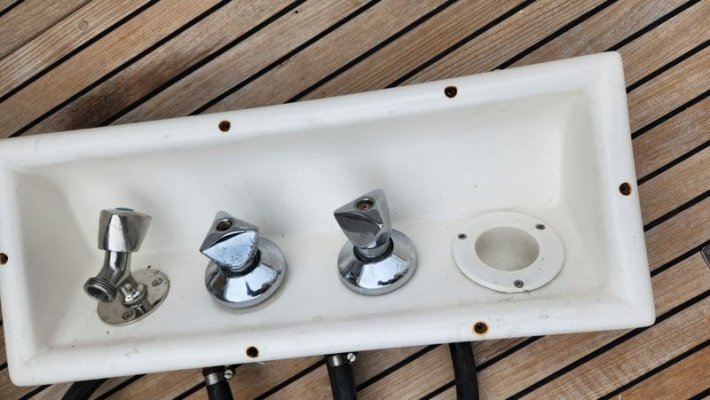
Anyone know what brand faucets GB used for the transom shower on an EB47?

The ones in my EB42#7 have seized up. And since they've got TRIANGULAR shaped handles there's no decent way to get a grip on them.

The back side of the faucet body has one "COBRA" on the housing. No part/model# I could find.

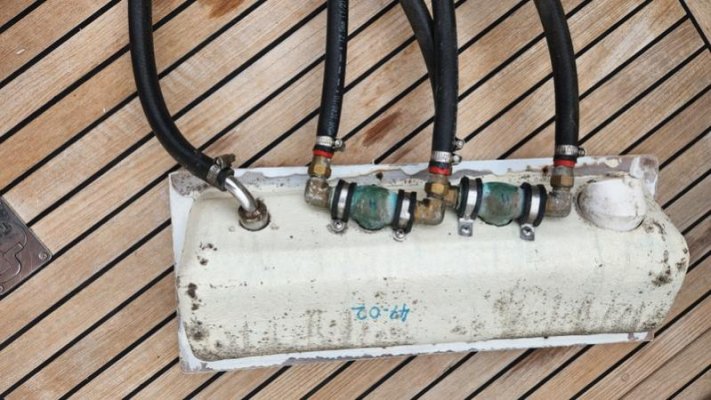
One handle retaining screw is thoroughly corroded in-place and will likely have to be drilled out. The other screw came loose but the handle is seized onto the post (I'd imagine a puller should be able to extract it). I've got them doused with penetrating oil for now.

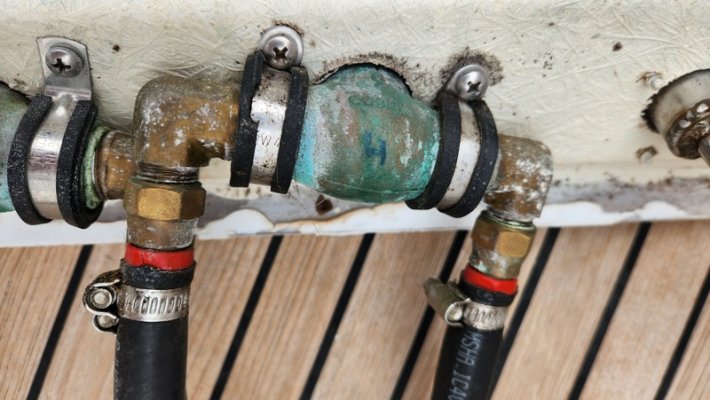
Getting the housing off the transom was a CHORE. It feels like 5200 was used to bed it into place. I had to use a very thin putty knife to slice through the bond around the whole unit. It was only once I had all of it cut through that I could remove the box.

Anyone know who made these, and if they're still available? Though I don't suppose it really 'matters' as I could just as easily replace them with another set of faucets. I'm open to alternatives but given the odd way the existing faucets are installed I don't know what else to consider.

If I do manage to get these bastards apart I'll certainly consider rebuilding them, but would gladly replace them with something else if there's hope of less hassle down the line.
 

Attachments

  • 20232328_162838000.jpg
    20232328_162838000.jpg
    61.3 KB · Views: 21
  • 20232328_162825000.jpg
    20232328_162825000.jpg
    76.1 KB · Views: 17
  • 20232328_162852000.jpg
    20232328_162852000.jpg
    149.3 KB · Views: 18
I think GB used Grohe, but the European version, not comparable with most parts available in the US. But see what Grohe has to offer.
 
My galley faucet is a Grohe. Shower (s) and head look to be the same. Parts are available / can be ordered at FW Webb. Just went through that drill. Yours look similar.
 
Last edited:
Underside looks like two standard inline gate valves, not a single standard mixing valve. If you can get the chrome handls off intact, might be possible the valves are easily matched and reuse the handles and chrome escucheons. If you have a Fergusons in your area, would be a good first stop.

Handles appear to be similar/same as Skandvik. Hit-or-miss with Defender, but sometimes their inside-sales folks can source oddback replacement parts. Skandvik has a large product line. Or you could buy a complete shower-valve setup and use a piece of ABS as adapter plate to cover old holes.

HERE is the closest Skandvik shower valve I could find......$400 (ouch!)


Good luck.

Peter
 
Last edited:
My galley faucet is a Grohe. Shower (s) and head look to be the same. Parts are available / can be ordered at FW Webb. Just went through that drill. Yours look similar.

Yes, some of the interior plumbing hardware are Grohe. These are not any I've seen from Grohe, as those tend to at least have their marked on the housings.

You are correct that the shower unit is a Scandvik. The local Fawcett's had a replacement for it. That's not the issue as much as the taps themselves.
 
What's not shown in the picture is the 'mixing tee'. Both the handshower body and the tee split. The way the water was running down made it a two-step job. Eliminating the handshower leak, but a dribble still remained. That required pulling apart the 'tee' to find that it had split on the side not visible.

The way it's plumbed used various pieces of plumbing to act as a tee for the hot and cold to come together for the handshower. Cold and hot into separate valves, via hoses, and their output hoses into a tee with hose barbs and a 1/2" NPT pipe nipple for the handshower outlet. I'll try and get a picture posted of it later.

The way the tap valves are mounted is odd. They're not mounted using the typical nut around the tap handle collar sort of arrangement. That part just sticks through the mounting box. Then the body of the valve is held onto the obverse using just the cushioned straps. The way the box sets into the transom leads to be think this arrangement was done to manage limited depth. There's only so deep things can intrude and maybe this was because of it? Don't know. I didn't get a measurement of the depth into the cavity (and I'm now an hour away from the boat, of course).

So I'm faced with a few complicating variables. The opening size is non-standard and wider than any combined shower units I've seen retailed. The housing is marked 47-02 and definitely seems like a factory-built assembly. That and beyond the hot/cold handshower it also has a separate tap for just cold. I have that feeding a hosecoil mounted directly below. Both use fresh water, it's not plumbed with a raw water pump (and that's a different discussion).

Next is the spacing the holes for the taps. I'm betting their distance matches no other mixing tee scheme. I've seen some that put the mixing outlet on the top (with either a feed back through, or with the hose on the top).

So I'm kind of faced with either finding the specific valves and re-doing the existing setup OR raising the complexity of the job by drilling new holes for some other sort of arrangement. The hassle there is the plumbing is currently open and there's no inline shut offs for the lines feeding the transom (and they appear to be crimped pex?)
 
I wouldn't be opposed to the idea of simplifying it with a single-handled mixer. I could put a dummy cover over one of the holes.

https://ambassadormarine.com/136-1711-CW?search=mixer&category_id=0&page=9

Though I'm not sure about changing them from surface to recessed, as the look of a bunch of flap overs isn't as attractive, and they'd eventually break anyway.

That or if I used a surface mixer I'd also add a shut-off for it, to avoid anyone bumping the handle and turning it on.

https://ambassadormarine.com/136-1706-CP
https://ambassadormarine.com/by-collection/trinidad/136-0204-CP
 
Last edited:
If the cover is plastic then it will eventually turn yellow. I absolutely hate that. You have a nice looking boat with yellow plastic things all over the boat. So I paint the plastic things before I put them on the boat. I use Quantum 2 part polyurethane paint. They sell it in rattle cans with the activator on the bottom of the can. You push a plunger and it pierces the activator and then the 2 parts mix. Not cheap but my plastic parts stay white.
 
Comodave, thanks for the mention of the 2-part spray paint. I did not know that such a thing existed.
 
If the cover is plastic then it will eventually turn yellow. I absolutely hate that. You have a nice looking boat with yellow plastic things all over the boat. So I paint the plastic things before I put them on the boat. I use Quantum 2 part polyurethane paint. They sell it in rattle cans with the activator on the bottom of the can. You push a plunger and it pierces the activator and then the 2 parts mix. Not cheap but my plastic parts stay white.

Agree on the yellowing plastics problem, likewise some blacks fading to grayish. My opposition is more to having flappy pieces that get snapped off.
 
Comodave, thanks for the mention of the 2-part spray paint. I did not know that such a thing existed.

The can isn’t cheap, about $75 or so. But I hate the yellow plastic look. I think it ages an otherwise good looking boat.
 
Ok, so these appear to be 'Carina' model taps from Cobra, out of South Africa. Anyone know of a US supplier?
 
The adventure continues. Everything was corroded solid. Days of penetrating oil didn't help. Finally had to break out the gear puller and power drill. Though I'd give the left-handed bits a try first, as those often cause the screw to vibrate enough to start loosening (the drill in counter-clockwise).

Aaaaaaaand the bit snapped off in the hole. It was pure luck that I managed to get THAT back out of the hole, using a combination of a tinier bit drilling alongside it to relieve the drill bit flutes and a just enough of the bit exposed to get a grip on. The upshot was that hole was perfectly sized for a screw extractor bit to get a solid bite and the screw came out!

This thing smacks of dissimilar metal problems. A brass screw into what seems like some sort of copper alloy post, with a different sort of brass valve body. And of course they were not bonded to the rest of the boat systems (though for an above water transom shower situation I don't think that would have made any difference).

The valve assembly is a unique one. More complicated than most I've come across. The stiffness was due to the handle shaft getting pretty solidly corroded against the top nut of the valve. Made worse by the design of the escutcheon collar that just BEGS for water to collect in it. I'll try to post pix later.

Meanwhile, no word back from the company via e-mail or online. If/when I find a US supplier I'll share the info. I know of at least 3 other GB owners that are having similar hassles with these taps.
 
I'll put my money on the notion they are Grohe. That said, this is a common issue with GB's in freezing latitudes. Many of us have had to deal with same because that system does not drain unless the entire boat system is drained completely and valves are left open during freezing conditions. When my repair was required I added "Shark" quarter turn ball valves on the H/C feed lines at the transom so the fixtures can be manually drained to make sure. End of problem.
 
I'll put my money on the notion they are Grohe. That said, this is a common issue with GB's in freezing latitudes. Many of us have had to deal with same because that system does not drain unless the entire boat system is drained completely and valves are left open during freezing conditions. When my repair was required I added "Shark" quarter turn ball valves on the H/C feed lines at the transom so the fixtures can be manually drained to make sure. End of problem.

They're not Grohe, not at all.

Quarter turn valves wouldn't do much good unless they also had a drain port on them. House house bib outlets use that kind, where you turn them off and then loosen a cap to allow the rest to drain. Either back out that drain port or out through the hose end.

That and you're really better off running antifreeze through the lines and THEN draining their supply. The way the plumbing is set up allows for pooling where the hot/cold mixing is done to feed the hose line. That was also part of what split in mine. There'd be no way to drain that, and I've never seen a tee with a drain port.
 
European Grohe and the parts don’t match what’s available here. Usually all the fixtures onboard had the same handle/finish too.
 

Latest posts

Back
Top Bottom